
Play centers turn an ordinary corner of your home or yard into a unique space designed to inspire and make open-ended play possible. This gives kids a starting place and the ability to iterate. Plus, once the centers are set up, kids can play independently without any effort or even involvement on our parts!
PRO TIP: RELEASE NEW INGREDIENTS OVER TIME
Leave a few items out when you “launch” each play center. Hold back a few art supplies when you open up your art center. Or, keep a spice or a special kind of pie pan out of the mud kitchen for the first week. This gives you something to introduce to keep the centers dynamic and exciting. Plus, remember that objects from nature (sticks, tree fruits, bark, pebbles, etc) can become spoons to stir with, stamps to stamp with and ingredients for all kinds of play!
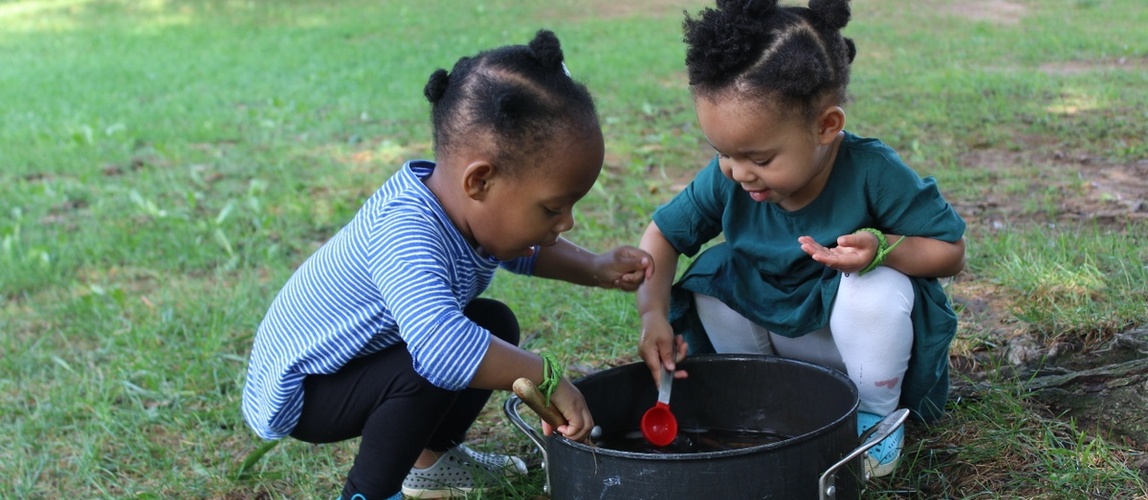
The Mud Kitchen
Play with food and cooking is, quite possibly, the most universally appealing and accessible pretend play theme at any age. Toddlers can emulate us making meals, and older children can use mud kitchens to cook up grand feasts or to make concoctions and science experiments. Really, all you need is a set up that allows kids to play with water, house their bowls, scoops and other containers, and some surfaces on which to mix, mash, stir and “cook.”
Mud kitchens can range from the simple (nesting bowls and some scoops) to the Pinterest-worthy. If you do not have green space attached to your home, grab a reusable shopping bag and fill it with bowls, scoops and a kitchen item or two that can take some muddy love and— voila—a portable mud kitchen!
PRO-TIP: MANAGE THE WATER SUPPLY
The key ingredient in any mud kitchen is actually water. Not everyone has a hose, and even if you do, you don’t want kids to let it run endlessly as they play (and hoses have a way of doing that once placed in kids’ hands). Plus, it’s never too early to teach kids to conserve and to manage a limited supply of resources. For each play session, give kids a 3-gallon bucket of water or a portable 2-gallon water carrier designed for camping. Let them know that’s all the water for this play session. Kids will quickly start to learn how to make that amount of water stretch—and you can get hours of play out of just a few gallons.
Materials for the “no nails” Mud Kitchen:
- Recycling bins (2)
- around 6 foot lengths of 2’x4’ wood (2)
- Milkcrate
- Small trash can
- Nesting bowls
- Duct tape
- Garden stakes, twine and pipe cleaners
- Various, non-precious kitchen items (old muffin tin, cookie sheet, measuring cups, mortar and pestle, etc.)
The Art Center
Making art supports so many aspects of learning—creativity, self-expression, sensory integration, motor skills—and creating art is joyful for humans of all ages. And, it can be really easy to set up an art center that makes materials readily available to kids and gives them even more opportunity and inspiration to create.
Pick a corner of your home where you can set out containers of art supplies and where there is space on the floor or on a table for kids to use the materials. If it helps, lay down a tablecloth or sheet so kids can create and make messes freely without risking damage to furniture or your peace of mind. You can also cover the table with a large piece of paper. Leave it there for a week and—voila—you have a piece of abstract art that documents your child’s creativity that week!
If you want to make art outdoors, or you don’t have space to dedicate to an art “center,” fill a bin or wagon with art supplies for an art center on-the-go.
Whatever materials you include in your art center, make sure they are visible—merchandising can help inspire kids to use them. Put each kind of material in its own container so they are easy for kids to find and keep organized.
Materials for a simple art center:
- Crayons
- Markers
- Colored pencils
- Watercolors, water bottle, and bowl
- Paintbrushes
- School glue/glue sticks
- Tape
- Age-appropriate scissors
- Colorful spices (e.g. turmeric)
- Paper
- Bits of fabric, ribbon, yarn, pipe cleaners, etc.
- Old magazines, holiday cards or papers of interesting colors or textures
The Water “Playground”
’Tis the season for soothing, stimulating WATER play—and you don’t need an in-ground pool or the beach to support hours of it.
To a small human, a bowl of water and a measuring cup can qualify as a water playground, so make yours as simple or elaborate as you like. Each week you can offer a new “surprise” tool and wonder aloud: “I wonder how we could use this in our water playground?” Whether or not you already have a setup, here are some ideas to help make water play extra special this week:
Find a spot where kids can comfortably and easily play with water. If you have outdoor space, do you have a water source? If not, where, in the space, can you easily transport bins or buckets of water? What can contain the water for play? Kiddy pools, bins, and even large cooking pots work well. Feeling crafty? Wrap a tarp around a few pool noodles to form a pond.
Doing your water play indoors? Try the bathtub, the shower, or the sink. Or, lay towels on the floor and place a plastic bin or cooking pot in the middle.
Gather tools that can be used again and again to enhance water play. Some ideas:
- Cups and containers of all shapes and sizes
- Fun kitchen gear (funnels, basters, measuring scoops, etc.)
- Washcloths, sponges, or other absorbent items
- Rocks or household items that kids can “wash” and use to explore sinking and floating
- Pool noodles, drain pipes, or other items that can be used as water channels
- A smock (could be a raincoat or just a change of clothes) if your child prefers to stay dry during play
Need some fresh ideas?
Related reads


