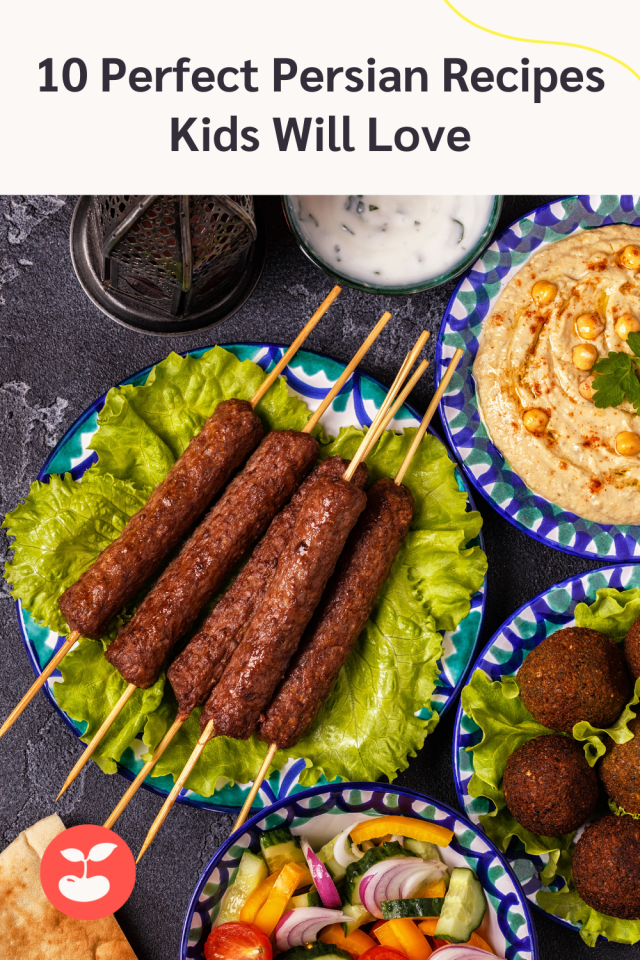
Also known as Iranian cuisine, Persian food is uber kid friendly with it’s slew of rice and meat dishes. From quick kabobs and saffron rice, to Persian rice cookies, this roundup of recipes will have your kids taste buds expanding before your very eyes.

Salad Shirazi

Unicorns in the Kitchen

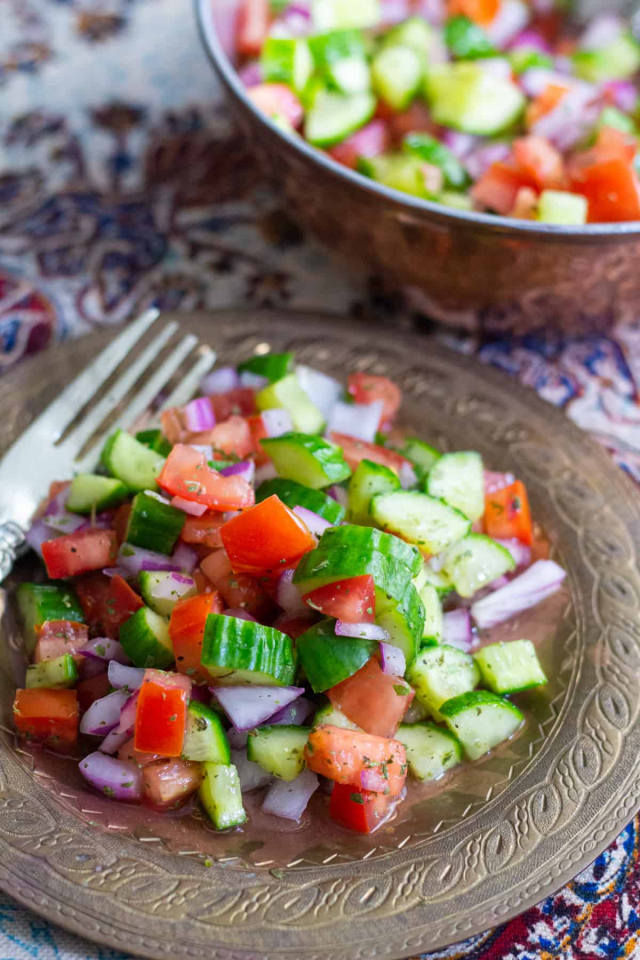
Your kids won't spy any lettuce in this Persian salad. The cucumber and tomato-based dish from Unicorns in the Kitchen comes together quickly and packs lots of flavor from simple ingredients that make this the perfect side dish any time of the year.

Persian Rice

Dinner in the Dessert

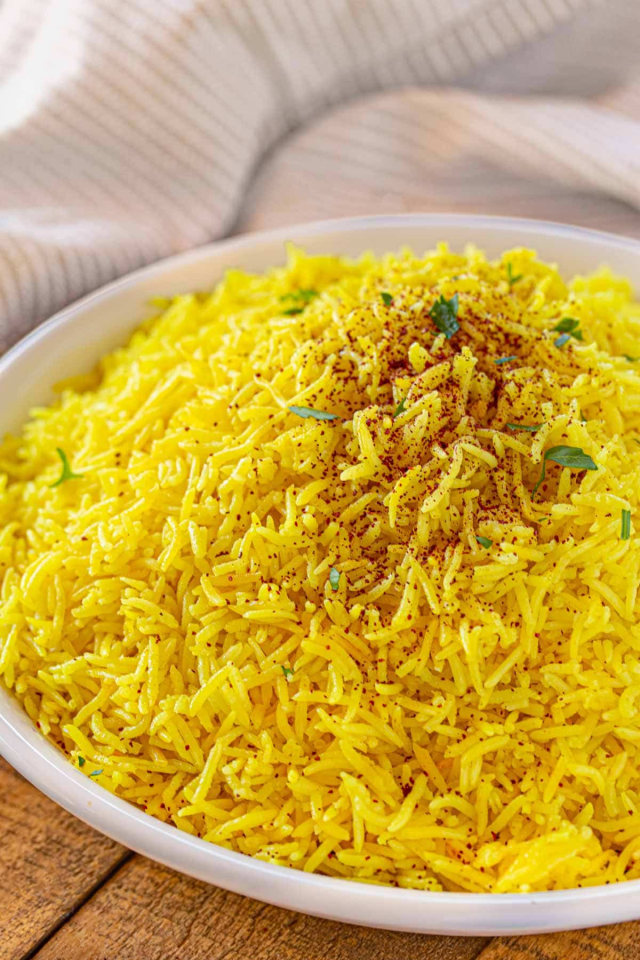
Persian saffron rice is a staple in many dishes, and this easy 30 minute version from Dinner in the Dessert will have it on the table in no time. You'll be using a mortal and pestle to ground saffron threads in no time!

Dolmeh Felfel

I Got It From My Maman

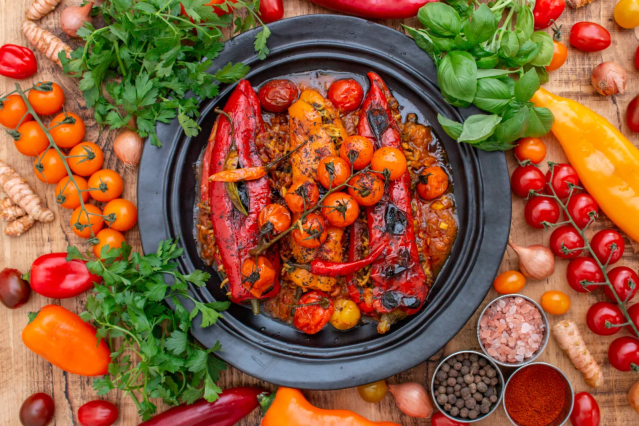
One you eat Persian Stuffed Peppers, you may never go back. I Got It from My Maman shares a delicious recipe where you can customize your stuffing so any picky eater will be asking for seconds.

Caramelized Onion and Herb Chicken Patties

LivLaughCook

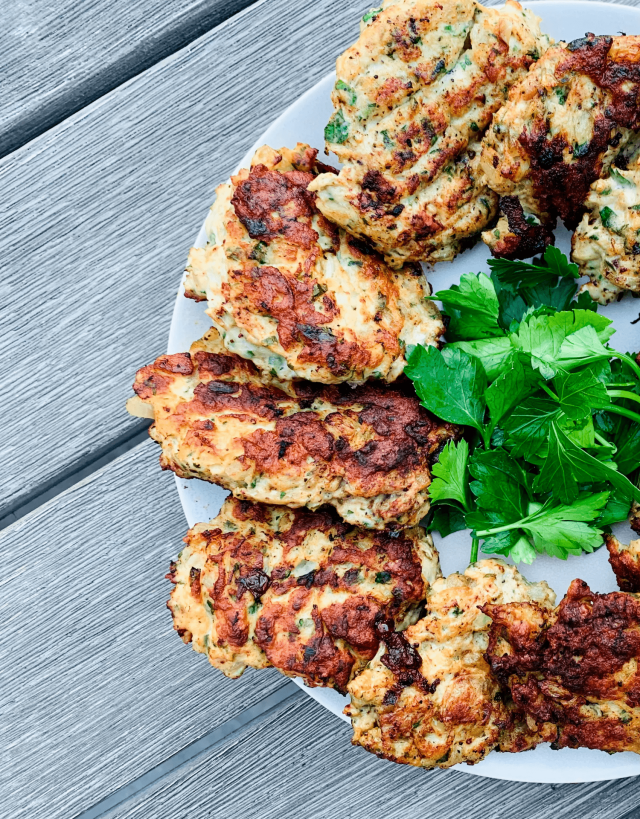
Lots of chicken and hidden spinach? This dish from LivLaughCook is a parent's dream come true. A new take on a traditional Persian frittata, these ground chicken patties mixed with caramelized onions pack the perfect amount of sweet and savory punch that kids and adults will both enjoy.

Kuku Sabzi

Savory Thoughts

Still want that OG Persian Herb Frittata recipe? Savory Thoughts has the perfect meatfree dish that focuses on herbs and is great for breakfast, lunch or dinner.

Barbari Bread

Silk Road Recipes

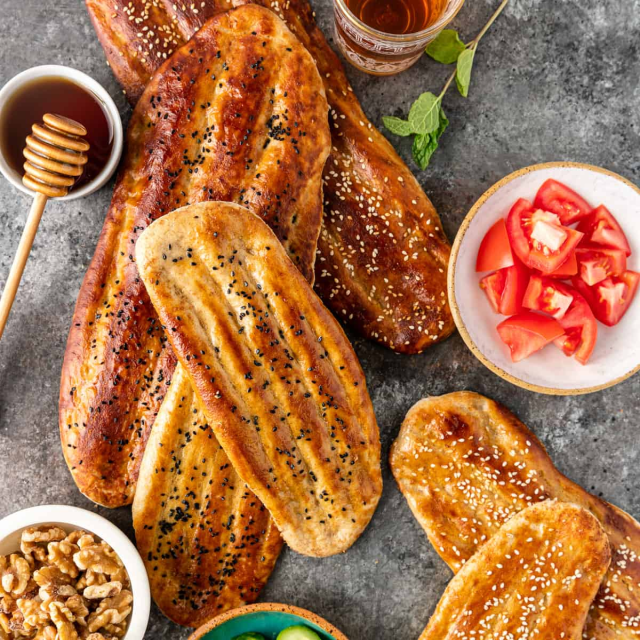
This Persian flat bread from Silk Road Recipes is worth the seven-day wait it takes to get the dough ready for baking. If you've mastered your pandemic sourdough, you'll love trying your hand at this yeast-free dip-worthy bread.

Fesenjan

Feasting at Home

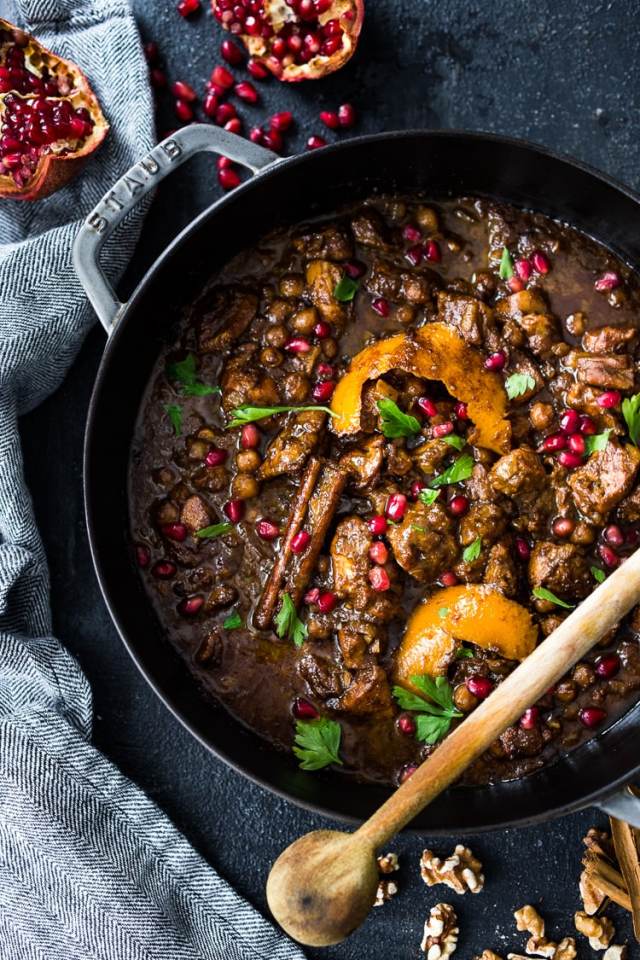
Perfect for your little foodies, this Persian Walnut Pomegranate Stew from Feasting at Home is the perfect cold night comfort soup. Made with chicken, ground walnuts and lots of spices, it's served perfectly alongside that bath of Persian rice.

Kabab Tabei

The Delicious Crescent

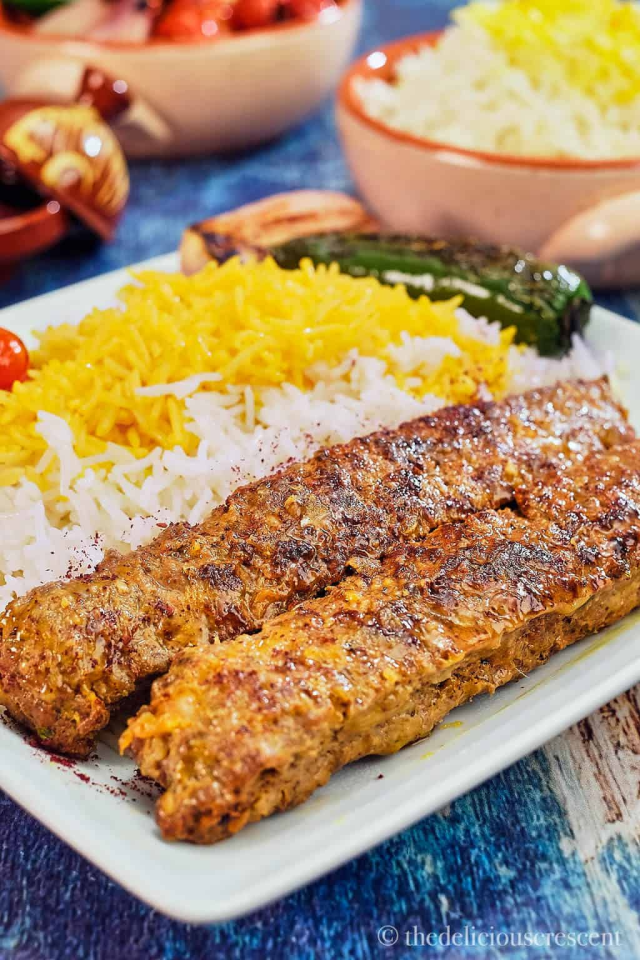
You can skip the skewers and the grill for this easy pan kabob recipes from The Delicious Crescent. Made just on the stovetop, you can get this dinner together in a flash when you serve alongside simple veggies or rice.

Persian Almond Cardamom Pistachio Cake

Spoonabilities

Break us off a piece of this delicious pistachio cake! Spoonabilities' recipe is flourless with almond extract and cardamom to give that perfect, warming essence that even kids will enjoy.
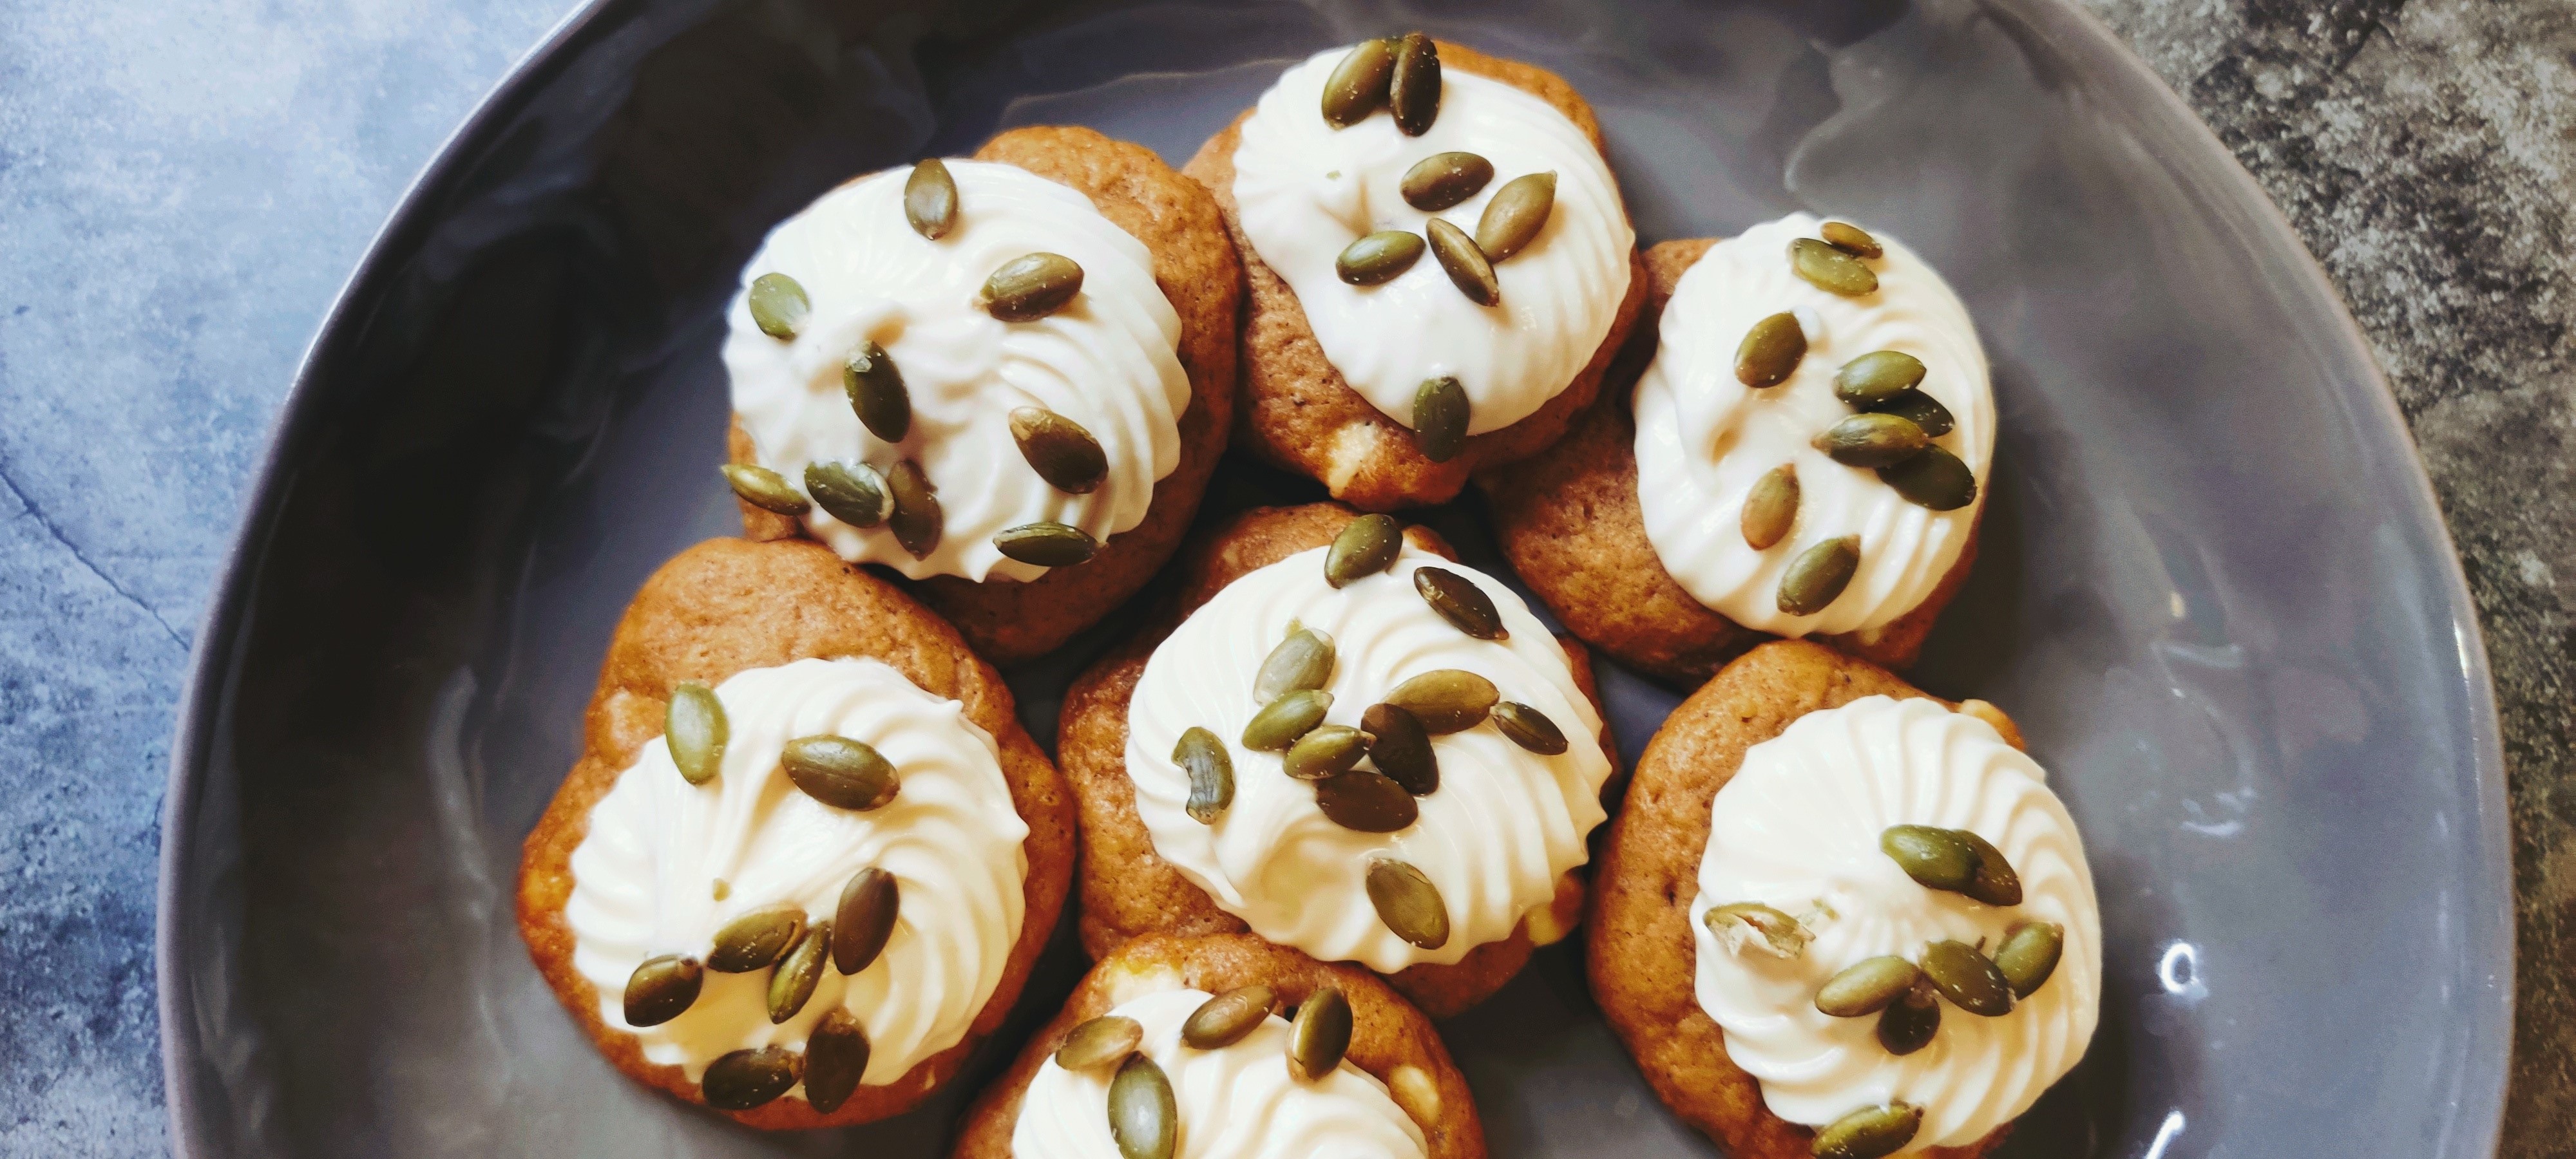
Nan-e Berenji

Ahead of Thyme

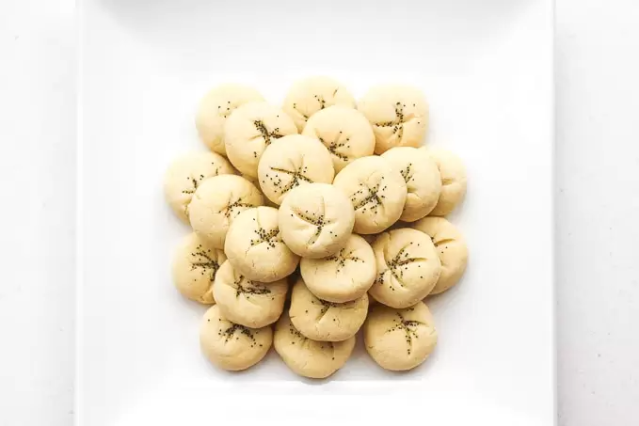
Cute and bite-size, these Persian rice cookies with poppy seeds from Ahead of Thyme will quickly become a fave. The butter-free cookies are made with rice flour which also makes them perfect for gluten-free kiddos.

––Karly Wood


RELATED STORIES

20 Global Recipes Your Kids Should Try at Least Once

10 Authentic German Food Recipes Perfect for Oktoberfest

8 Traditional Cuban Recipes for the Entire Family

9 African Food Recipes You Need to Try at Home

10 Tasty Vietnamese Recipes for Families

14 Restaurant-Worthy Middle Eastern Recipes Families Will Love

11 Simple Greek Recipes for Families

11 of the Best Kid-Friendly Indian Food Recipes

Fall is here, and pumpkins are everywhere! Americans, both young and old, share enthusiasm for this time of year—maybe it’s the trick-or-treating, carving jack-o-lanterns, baking tasty treats, setting up decorations, enjoying pumpkin lattes, baking pumpkin pie, dressing up in Halloween costumes—either way, there’s a comforting feeling and festive energy with this season.

Do You Know The Origins of Halloween?

The tradition originated with the ancient Celtic festival of Samhain, when people would light bonfires and wear costumes to ward-off ghosts. In the eighth century, Pope Gregory III designated November 1st as a time to honor all saints. Soon, ‘All Saints Day’ incorporated some of the traditions of Samhain. The evening before was known as ‘All Hallows Eve,’ and later ‘Halloween.’ Over time, Halloween evolved into a day of activities like trick-or-treating, carving jack-o-lanterns, festive gatherings, donning costumes, and eating treats (source: history.com).

Pumpkin Fun Facts (source: Farmers Almanac)

* The word ‘pumpkin’ comes from the Greek word, pepon, which means a “large melon.”

* Pumpkins originated in Central America.

* Pumpkins are actually a fruit. Many people think it should be our national fruit.

* Pumpkin is also a squash; a member of Curcurbita family.

* The yellow-orange flowers that bloom on the pumpkin vine are edible.

* Pumpkin seeds taste great roasted and contain medicinal properties.

* Native Americans grew and ate pumpkins and their seeds long before the Pilgrims reached this continent. Pilgrims learned how to grow and prepare pumpkins from the Native Americans.

* Pumpkin was most likely served at the first Thanksgiving feast celebrated by the Pilgrims and the Native Americans in 1621.

* The earliest pumpkin pie made in America was quite different than the pumpkin pie we enjoy today. Pilgrims and early settlers made pumpkin pie by hollowing out a pumpkin, filling the shell with milk, honey and spices and baking it.

* Early settlers dried pumpkins shells, cut it into strips and wove it into mats.

* Pumpkin has been prepared in a variety of ways from soups to stews to desserts since the immigration of the first European settlers.

* The ‘Pumpkin Capital of the World’ is Morton, Illinois. Home of Libby’s pumpkin industry.

* The state of Illinois grows the most pumpkins. It harvests about 12,300 acres of pumpkins annually.

* The latest U.S. record (2019) for the largest pumpkin ever grown weighed in at 2,517.5 pounds by Karl Haist of Clarence Center, New York.

* Pumpkins were once considered a remedy for freckles and snakebites.

Natural medicine practitioners have proven that consuming pumpkin seeds reduces the risk of prostate disorders in men.

Decorate Those Pumpkins!

Carving, coloring, painting, and stenciling are just some of the millions of ways to trick-out Jack.  The real stars of the night are our little one’s dressed to fright!

What to do with all that pumpkin goo? Check out this bonus recipe, so easy to do!

White Chocolate Pumpkin Cookies with Almond-Maple Cream Cheese

These soft pumpkin cookies are a great snack idea when having a pumpkin carving party! The almond maple cream cheese gives it a nice finishing touch.

Recipe Type: Easy

Time to cook: 40 minutes

Serves: 8

Ingredients

12 oz. butter, softened 3/4 c. granulated sugar 3/4 c. brown sugar 2 eggs 1 c. pumpkin puree 1 tsp. cinnamon 1/4 tsp. allspice 1/4 tsp. ground nutmeg 1/4 tsp. ground cloves 1/4 tsp. ground cardamom 1 tsp. vanilla extract 1 tsp. baking soda 1 tsp. baking powder 1 tsp. salt 2 1/4 c. all-purpose flour 12 oz. white chocolate chips 8 oz. cream cheese, softened 1/4 c. maple syrup 2 c. powdered sugar 1 tsp. almond extract 1 c. pepitas, toasted

Instruction:

For the Pumpkin Cookies:

* Preheat the oven to 375 degrees.

* In a KitchenAid mixer or using a handheld mixer, add 8 oz. butter, brown sugar, and sugar. Mix for 1-2 minutes or until light in color and fully incorporated.

* Add one egg at a time. Mix.

* Add pumpkin puree, vanilla , and white chocolate chips.

* Fold in flour, cinnamon, allspice, nutmeg, cardamom, cloves, salt, baking soda, and baking powder.

* Line two baking sheets with parchment paper.

* Roll cookie into golf size balls or use a small cookie scoop. Place evenly on the baking sheets. There should be 12 cookies on each sheet.

* Gently flattened the cookie dough with the bottom of a spoon.

* Bake 10 minutes.

* Remove from the oven once turned light brown.

* Allow to cool for 2-3 minutes before transferring to a cooling rack.

For the Almond-Maple Cream Cheese:

* In a KitchenAid mixer, add cream cheese, powdered sugar, almond extract, and maple syrup. Mix for 1-2 minutes at medium speed.

* Add 4 oz. of butter (1 tbs. at a time) and mix until fully incorporated. Taste.

* Refrigerate until ready to use.

For the Pepitas:

* Heat an 8 inch pan on medium-low heat. Add pepitas.

* Cook for about five minutes. Stir frequently.

* The seeds will pop, puff up, and become toasted.

* Remove from heat. Set aside to cool.

Assemble:

* Once cookies have cooled, top with almond cream cheese.

* Garnish with toasted pepitas. Enjoy!

—via Chef Ryan Rondeno

Private Chef to the Stars, Ryan Rondeno, is a true master of his trade and is ready to shake up the restaurant industry by bringing elegant dishes, bold flavor, and simple technique to the home front. His masterful cuisine has been relished at large-scale culinary events, gala dinners, and as a personal chef to some of the most notable names in the industry. As founder and owner of Rondeno Culinary Designs and the Rondeno Spice Collection, Chef Rondeno is focused on guiding cooks of all skill levels enhance the flavor of the dishes and experiences to the kitchen table with his FoodCulture App.


Ruthi Davis is a the Founder of Ruth Davis Consulting LLC with over two decades of success in advertising/marketing, media/publicity, business development, client relations, and organizational optimization for a variety of clients. Ruthi is a proud mom and influencer in the parenting and family market as founder of the Superfly Supermom brand.

With birthdays, holidays and general “let’s eat a cupcake” days, every baking parent needs a few go-to recipes in their apron pockets. Even if you’re going box cake (not that there’s anything wrong with that) this easy frosting recipe will give your cake or cupcakes the from-scratch feel. It has a creamy texture that rivals any store-bought frosting and kids can lend a hand (it’s really hard to ruin this frosting). Scroll down for the recipe.

cupcakes by amber & henrik
Photo: Amber Guetebier

Ingredients:

1 stick (real!) butter (that’s 1/2 cup for most kinds)
1 8 oz. box cream cheese
1 cup (or less) powdered confectioner’s sugar (less sugar gives it a tarter, cream cheesier flavor)
1-2 tsp. of vanilla (or other extract)
Food coloring (optional)

Method:

1. Let the butter and the cream cheese sit out until they are soft, about room temperature. (This is the part that takes the longest, we swear.)

2. Once they are malleable, put the butter and cream cheese in a bowl. Use a hand or stand mixer on medium speed, whip the butter and cream cheese together. Beat for about 3-5 minutes.

3. Once the cream cheese and butter mixture is sufficiently blended, add the sugar, 1/2 cup at a time until blended, tasting along the way for flavor.

4. Add the vanilla, blend, and then add the food coloring of your choice.

One batch frosts about 6 cupcakes generously or 12 cupcakes lightly.

Tips: To double the recipe (which you probably will) just remember the one to one to one ration. One stick of butter, one box of cream cheese, one cup of sugar.

Add a little less sugar, sub the vanilla for coconut or almond extract and your frosting takes on a whole new personality.


—Amber Guetebier


RELATED STORIES

Feeling Left Out? Common Baking Substitutions Real People Swear By

Pantry Staple Recipes for When the Fridge Is Empty

Gluten-Free Dark Chocolate Zucchini Cupcakes


cream cheese christmas tree cookies

Your cookie cutters may sit in a bag in the cupboard for eleven months out of the year, but once the holidays arrive it’s go time. Kristina Moy, Red Tricycle’s Seattle Editor, whips out her Christmas tree cookie cutter each year to make her favorite recipe: cream cheese Christmas Tree cookies with vanilla frosting. She tells us that the recipe works best if you double it, use one 8 oz. package of cream cheese and refrigerate the dough for at least two hours before rolling it out.

Ingredients:
1 cup white sugar
1 cup butter, softened
1 (3 ounce) package cream cheese, softened
1/2 teaspoon salt
1/2 teaspoon almond extract
1/2 teaspoon vanilla extract
1 egg yolk
2 1/4 cups all-purpose flour

Method:
1. In a large bowl, combine the sugar, butter, cream cheese, salt, almond and vanilla extracts, and egg yolk. Beat until smooth. Stir in flour until well blended. Chill the dough for 8 hours, or overnight.

2. Preheat oven to 375 degrees F (190 degrees C).

3. On a lightly floured surface, roll out the dough 1/3 at a time to 1/8 inch thickness, refrigerating remaining dough until ready to use. Cut into desired shapes with lightly floured cookie cutters. Place 1 inch apart on ungreased cookie sheets. Leave cookies plain for frosting, or brush with slightly beaten egg white and sprinkle with candy sprinkles or colored sugar.

4. Bake for 7 to 10 minutes in the preheated oven, or until light and golden brown. Cool cookies completely before frosting.

Click here to find more Christmas cookie recipes like this.

Tell us how your Christmas Tree cookies turn out in the comment section below!

photo above courtesy of Kristina Moy; featured photo credit EvanMischelle via flickr; recipe courtesy of Allrecipes.com

Put your ice cream maker to good use with this delicious vegan almond joy ice cream recipe that comes to us from Fried Dandelions. Don’t have an ice cream maker? One glance at this gluten- and soy-free recipe and you’ll want to go out and buy one.

Ingredients:
½ c unsweetened shredded coconut
1 can coconut cream (thicker than coconut milk)
¼ c maple syrup
2-3 t almond extract, depending on how strong you want the almond flavor
2 ounces dark chocolate
1 T coconut oil, optional

Method:
1. Spread coconut out on a parchment lined caking sheet. Place in the oven at 350 degrees for about 5 minutes while the coconut toasts. Keep an eye on it because it goes quickly! As soon as you smell it it’s probably done! Remove coconut from oven and set aside.

2. Pour coconut cream, maple syrup, and almond extract into a storage container and whisk together. Add coconut and mix. Cover and place in the fridge for at least 3 hours to chill (this will make the freezing process easier).

3. Once chilled, pour the mixture into your ice cream maker and churn according to machine instructions.

4. While it is churning, place the chocolate in a microwave safe bowl. If you would like, add the coconut oil as well. The coconut oil will make the chocolate freeze into chips very easily, and will make it a little smoother to work with, but is by no means necessary so if you are watching your oil intake feel free to leave it out.

5. Place the bowl of chocolate in the microwave and heat for 1 minute until melted. Line a jelly roll pan (that fits in your freezer) with a piece of parchment paper and pour the chocolate on top. Use a spatula to spread it, almost like you are painting the parchment. Place it in the freezer to freeze—it only needs about 5 minutes.

6. Once the ice cream is nearly done, remove the now frozen chocolate from the freezer. Using a fork, break up the chocolate into flakes. You can pull at the edges of the parchment paper to help with this process. Don’t use your fingers or you will melt all of your chocolate! Add the flakes into the ice cream during the last minute of churning and allow it to mix in.

7. Remove the ice cream from the ice cream maker and place into a storage container. You can eat the ice cream right away, or place it in the freezer to allow it to freeze completely. Let it sit at room temperature for a few minutes before serving for easy scooping.

“Like” this story if you’re excited about making this recipe!

This recipe comes to us courtesy of Sarah at Fried Dandelions. Check out Fried Dandelions for more vegan recipe ideas!

Halloween is the time of year for satisfying your sweet tooth. It’s also when all the creepy crawlies and spooky spirits come out and play. In this recipe we find the best of both worlds! Witch Finger cookies are gross enough to have your kids yelling awesome! But delicious enough they munch on them immediately. Plus, this is the perfect recipe for little helping …. fingers.

Ingredients

1 cup butter, softened

1 cup confectioners’ sugar

1 egg

1 teaspoon almond extract

1 teaspoon vanilla extract

2 2/3 cups all-purpose flour

1 teaspoon baking powder

1 teaspoon salt

3/4 cup whole almonds

1 (.75 ounce) tube red decorating gel

Method

1. Combine the butter, sugar, egg, almond extract, and vanilla extract in a mixing bowl. Beat together with an electric mixer; gradually add the flour, baking powder, and salt, continually beating; refrigerate 20 to 30 minutes.

2. Preheat oven to 325 degrees F (165 degrees C). Lightly grease baking sheets.

3. Remove dough from refrigerator in small amounts. Scoop 1 heaping teaspoon at a time onto a piece of waxed paper. Use the waxed paper to roll the dough into a thin finger-shaped cookie.(This is a great task for kids)

4. Press one almond into one end of each cookie to give the appearance of a long fingernail. (Perfect for little ones!

5. Squeeze cookie near the tip and again near the center of each to give the impression of knuckles. You can also cut into the dough with a sharp knife at the same points to help give a more finger-like appearance (as pictured). Arrange the shaped cookies on the baking sheets.

6. Bake in the preheated oven until the cookies are slightly golden in color, 20 to 25 minutes.

7. Remove the almond from the end of each cookie; squeeze a small amount of red decorating gel into the cavity; replace the almond to cause the gel to ooze out around the tip of the cookie.

Adapted for kids from Allrecipes.com