It doesn’t get much easier than this 5-ingredient taco salad from the food blog, Sweet Phi. If you dare go above the five ingredients feel free to sub in or add your toppings suited to your kiddos’ taste buds. Either way, we promise this turkey taco salad dinner will be one of the easiest and tastiest you’ve ever made.
Ingredients for Turkey Taco Salad
1 lb ground turkey, extra lean
1 cup salsa, divided
6-8 cups romaine (or lettuce of choice)
1 cup tortilla chips
1 cup shredded cheese (I use Mexican blend cheese or pepper jack)
Notes from the Chef:
• If making this salad to eat later, cook the ground turkey and salsa, and store it in an air-tight container in the fridge until you’re ready to use it.
• This salad is good with both warm or cold ground turkey
• Alternatively you could use slow cooker salsa chicken as a topping (just put salsa and chicken in a crock pot on low for 6 hours and then shred when done).
Method for making Turkey Taco Salad:
1. Pour ½ cup salsa into a large frying pan, add the ground turkey, and cook it, breaking it up as you cook it. Cook for 15 minutes, or until the turkey is cooked through.
2. In a large bowl (or 4 small bowls) divide out the lettuce.
3. When the turkey is done cooking spoon out on top of the salad, pour the remaining salsa on top of the ground turkey, then add the cheese and tortilla chips (I like to crush some of the tortilla chips as I add them to the top the salad).
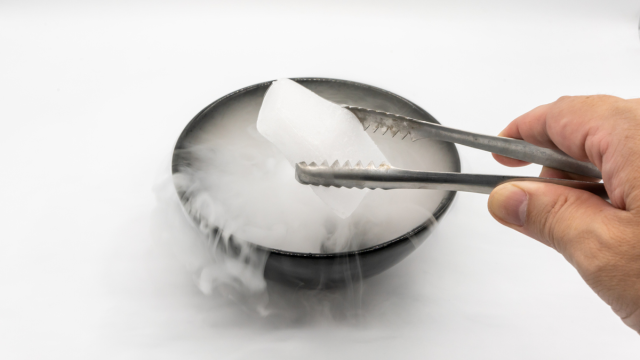
Frozen carbon dioxide, a.k.a. dry ice, is frozen at a temperature of negative 109 degrees Fahrenheit
Experimenting with ice is cool. But dry ice experiments are even cooler! Unlike the ice cubes in your freezer, dry ice doesn’t melt into liquid. Instead, these blocks sublimate, which means instead of transforming from a solid to a liquid, dry ice goes from a solid to a gas. With the proper precautions, this type of science experiment for kids is safe—so grab gloves and tongs, open a window or take the CO2 outdoors, follow these guidelines from the National Weather Service, and check out these awesome dry ice experiments.
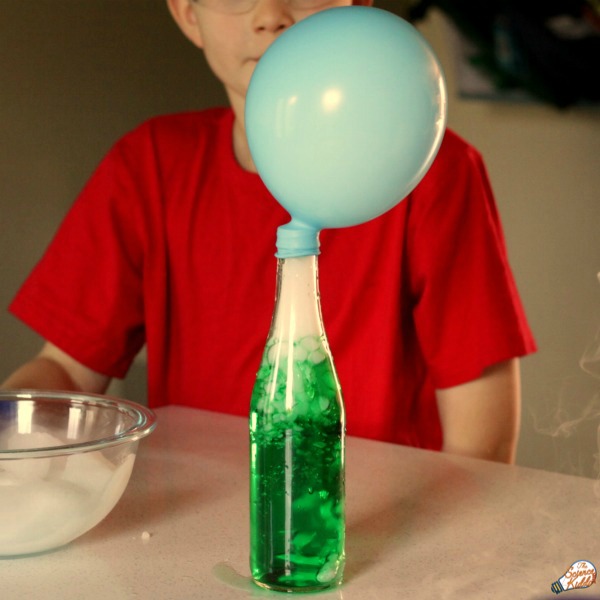
The air from your lungs isn’t the only way to blow up a balloon. This chilly experiment from Science Kiddo helps your budding scientist explore the properties of dry ice.
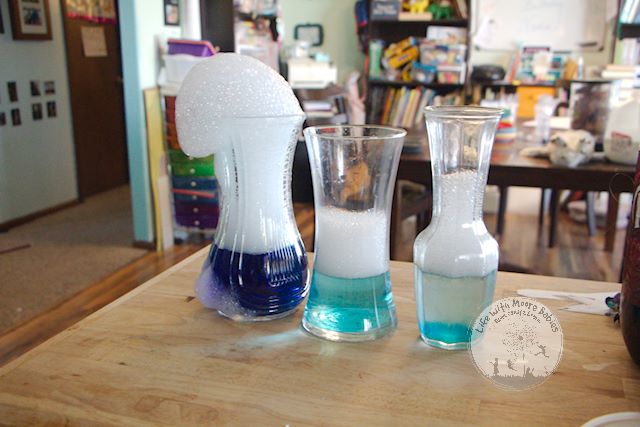
Check out this awesome overflowing dry ice volcano experiment from Life with Moore Learning! As if this isn’t enough fun, you'll also get a step-by-step guide to help your kids compare regular ice with dry ice and other freezing explorations.
Plan a Potion
iStock
Whether you want to make a witch’s brew for your family's Halloween monster bash or you just want to mix up a cool (literally) concoction, Our Best Bite’s Mad Scientist Potion has everything you need to make a mocktail that’s overflowing with fog.
Make your own at-home outdoor fog machine with two ingredients—dry ice and hot water. Remember, dry ice doesn’t melt into a liquid. Instead, it sublimates or turns into a vapor. Place blocks of dry ice into a glass or bucket of hot water and then stand back and watch as the fog pours across your yard!
Can dry ice help extinguish a candle quickly? Your littles can easily blow out their bday cake candles, but have they ever used dry ice to make a flame go away? Head over to Life with Moore Learning for the how-to steps to this easy science exploration.
How can your kids make a crystal ball? Gather a few pieces or pellets of dry ice, a bowl, dish soap and a kitchen towel. Put the dry ice into the bowl, add hot water and watch the fog show begin. Even though this is exciting, it’s not where the experiment ends. Dip the dish towel into a soapy solution, and spread it around the rim of the bowl. Gently pull the soap-soaked towel across the bowl and watch as a ball-like bubble emerges in front of your eyes.
Compare and Contrast
Erica Loop
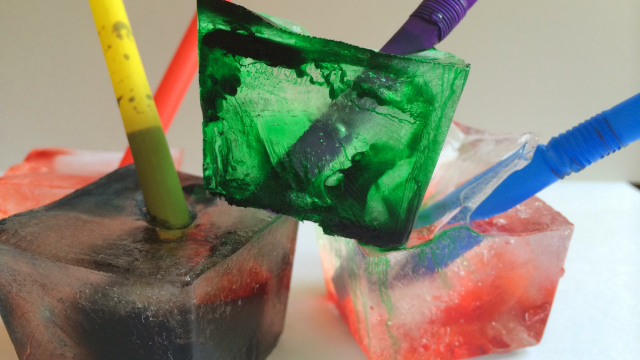
How does dry ice melt? The answer isn't regular ice. While you might already know this, your child doesn’t. Freeze water, juice, soda, milk, and any other liquid you want. Put the frozen liquid cubes on plates and create a comparison plate with dry ice. Watch each ice option carefully. Your child can jot down what happens to each piece of ice and when.
If you have boxes of plastic or latex gloves hanging around your home, forget about cleaning. It’s time to put these gloves to scientific use, as they are a great substitute for balloons. Drop a shred of dry ice into the glove, tie the end and watch it magically grow. Hint: Don’t use too much dry ice for this experiment. A pellet will do. Overdoing it with the frozen CO2 might create too much gas, causing the glove to burst.
You’ve covered dry ice with water and watched it fog. But what happens if you put the frozen CO2 into a bath of bubbles? Use your kiddo’s paddling pool or fill the sand table with a water and bubble solution or dish soap mix. Ask your child to predict what will happen as the dry ice sublimates. Observe the bubbles as the CO2 gas fills the water and moves into suds.
Magical Disappearing Ice
iStock
When regular ice melts it leaves behind a puddle, but the same isn't true for dry ice. Again, the sublimation process causes it to turn into a gas state. Help your child learn more about the states of matter with easy observation-based science exploration. Place a piece of dry ice in a bowl outside on a warm day or in the sun. Ask your child to predict what they think will happen to the dry ice. Go back later in the day and take a look at the bowl. Like magic, the ice is gone, and nothing is left behind. Discuss what happened. Your child can hypothesize where the ice went and why there is no water in the bowl.
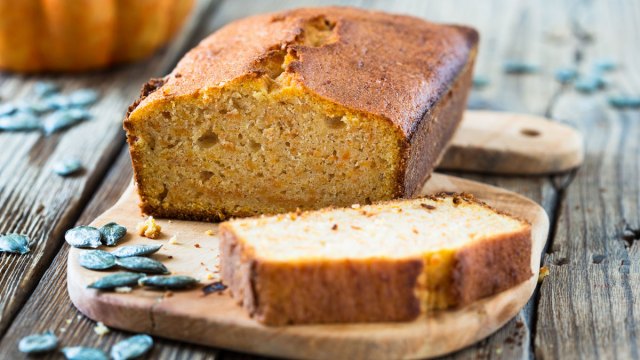
Pumpkin bread that’s moist, flavorful, and easy to make? Yep, it’s true! This easy pumpkin bread recipe is perfect for the festive holiday season, especially when your time is limited since there is very little prep time or dirty dishes involved. Try making the pumpkin bread in a regular loaf pan, or if you’re looking for a unique present, bake the bread in a coffee tin or in old soup cans. Then wrap it up with cellophane or tissue paper and you’ve got yourself a great (and delicious) gift.
Easy Pumpkin Bread Recipe Ingredients:
1 (15 ounce) can of pumpkin puree
4 eggs
1 cup vegetable oil
2/3 cup water
3 cups white sugar
3 1/2 cups all-purpose flour
2 teaspoons baking soda
1 1/2 teaspoons salt
2 teaspoon ground cinnamon
2 teaspoon ground nutmeg
1 teaspoon ground cloves
1 teaspoon ground ginger
**this recipe will yield three 7″ x 3″ loaf pans. We suggest cutting the recipe in half if you don’t want that large of a portion. If you do cut the recipe in half, it will make one regular loaf.
Method:
1. Preheat oven to 350 degrees F (175 degrees C). Grease and flour three 7×3 inch loaf pans.
2. In a large bowl, mix together pumpkin puree, eggs, oil, water, and sugar until well blended. In a separate bowl, whisk together the flour, baking soda, salt, cinnamon, nutmeg, cloves, and ginger. Stir the dry ingredients into the pumpkin mixture until just blended. Pour into the prepared pans.
3. Bake for about 50 minutes in the preheated oven. Loaves are done when a toothpick inserted in the center comes out clean.
Sit back and relax with this amazingly simple recipe (it might be the easiest we’ve ever seen!), and add some kid-friendly flavor to your evening
We can’t think of much that our kids like better than chicken teriyaki! For the perfect family feast, try this Crock Pot Chicken Teriyaki recipe from Kylee at Our Little Acre. If you’re looking for other amazing dinner ideas, check out our list of crock pot dinner recipes.
Crock Pot Chicken Teriyaki Ingredients:
1 lb. chicken, cubed
1 cup chicken broth (optional; Kylee recommends skipping it)
1/2 cup teriyaki sauce
1/3 cup brown sugar
3 garlic cloves, minced
Preparation Method:
1. Combine chicken broth, teriyaki sauce, brown sugar, and garlic cloves in a large bowl.
2. Add chicken to the sauce, and mix.
3. Pour chicken mixture into crock-pot.
4. Cook on low for 4-6 hours, or until chicken is cooked through.
5. Serve over hot cooked rice and spoon on extra sauce if desired.
Check out these spooky Halloween minute to win it games that all the kiddos will love!
Halloween is right around the corner, and if you’re looking for fun Halloween games to make the holiday extra spooky, these minute-to-win-it ideas are exactly what you’re after. Whether you’re staying in this year or going out for trick-or-treating, these party games will keep your kids entertained for hours. While you’re at it, make the night extra special with some fun Halloween jokes, kid-friendly ghost stories, easy Halloween treats, and awesome Halloween crafts.
What’s a minute to win it game?
Simply put, it’s a 60-second game using items typically found around the house. Participants attempt to see who can finish a challenge first or who can complete a task the most times in under a minute. You can try these holiday minute to win it games when Halloween is over or attempt some year-round minute to win it favorites!
Take their favorite piece of Halloween candy (that isn’t too messy, of course) and place it on your child’s forehead. They’ll need to use their facial muscles to move it down their face into their mouth without using their hands.
2. Pumpkin Balance
This involves two players balancing mini pumpkins on their heads and racing to a certain point without dropping the pumpkin. You can make it tougher by making it a running race!
3. Donut Race
Slide a donut on a string and see who can eat it off the string the fastest. What a delicious game to play!
4. Candy Balancing
Put the end of a craft stick in your mouth and stack a candy of your choice on top. Whoever stacks the most pieces wins! You can make the game more challenging by choosing a non-flat candy.
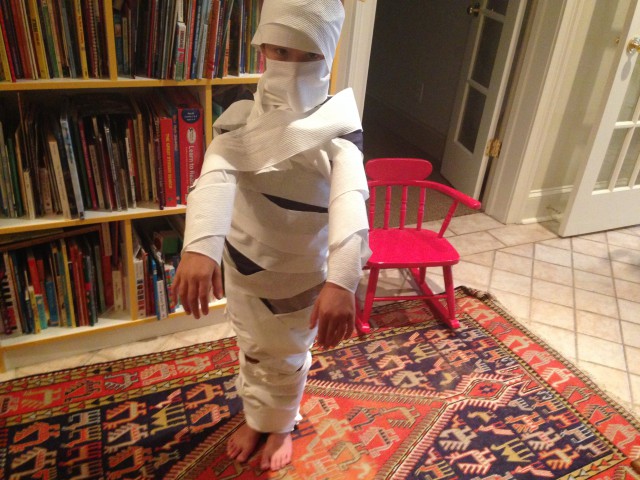
A two-player game that involves wrapping the other player in toilet paper to look like a mummy.
6. Stack 'Em
Using apples, gourds, or mini pumpkins with the stems cut off, little ones have one minute to stack five apples or pumpkins (or three for younger kids) on top of each other and get them to stay for three seconds.
7. Candy Toss
Have two players take turns tossing their favorite candy (wrapped or unwrapped) into a bowl or cauldron. Whoever gets the most pieces into the cauldron in a minute wins.
8. M&M Switch
Each player will need two plates; one filled with M&Ms and one empty. Players use a straw to suck up each M&M and drop it onto the other plate. Whoever gets the most M&Ms onto the other plate wins!
Make ghost or mummy Halloween pins out of toilet paper rolls or white/clear plastic cups. Use a mini pumpkin or a regular-sized pumpkin (real or fake) as your bowling ball and get rolling.
10. Witch's Hat Ring Toss
Connect glow sticks or fuzzy craft sticks into rings. Each player takes turns tossing their rings onto the witch's hat, and whoever gets the most rings onto the hat wins (You can also use a pumpkin stem to catch the rings.)!
11. Candy Unwrapping
Have your contestants take a wrapped piece of candy (choose a difficult one for a challenge) and have them unwrap it one-handed.
12. Dig for Creepy Crawlies
Crumble up your favorite cookie (that resembles dirt) and fill a bowl or bucket. Hide plastic creepy crawlies inside the dirt and have the players dig for them with a spoon. Whoever finds the most creepy crawlies wins.
They’ll be begging for more of this easy dinner recipe!
While the quintessential American festival and fair food has to be the corn dog, there’s nothing healthy about this food on a stick. We decided to make a healthier version of the corn dog with a kid-friendly twist. Deep frying is replaced by baking, and instead of an unwieldy eat we made these into baked corn dog muffins perfect for little hands. Be sure to check out our other healthy swaps that are picky eater approved!
Ingredients for Corn Dog Muffins:
1 cup of unbleached all-purpose flour
1 cup yellow cornmeal
1/3 cup of sugar
2 1/2 tsp baking powder
1 cup milk
2 large eggs
1/4 vegetable oil
3 hot dogs cut into 1/2 inch pieces (veggie, chicken apple sausage, beef, or any type you like)
Mini muffin tin
Method:
1. Preheat oven to 425 and grease mini muffin tins.
2. Mix the first four dry ingredients in one bowl; mix the wet ingredients in a second bowl. Add the dry ingredients to the wet ingredients.
3. Sautee your 1/2-inch hot dog bites for a few minutes over medium heat.
4. Pour batter into prepared muffin tins until each is 3/4 full. Put one hot dog slice into each batter-filled muffin cup so it’s submerged in the batter.
Summer sun means ice cream fun! If you want an afternoon of deliciousness, you can’t top an ice cream sundae bar. With creative cones, tasty toppings, and whimsical decorations, it’s enough to make anyone scream for ice cream. We’ve got the scoop on ice cream bar ideas that include homemade sundae cups, creative displays, and even homemade ice cream that you’ll love.
Say goodbye to regular old bowls forever. These are made with classic ingredients and shaped using a muffin tin. Get all the details and the full recipe here!
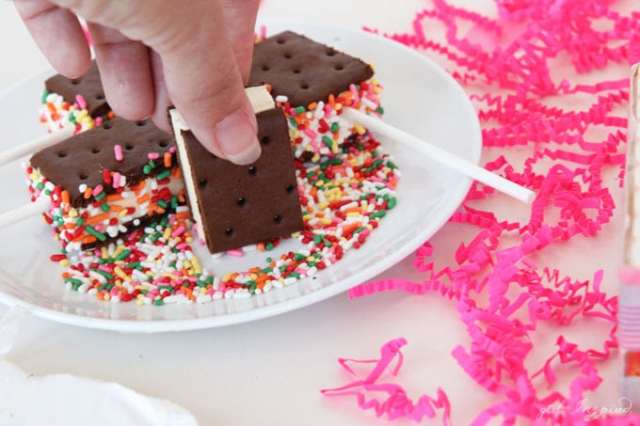
Mini Ice Cream Sandwich Pops
The Girl Inspired
Store-bought sandwiches never looked so cute! These easy-to-make pops are perfect for little hands, easy to customize with any type of sprinkles, and make a great option for a party for little ones. Get the easy instructions over at The Girl Inspired.
Did you know you can make your own version of this classic ice cream topping right at home? You can, and even better, you can add extra goodies, like Heath Bar. See above!
What’s more fun to eat than ice cream? An ice cream sandwich! Offer a selection of ice cream flavors, a variety of cookies, sprinkles, and mini chocolate chips. Let guests choose their adventure!
If you’ve got one of these collecting dust in your cabinet, bring it out and use it to create more space on your ice cream bar. Plus, it’ll make you look fancy.
Adding a simple sign to your display makes the event a bit sweeter, don’t you think?
Scoop Ahead of Time
Kojo Designs
We’re always on the hunt for hints to make our parties look a little more seamless. This clever tip comes from Kojo Designs. Scoop your ice cream in advance and put it back in the freezer until it’s party time. It makes for a delectable display, and you’ll get to spend time with your guests rather than with the ice cream scoop.
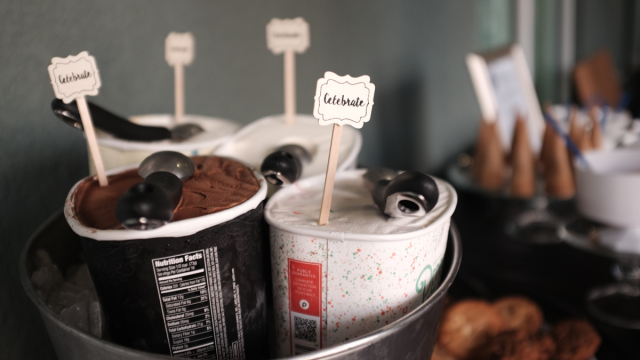
Keep It Simple
Steve Shreve via Unsplash
If you love the whole “ice cream bar” idea, but it seems a tad unrealistic to you, especially on a hot day, try a very simple method. Set out your cones and anything non-perishable in advance, then just before your party peoples are ready for their treats, keep the ice cream in its pints and set it in a bowl of ice. Make tiny labels to make it look chic—they can have the flavors of the ice cream or just simple words, like “celebrate.”
If you think that Pasta Carbonara is a dish you can only have in restaurants, you’ll be shocked to see how simple making it really is. Here to break down the steps for any home cook are Gayle Pirie and John Clark, Chefs and Co-owners of Foreign Cinema in San Francisco. Read on for the full recipe.
Ingredients for Pasta Carbonara:
1 pound (or just under) long noodles (spaghettini, fettucini, or linguine)
6 thick slices of smoky bacon
2 Tablespoons pure olive oil
4 eggs
Salt to taste
A chunk of Parmesan cheese, freshly grated
Freshly ground black pepper to taste
Method:
1. Bring lightly salted water to a boil in a large pot. Cook the noodles until tender but firm.
2. While the noodles cook, dice the bacon and cook it in the olive oil until just lightly crisped in a medium sauté pan. Pour off the excess fat, reserving 4 tablespoons in the pan.
3. In a bowl, beat the eggs and season with a little salt.
4. Drain the noodles, saving about 2 tablespoons of water for later. If the pan has cooled down, warm it up again right before adding the noodles.
5. Add the noodles to the warm bacon in the pan; thoroughly toss with the oil and bacon, and season with salt. Work fast and pour the beaten eggs onto the warm noodles and mix well to coat the noodles.
6. Add the reserved pasta water if the noodles look dry. The heat of the noodles and the pan will thicken and set the eggs. If there is not enough heat, turn the burner on very low, just to warm the noodles, then turn it off. Too much heat can scramble the eggs.
7. Once the noodles, egg, and bacon are well mixed, add freshly grated Parmesan cheese, and stir. Freshly ground black pepper is an essential addition. Serve in warm pasta bowls.
Partners Gayle Pirie and John Clark are two highly original talents who have been deeply involved in the competitive and innovative ferment of the San Francisco restaurant scene for over two decades. Today, Pirie and Clark are the chef talent, and owners behind the very popular and exciting dining destination- Foreign Cinema. In addition to Foreign Cinema they have published two cookbooks, Country Egg, City Egg in 2000 and Bride and Groom in 2006.
Give the pre-made pancake mix a break with this fast and made-from-scratch buttermilk pancake recipe that even the most pancake-challenged parents can easily make. Get the little ones in on the fun by letting them help pour the ingredients into the bowl and sprinkle fresh blueberries into the batter. The whole family will be digging into these yummy cakes within 20 minutes. If you want to get fancy, check out our round-up of creative pancakes, and pass the maple syrup!
Buttermilk Pancake Recipe: Ingredients
1 ½ cup flour
1/3 cup sugar
2 teaspoons baking powder
½ teaspoon baking soda
½ teaspoon salt
1 ½ cup buttermilk
2 eggs
3 tablespoons canola oil
1 teaspoon vanilla
Instructions:
1. Get ready by taking out all of your ingredients and placing a griddle or large pan over medium-low heat. You’ll need 2 large bowls, measuring cups, measuring spoons, a whisk, and a large spoon.
2. In bowl number one, pour and mix all your dry ingredients together (flour, baking powder, baking soda, salt).
3. In bowl number two, pour and mix all your wet ingredients together (buttermilk, eggs, canola oil, vanilla) and whisk.
4. Pour bowl number two (wet ingredients) into bowl number one (dry ingredients) and mix gently with a large spoon.
5. Butter the griddle or pan and spoon pancake batter onto the pan in little circles. You can even experiment with making shapes (mickey mouse is a popular choice).
6. Cook each side until golden (you’ll see bubbles begin to form when it’s time to flip). Top with butter and maple syrup and enjoy.
This three-ingredient crock pot sweet pork recipe is so simple you can make it with your eyes closed. At least, that’s what Erin at Table for 7 claims she loves most about this dish. Depending on how much spiciness your tastebuds like (or don’t like), you can switch up your salsa choices to best suit what your picky eaters enjoy most. Serve this pork on top of a bed of rice and dig in.
Ingredients for Crock Pot Sweet Pork:
2 lbs boneless pork
2 c salsa
1 c brown sugar
Method:
1. Spray crock pot or line with crock pot liners/parchment paper. Add pork into crock pot.
2. In a separate bowl, mix salsa and brown sugar well. Pour over pork.
Keeping a chronicle of her cooking exploits on her site Table for 7, Erin says her site is all about her cooking and baking experiences; the good and the not so good. Erin’s not a professional baker, cook, or photographer but honest about what she prepares at home. Along with her plain-eating husband, her family consists of a couple of picky eaters (and one very picky eater). She creates recipes that aren’t fancy, flashy, or cost you a small fortune to make.