There’s no reason you can’t be the mastermind behind your own baby photoshoots
You’ve probably been taking impromptu pics of your baby since day one—an unexpectedly adorable expression here, a snuggly selfie there. But wouldn’t it be nice to have a few really good shots of your growing family? Yes, you could hire a professional photographer to create the perfect experience, or you could get creative and do it yourself (which can be a lot more fun!). With the holiday season on the horizon, you have a great excuse to get everyone together for some quality, photo-worthy time, and then share the amazing snaps from your baby photoshoot with friends and family on Tinybeans (check out our app here!).
Here’s how to plan and execute your DIY photo shoot.
1. Enlist a friend or family member
Do you have a teenage niece or nephew who’s passionate about photography? What about a neighbor with a really great DSLR camera? Call in a favor and ask if that artsy pal of yours would be interested in setting aside an hour or two to capture your family for a moment in time. Offer to return the favor in some way (especially if he or she has a family to be photographed!), and say “thanks” with a gift card to a nice restaurant or a bottle of wine and some gourmet chocolate.
2. Nail the timing
Think about your baby’s fluctuating energy and moods throughout the day, and pick a time when you know your little one will be the most calm and content. For some, this is first-thing in the morning. For many, this is right after a nap or feeding. Be flexible with your baby photoshoot and work around the youngest one’s temperament. Also, if you’ll be shooting outside, try to maximize the natural light by taking advantage of early morning or late afternoon rays, but avoid the harsh overhead sun at midday.
3. Coordinate outfits—without being matchy-matchy
We’re all familiar with the matching khaki pants and crisp white shirt look found in countless family photos. While you want to look cohesive, don’t feel obligated to match outfits, which can look canned and inauthentic. Instead, decide on two or three colors (at least one being a neutral) that you will use as your inspiration and find outfits that fit the bill. Simple, solid (non-patterned) clothing is always a safe bet.
4. Carefully consider props
Think about what toys and objects mean something to you and your little ones. If your child has a favorite, love-worn stuffed animal, why not include it in the shot? Be selective, but try a few different props that are unique to your family. And be sure to bring plenty of soft blankets to lay on the grass, curl up in, and play peek-a-boo with.
5. Get low and close
If you’re all sitting on a blanket or casually lying down on the grass, ask your photographer to get as low to the ground as possible so you’re all at the same eye level. And see if he or she is willing to do some close-up shots in addition to wider angles. The variety will make for a really nice collection of photos.
6. Be goofy
Encourage everyone to be silly in an effort to get the baby to laugh and smile. Too often, parents are focused on “looking” polished and perfectly happy in their first baby photoshoot. But feeling carefree in the moment and trying to have fun will result in nicer, more natural images.
7. Forget the camera
Some forward-facing shots are a good idea, but try not to focus on where the camera is at all times. Ask the photographer to move around and achieve different angles that way, rather than trying to coax your baby to turn in a specific direction. Candid shots can be unique and just as gorgeous as posed photos.
8. Don’t stop shooting
If your pal hasn’t photographed babies or tots before, kindly explain that fast-moving little ones make for difficult models so he should use continuous shooting mode and keep snapping. Chances are, one or two of the series will be the perfect pic.
9. Take turns
A big, happy family photo is a great idea, but don’t hesitate to take turns experimenting with who’s in the photo. Take some with just kids, just Dad and baby, just Mom and baby, and all potential iterations. Don’t get too preoccupied on everyone being in same photo.
10. Just go with the crazy
If you have an older toddler running around in circles or your newly crawling baby wants to be on the move, grab a kid, have your partner do the same, and flip them upside down for a playful shot. If tears or tantrums are part of the mix, don’t stress. They can actually make for great, memorable photos.
For parents who want to share special moments with friends and family without making it a public display, there’s the Tinybeans app (you can learn more and download here!). The secure platform puts parents in total control of who sees and interacts with photos and videos of their kids.
These are the baby monitors that will help you rest easier
Nanit versus Owlet? Miko versus Cubo? Baby monitors have come such a long way from what our parents had when we were young. They aren’t just essentially one-way radios anymore; these are high-tech gadgets that come in a bunch of choices. There are more baby monitors out there than there are sleepless nights in your future. And with so much already on your mind being the parent of a baby, wading through a million different monitor options, all promising to be the absolute best on the market, isn’t exactly easy. There are so many to choose from, and each one does something just a little bit different. That’s where we come in. We’re here to help you sort through all the best baby monitor details.
We’ve done the research and compiled a list of the best monitors on the market. From wearables to AI to the high-tech video monitors, we’ve got you covered. You can do all the comparisons right here (afterall, the Nanit versus Owlet debate is a hot-button topic in the parenting world). So whether you’re up late rocking a newborn, looking to upgrade your existing monitor, or shopping for a baby shower gift, we’ve got it all right here.
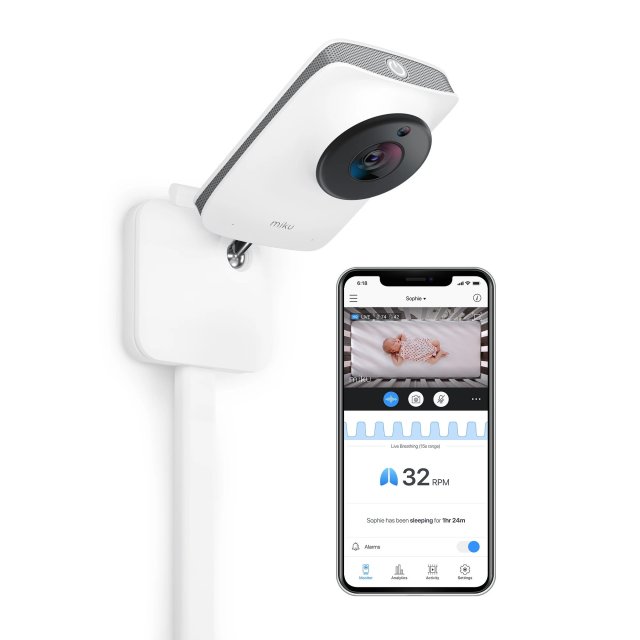
Miku Pro Smart Baby Monitor
Miku
A contact-free, real-time respiratory baby monitor, the Miku Pro tracks your little one's breathing and sleep without the use of wearables. That means babies can sleep in any clothing, in any position (both within those infant safety guidelines your pediatrician shared with you), and you can still use this monitor as your child gets older. Create customizable alerts to track movement, sleep, sounds, temperature, humidity and more. The monitor can also play white noise and lullabies to help put your little bundle of joy to sleep. Miku Pro Smart Baby Monitor ($389.98)—Buy Here!
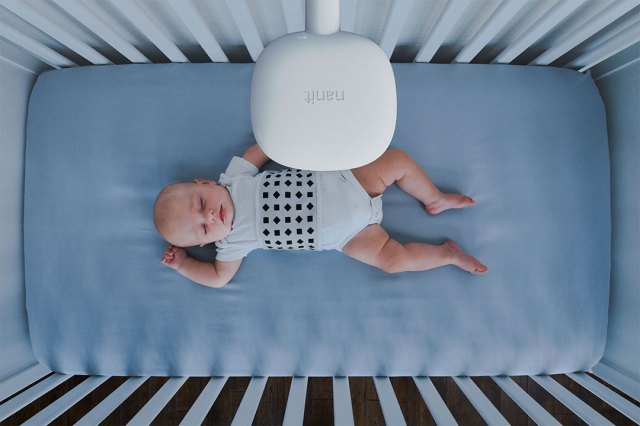
Nanit Pro Monitor & Complete Monitoring System
Nanit
The Nanit Pro camera (available on its own or in a bundle) tracks baby's sleep metrics, breathing motion, temperature, humidity and even height while saving images on crystal-clear HD video. The complete monitoring system bundle includes the camera, a Breathing Band to monitor baby's breathing motion, and Smart Sheets that tracks physical growth. The camera comes with a wall mount; or you can snag a floor stand. You can also purchase Nanit Pajamas, which monitor baby's breathing motion in real time without wires or sensors and alerts you when your they need you. Nanit Pro Monitor & Complete Monitoring System ($379.00)—Buy Here!
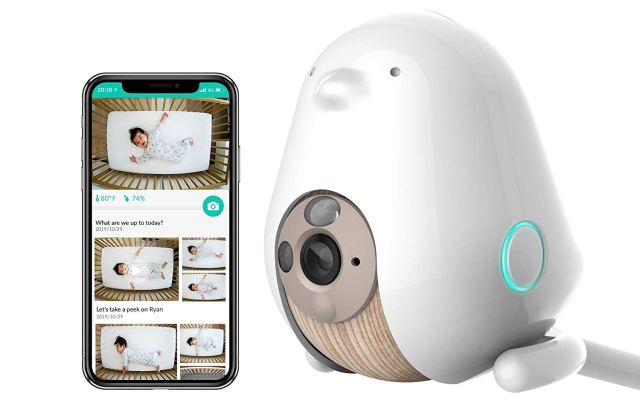
Cubo AI Baby Monitor
Cubo AI
There's a lot of sophisticated technology packed inside this cute, bird-shaped monitor. The Cubo uses face detection technology to alert you if your baby's mouth and nose may be covered, either from rolling over on their tummy or having an item covering their face. Set the danger zone alert to let you know if your baby is scaling their crib, or position it around the house to know when your child is too close to the stairs or other potentially unsafe areas. A text alert pops up on your phone when Cubo detects your child's cry. And the AI is even smart enough to notice smiles and larger movements and automatically take photos of them for your viewing pleasure.
Other features include 1080p HD night vision, a wide-angle (135-degree) viewing area, 18-hour video replay, built-in nightlight, temperature & humidity gauge and 4x digital zoom. Three included stands (crib stand, floor stand, and mobile stand) means the monitor grows with your child. Cubo AI Baby Monitor ($299.00)—Buy Here!
Owlet Cam
Owlet Baby Care
This clever camera rests on a magnetic base so you can position it wherever you like; then use the included cable guard kit to secure cables out of baby's reach. There's a secure, encrypted WiFi connection to keep out hackers, but you and other loved ones can view your child on high-definition 1080p video on your phone. Set the Owlet app in Background Mode and you can hear your baby while you use your phone for other tasks. Owlet Cam ($99.99)—Buy Here!
Oma Sense Baby Breathing Movement Monitor by Levana
Levana
This breathing monitor clips on to baby's clothing to monitor stomach movements. If a lack of movement is detected, the monitor vibrates to stimulate the baby and alerts you to the situation. If there's still no movement, the monitor emits an emergency audio alarm so you can check on your baby. Cordless and battery powered, you can easily pop it in a diaper bag for overnights at grandma's house or longer trips. Oma Sense Baby Breathing Movement Monitor by Levana ($82.99)—Buy Here!
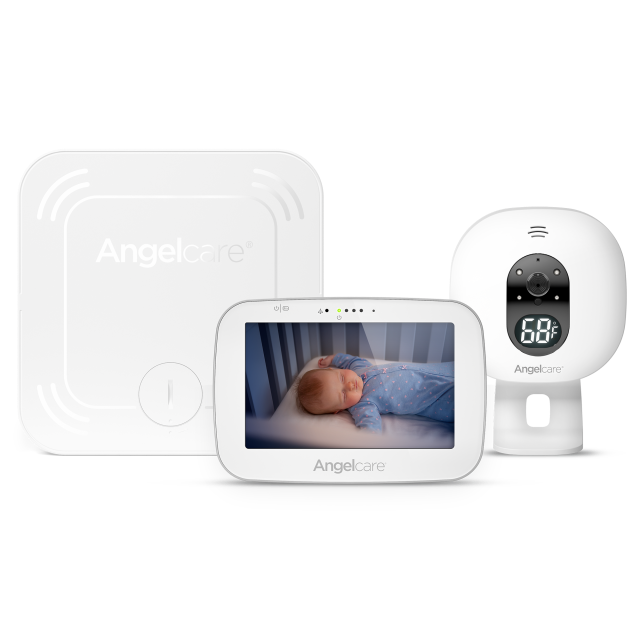
Angelcare 3-in-1 Baby Monitor
Angelcare
A 5-inch touchscreen provides clear night vision of your sleeping babe as well as an easy way to access the unit's settings. The unit in the nursery can be placed on a tabletop or the wall transmits a clear image and displays the room's temperature. The monitor comes with a wireless baby movement sensor pad to monitor baby's movement; the monitor sounds if no movement is detected for 15 seconds. Angelcare 3-in-1 Baby Monitor ($274.99)—Buy Here!
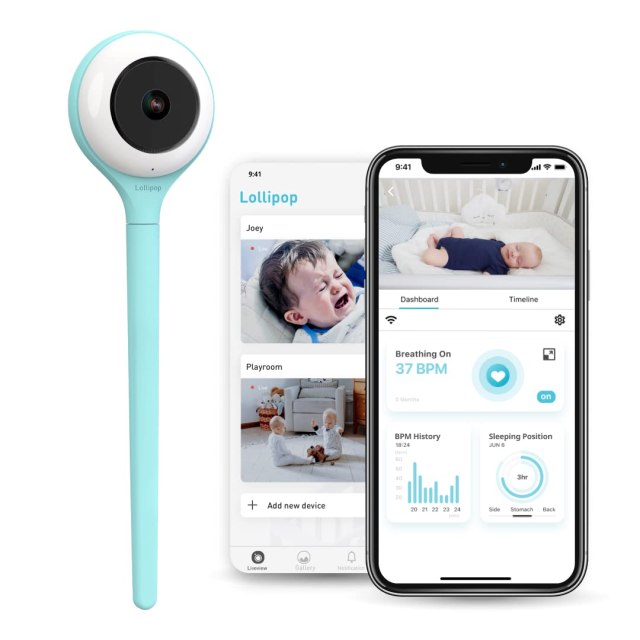
The Lollipop
Lollipop
If you're not into wearable monitors, the Lollipop is a great option. AI technology monitors your babe's breathing and filters out ambient noise like wind to accurately alert you when crying is detected. With 1080p Full HD quality, checking on your baby through the Lollipop live feed on your tablet or smartphone from anywhere you are is no problem. You can even set a border inside the camera view to track movements in your baby’s crib. If anything happens outside the border, you’ll be notified. The Lollipop ($159.99)—Buy Here!
All the products listed are independently & personally selected by our shopping editors.
If you buy something from the links in this article, we may earn affiliate commission or compensation. Prices and availability reflect the time of publication.
If you’re looking for a snowflake science experiment, you’ve come to the right place
Whether your sidekick playfully carves out angels in the snow or sits at the window longing for some of that white stuff to actually fall, she’s all about the frosty flakes. And while play is her main motivation, she’s got serious questions about this wonderful winter phenomenon. Like, how do snowflakes form and what do they really look like up close? Dig deep with a flurry of experimental activities we’ve outlined below to find answers to all her snowflake science questions.
Piece It Together
Allison Sutcliffe
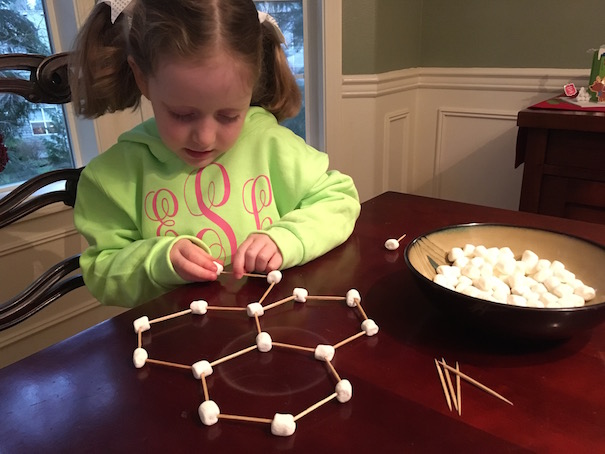
We hate to break it to you, but those adorably sweet snowflake cutouts your kid has been bringing home from school this winter don’t pass scientific muster. Because even though folding paper to make four or eight-sided flakes are super easy, Mother Nature’s snowflakes showcase six-sided symmetry exclusively.
Before diving into your own masterpiece, introduce your scientifically-inclined sidekick to the principle that helps explain why six is the magic number for snowflakes: When the water/oxygen molecules bond during freezing they make hexagons. Recreate this microscopic lattice phenomenon on a larger scale using mini marshmallows and toothpicks with your kids (Click on the link above to find a handy-dandy diagram from Ohio State University!).
Cut It Out
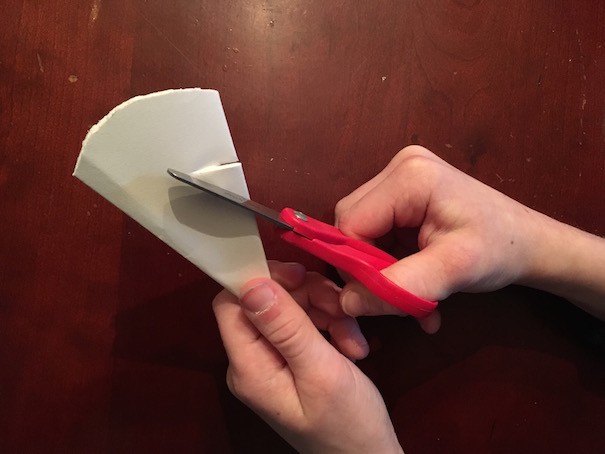
Allison Sutcliffe
Now that your kiddo’s got the six-sided thing down, it’s time to make some of your own scientifically accurate snowflakes from paper. We’ve found an easy way for the tot lot to get the signature six-sided look they’re going for (hint: it’s all about the fold). Simply follow this illustrated tutorial to make paper snowflakes that are true to life. And if you’re looking to bypass the mess, the Make-A-Flake digital option is definitely the way to go. Your tech-savvy tot can cut and save all her frosty creations and save trees too!
Observation is the next step when it comes to snowflake science. If you don't have fresh snow on the ground, you’ve got to get creative and make your own: Leave your freezer door open for a couple of minutes and then close it for 20. When you open it again, your inquisitive cutie should find frosty snowflakes lining the interior.
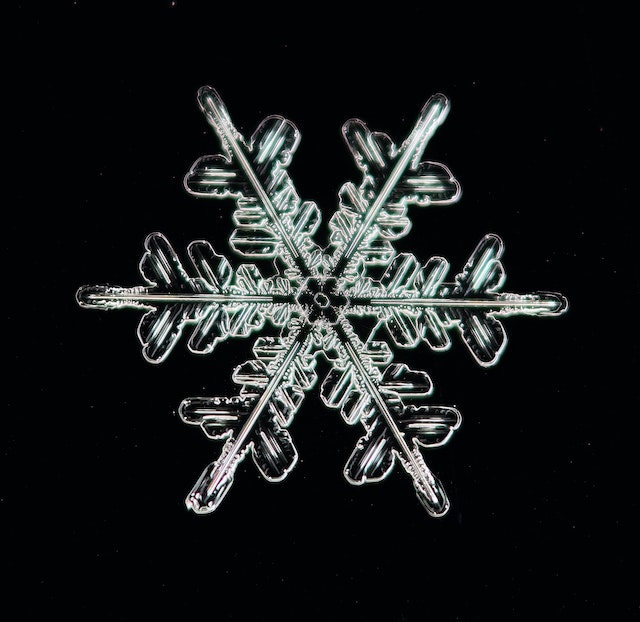
Now that you’ve got snow to work with, it’s time to get an up-close look at some of Mother Nature’s most delicately beautiful creations. To do this, you’ll need a magnifying glass and a dark piece of paper or, if you’re outside, you can also capture snowflakes on clothing like your gloves or jacket sleeve. Gather a few fresh flakes and use the magnifying glass to examine them in detail (If you’re working with freezer snowflakes, melting is an issue, so leave those tiny miracles in the freezer while you magnify.).
Reassure your little scientists that it’s true, no two are alike, and let them know that just one can be made up of over 200 tiny ice crystals! While you’re looking, have your mini-me count up the sides and use this chart to match what you’ve got in hand with standard ice crystals.
You’ve figured out a snowflake’s molecular structure, cut out creative and accurate examples of your own, and examined the real deal through a handheld magnifying glass. Now it’s time to take it one step further. Go behind the scene with rad videos that explain a ton of science behind snowflakes, like their formation and life cycle.
Science Friday’s Snowflake Safari follows Kenneth Libbrecht—CalTech’s resident snowflake expert—a scientist who’s spent a lot of time looking into these chilly chips, as he examines snowflake basics. Be sure to augment your own magnifying experience by flipping through some of Libbrecht’s spectacular snowflake slides online. They’re a great way to demonstrate many of the concepts you and your kiddo have already explored.
Finish up your viewing session with the National Science Foundation’s video about photographing snowflakes. It starts with the man who pioneered the field, Wilson “Snowflake” Bentley, and ends with the discoveries made by the Present Weather Imager, a high-tech camera that captures snowflakes in action. Lights, camera, learn!
Make Your Own
Allison Sutcliffe
Wrap up what you’ve learned about snowflake science by making a crystal snowflake of your own. Use pipe cleaners to create a six-sided snowflake that gets suspended in a Borax solution overnight. What’s created is a larger-than-life snowflake that’s just as sparkly as the ones that fall from the sky.
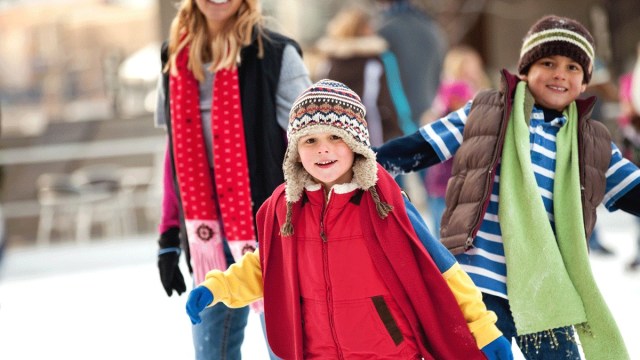
Lace up your skates! It’s time to go ice skating, Portland families
Unless you live in Canada or somewhere in the Midwest, ice skating comes once a year—during the holiday season. For many Portland families, heading out to a local ice skating rink is as much a winter tradition as watching the Christmas Ships or going snow tubing. Portland has no shortage of winter activities, and ice skating here is no different. Grab the family and your friends and venture out to one of these holiday-happy skating rinks to get your Christmas on. Don’t forget your Santa hat and festive scarf so you can snag a few photos while you’re at it.
If you have seen I, Tonya, or have followed the story of Tonya Harding, you are no stranger to the Lloyd Center Ice Rink. Set in the Lloyd Center mall, this ice rink has been a focal point of Portland holiday tradition for generations. Bring the family, regardless if you have skates or not. The Lloyd Center rink offers rentals for only $4, and a typical admission fee of $20 during the winter season. Head online for open skate sessions and get ready to carve your way around the rink!
Rock ‘n Skate at Lloyd Center
Want to pay less and have even more fun? Swing by on a Friday or Saturday between 5:30 p.m. and 7:30 p.m. for the rink’s “Rock ‘n Skate,” featuring a live DJ. Cost only runs $18, including the skate rental. Don’t wait, add some fun to your calendar next weekend and hit the ice with your favorite people.
Dates: Fri. & Sat., 5:30-7:30 p.m.
Lloyd Center Mall 2201 Lloyd Center Portland Online:lloydice.com
Come out and skate where to pros skate—the Winterhawks Skating Center. You don’t need to be a professional ice hockey player to skate here; they share the ice. Get out of the city and take a trip over to Beaverton for some slippery fun, especially because the skate rental is free. Admission is $20, but if you have little ones who are 5 years and younger, don’t worry about paying—they skate for free. Be sure to stop by their concession stand for some snacks in between loops around the rink, or grab a hot cocoa for an added touch of the holiday feel.
Sherwood Ice Arena coins themselves as “the coolest place in town”, and they aren’t wrong. With a whole host of times for different kinds of sessions (freestyle, adult skills, pick-up hockey, etc.), this ice rink has something to offer for the whole family. Public skate sessions are available nearly every day, so grab the kids and hop in the car for a cute, cool, cozy outing on the ice.
Disco Skate
Just because it’s the holiday season doesn’t mean there isn’t time for Disco. Let the disco ball at the Sherwood Ice Arena light up your night when you lace up your skates every Friday night. Come get your groove on with friends and family, and experience a night to remember underneath the twinkling lights.
Maybe you heard about it through your ice hockey club or your neighborhood friends, or maybe you’re hearing about the Mountain View Ice Arena for the first time right now. Whichever it may be, after visiting Mountain View, you’re sure to know that it is a hit with friends and family alike. Perhaps it is because of their ice skating instructional session, offered seasonally, their birthday party packages, or their flexible schedule and affordable pricing. With a skate rental of only $3, filling your children’s afternoon with fun on the ice is sure to be an awesome holiday memory. Toss everyone in the car and head up north today.
14313 S.E. Mill Plain Blvd. Vancouver, WA Online:mtviewice.com
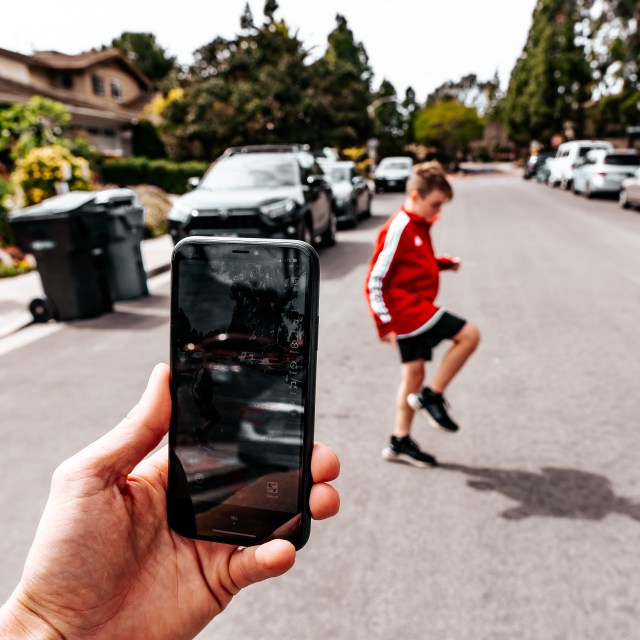
Does your little influencer want a worldwide stage? Join the club! With YouTube beating out TV for kids’ attention these days, and with its young stars mostly being regular kids who stumbled into stardom, it’s no surprise that kids everywhere want to be YouTubers more than any other job.“YouTube has become a learning tool,” said Trevi O’Neill, who along with her kids, Jake and Gianna, and her husband, Matt, started The Adventure Buddies channel on YouTube to document the family’s travels. “It’s how our kids taught themselves how to skateboard, surf, play soccer and guitar. It’s just the up-and-coming way to learn. Kids see it as an opportunity to see other kids in action.” So how do you launch your child into the “You-niverse” the right way? Keep reading because here’s our step-by-step guide to the very best YouTube equipment for beginners.
Here's the deal: Kids under 13 are technically not supposed to have their own YouTube channels since YouTube collects data on its users (and that goes against the Children’s Online Privacy Protection Act). That said, anyone who's ever given their phone to a toddler knows that Youtube is teeming with kids. That's because children can have a YouTube channel as long as their parents approve the account and agree to the fact that data is being collected.
Creating a YouTube channel requires a Google account, so you'll need to set that up first. Once you do, you can easily create your channel by going to YouTube and clicking "add a channel." If you already have an existing channel and want to give your littles their own, sign in to your Youtube account, click on "settings," then "Add a channel." From there, you just need to name your channel and upload your videos.
Maybe you already have an idea for a YouTube channel, or maybe your kids just want to get their faces out there. In any case, some fun themes for family YouTube formats include:
Cooking - Got a little chef? Consider letting her show off her skills in the kitchen like these adorable sisters do in the Bow Girls YouTube channel.
Product reviews - If your kids are talkative enough, let them give their viewers a mouthful by reviewing various toys and products as these kids do.
Travel Vlogs - Got wanderlust? Want to be like The Adventure Buddies, who travel the world in the name of documenting it? A travel Vlog is a perfect way to include the whole family in on the fun.
Tutorials - Is your kid an expert at something? Have them offer tutorials for other kids.
Animation/Claymation - Do you have a creative kid that would prefer to stay behind the scenes? Let them learn a little about the animation process by starting a YouTube channel for their creations (This works perfectly if you don't want your kids' actual faces to be out there for all to see.). There are plenty of kiddified apps and programs that teach basic animation using LEGO, drawings or clay, including Flip-A-Clip, which uses simple drawings to create animated clips, and Stop Motion Studio, which lets you animate real-life drawings, clay figures, LEGO or anything else you don't mind moving frame-by-frame to create a movie.
Make Sure Your Kids Know What They Can and Can't Say
Before giving your kids the spotlight, make sure they understand what's OK to post—especially when it comes to privacy. That means getting permission if they include anyone else in their videos and making sure nothing they post is potentially offensive. Kids should also make sure not to wear clothes that tell others where they live or go to school (like school uniforms), and they should keep their last names offline at all times. It's also a good idea to have you and your kids sign a media agreement, like this one from Common Sense Media, so they know what's expected of them.
Decide How "Public" You Want To Be
Do you want anyone to be able to watch your family videos, or are you more comfortable with only people you know seeing your kids' antics? Decide how much privacy you want before you upload videos. Setting your videos to "public" means anyone can tune in while setting them to "private" requires an invitation. Videos set to "unlisted" are a good middle ground as they don't appear in searches or on your main channel's page, and they can only be viewed by those with the link.
Tip: We recommend turning off comments for your child's videos because let's face it, people can be mean. Encourage your budding filmmakers to seek feedback from friends and family rather than strangers.
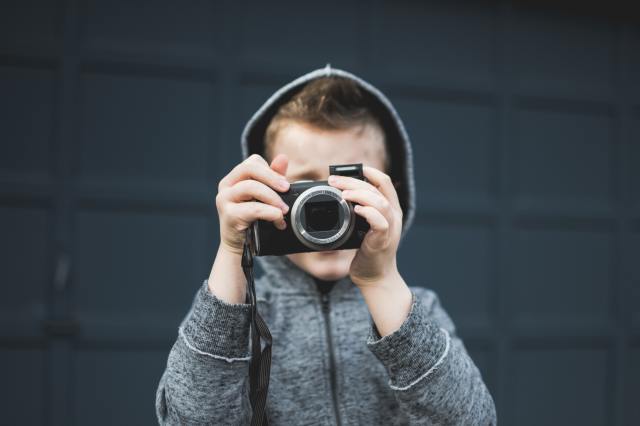
The Best YouTube Equipment for Beginners
YouTube Equipment for Beginners: A Good Camera (but a Phone Works Fine Too)
For your child to compete with the Baby Sharks and Ryans of the web (or even just to make videos that you'll want to post on your social media pages), you'll need a good digital camera. The good news? Your phone is good enough—most YouTube videos are shot on phones without professional help. If you do want to go a step further, try one of the ones below.
Best splurge:Tech Radar calls the Sony ZV-1 the "ultimate compact for YouTubers," ($748 on Amazon).
Best action cam: If you're looking for a camera you can prop on the edge of your surfboard, sled or bike, the GoPro ($399 on Amazon) is your best bet.
Best compact camera: The DJI Pocket 2 ($349 on Amazon) is an adorable little camera that will fit in your pocket but still has powerful image-capturing and stabilizing capabilities.
Overall Winner: Your smartphone. We're all for keeping it simple.
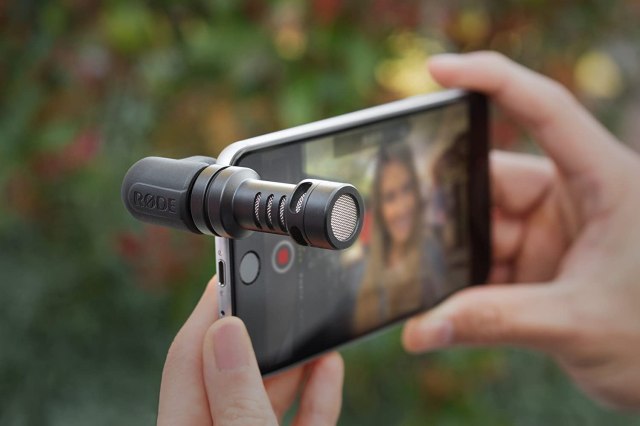
It's true, your phone has a microphone. But that's meant for talking on the phone, not making videos. If you want to capture crisp sound and block out background noise like wind, traffic, crowds or your smaller kids screaming in the other room, an external mic will help. Here are some good choices:
If you're going to be shooting in one place and you need your hands, consider a clip-on mic so you and your kids can keep your hands free. This also gets the microphone close to their face without being obtrusive in the shot. Try the Rode Lavalier GO, available at Best Buy for $80.
If you're going to be moving around a lot or if there's a lot of action in your video, a shotgun mic is your best bet. This attaches to your camera (or camera rig) and moves with you as you follow your subject around. If you want something small that can fit on your smartphone, try the Rode VideoMic Me Compact Mini ShotGun Mic, which is available on Amazon for $46. If you want a rig that'll hold your phone and microphone, try the iRig (available on Amazon for $130).
If your subject is too far away for a connected mic (or you don't want to deal with cords), PC Magazine recommends the Rode Wireless Go II, which is available at Best Buy for $300.
If you're going to be recording voiceovers post-production, studio mics work best. CNET recommends the Yeti Studio Microphone, which is available on Amazon for $100.
Note: If you're using your smartphone as your camera, you may need an adaptor (like this) to be able to plug in an external microphone.
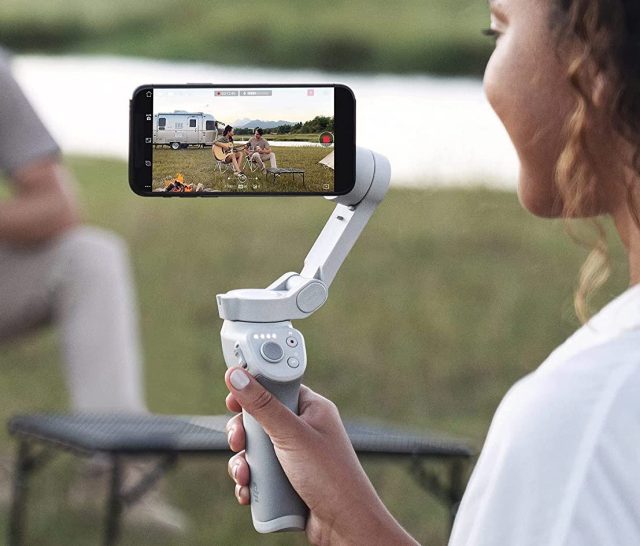
YouTube Equipment for Beginners: A Tripod or Portable Camera Rig
People are only so good at holding still—so when it comes to getting a good, even shot, it's best to use a tripod or a camera rig, both of which can keep your shots relatively jitter-free.
Best tripods for smartphones - PC Magazine recommends the DJI OM 4 ($129 on Amazon), a tripod and image stabilizer that has a magnetic mount so you can attach your phone quickly and easily.
Best tripod for selfie shots - If you want something you can wrap around various surfaces (say, a tree branch or railing, for instance), this Cloudsfoto tripod ($17 on Amazon) has flexible legs that can bend around various surfaces or fixtures. It also comes with a remote button if you want to start filming from afar.
Best tripod for (non-mobile phone) cameras - The JOBY GorillaPod Magnetic tripod ($20 on Amazon) has thick, bendable rubber legs for mounting larger cameras on various surfaces. It also has magnetic legs; you can pop it onto anything metal to capture cool angles and perspectives.
Best all-in-one camera rig - The Rode Vlogger Edition Filmmaking Kit ($149 on Amazon) is more than just a portable tripod—it also contains a mini shotgun mic, as well as a small light, all of which improve your smartphone's filmmaking capabilities. It's not the best quality mic or lighting, but it's good enough that it'll make your kids feel like bona fide YouTubers in no time. The tripod can be set onto a table for studio shots or handheld for on-the-go use.
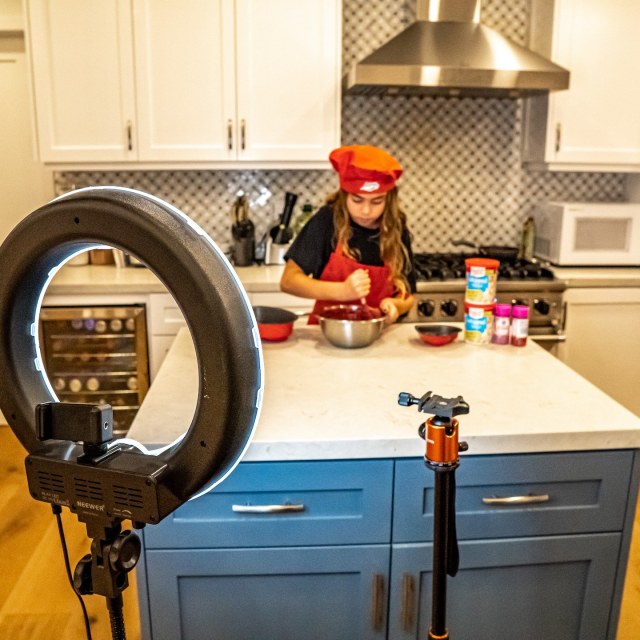
Proper lighting is key to making your videos go from grainy home movies to proper film quality without much effort on your part. The good news? Natural light works great! Shooting outside or indoors by a window will usually be all it takes to give your videos a crisp, clear picture.
If you're shooting at night or indoors without much natural light, external lighting is a must. The UBeesize 10" Selfie Ring Light ($36) is an easy choice and comes with a built-in holder for your phone, so all you need to do is put the phone in, turn on the light and go. If your kids are doing product reviews, performances of some kind or cooking shows (anything where they'll be in one area for the whole shot), three-point lighting systems like the Kshioe Photography Softbox Lighting Kit ($86) use three lights to fill in shadows and make your subjects look great, even in dimmer environments.
For more details on how to set up a three-point lighting system, this video from Think Media makes it easy to understand.
Since most TVs and computers are horizontal, not vertical, shooting in the landscape orientation ensures that your picture will fill the screen when viewed on YouTube. That said, some people think vertical videos appear more "authentic" since it suggests that the videos were shot on a phone (by an amateur), so if that's the look you're going for, own it!
Use Fun Video Effects to Wow Your Audience (and Your Kids!)
Here are some fun apps that'll make adding video effects easy.
Reverse Vid (or Reverse Movie FX on Android) - This makes everything you film go in reverse. Use it right, and you can make your kids look like they just summoned an object to jump into their hands or like your magical gymnast can dive backward out of a swimming pool.
Action Movie FX - Watch out for that meteor! Get out of the avalanche's way! Alien invasions! This app generates effects that your kids will love; just put your kids in the right spot and film, and the app does the rest.
FX Guru - Want to make the next Jurassic Park? This video effects app offers a stomping T-Rex that can make an appearance wherever you want. There are also other fun video effects, including a swarm of cockroaches, a whirling tornado and a "Zoo escape."
Superhero Power FX - Your family can become a superhero team with this simple special effects app that lets you take on various powers. Shoot laser beams from your hands! Disappear into a ball of fire! Throw giant ice crystals, Elsa-style. It's all possible. At least, it looks like it is. Once done, be sure to use this Movie Poster Maker to promote your up-and-coming blockbuster.
Use Editing Software & Apps to Splice Together Clips
Depending on your tech-savviness, there are a ton of options that'll help you get you a "like"-worthy finished product. We love the simplicity of the iMovie mobile app, which can be operated completely on your iPhone, but if you want to go a little deeper and you feel comfortable working with editing software, try Adobe Premiere Rush, which is a simplified, social media-centric version of Adobe's award-winning video editing software. For something that requires no design skills, including templates for you to use to make your videos insta-worthy, Animoto is a fun program you can install on your mobile device. GoPro also comes with easy-to-use editing software that helps you make pro-quality flicks.
Some things to keep in mind while editing:
Short clips are better.
Background music helps pull together the final product (watch the tutorials on the app to learn how to do this; it takes some practice but is easy once you get the hang of it).
Use text or captions when you can (since 92% of people view videos with the sound off when viewing on their mobile devices, according to a report from Verizon Media.
Most importantly, have fun! Making a movie—and sharing it with friends—is a fun activity the whole fam can enjoy together. And, save all the mess-ups for the blooper reel—because, let's face it, that's always everyone's favorite part.
If you buy something from the links in this article, we may earn affiliate commission or compensation.
Vacation is an adventure, and anyone who’s ever changed a diaper in a tiny airplane restroom can attest, adventure isn’t always, uh…easy. Take the distance out of traveling and take “staycation” to heart by playing tourist in your own town. Whether you live in the city, the country or somewhere in between, we’ve got some great ways to make your everyday into something postcard-worthy. Read on for ideas.
iStock
Dress the part: Comfy walking shoes, a fedora and sunglasses and weather-appropriate layers. A giant camera around the neck is optional, but it's ever-so-fun. Binoculars make a great accessory. Bonus points for socks with sandals, brightly colored floral tops and anything that has your town's logo on it.
Pack lightly and carry a big crayon: Any parent ever will tell you that the packing process for a vacation is just that: a process. Get the kids involved in this small-scale version by creating a checklist, with items like pens or crayons, stamps for your postcards, a journal, a camera, small bags for collected treasure or whatever seems to fit your day out.
Create an agenda without an agenda: Visit your chamber of commerce (or chamber’s website) and check out the brochures for local fun! Let your kids choose one touristy thing to do, likely something that you’ve never done before. Go on a duck boat tour, rent bikes if you don’t have any of your own, stop into a local museum you keep walking past or just take your time going into a few shops.
Look up and look down: Observe local architecture. Use binoculars to view the features of downtown buildings in greater detail. Stop and admire a sign. Let the children lead without a rush.
Ask out loud: Take time to ask the barista, shopkeeper or local on the park bench a question or two. What do they know about the history of your town? How long have they lived here? Tourists are known for being friendly and curious!
iStock
Get lost: Try using a paper map to navigate your way. Have each person in your crew pick a place from the map they'd like to visit. Don't use your GPS to get you back on track unless you're in dire need or feel unsafe. Enjoy what comes your way. If you get lost, ask someone for directions! Nothing says "tourist" more than that!
Make a written record: Stop by the local drugstore/tourist shop/gas station and grab a postcard. Then find a spot in a park or a coffee shop, grab a drink and write out your cards. Send one to your best friend, even if they live next door. Use the postcard to record a cool observation about your town. Parents can secretly write one out to their kids. If you didn't pack stamps, tromp over to the post office to grab a few.
Spend your hard-earned extra cash: Book a hotel room (try a last-minute deal on a travel site like Priceline). The beauty is you barely have to throw more than PJs and toothbrushes into a suitcase. And you can jump on the bed, splash in the pool and just vaycay without any muss or fuss (or too much cleaning up).
Put down the selfie-stick: If you have an older digital camera you don't use as much, let the children be in charge of taking photos all day. At least once, whether with your phone or your camera, stop and ask a nice-looking local to take your group photo. It's not just about getting the shot; you'll make a connection and bring a smile to a stranger's face. If you see someone you know, have them take your photo or get in on the photo! They'll love hearing about your crazy local adventure.
Gather souvenirs: You don’t have to load up on magnets and shot glasses. Save a receipt from a meal you loved, a penny you found on the ground, even a wayward pinecone your kid insisting on picking up. Put all these items in a mason jar with a label for the day, or press them into a scrapbook.
I once read a quote by Albert Einstein that said something about defining insanity as doing the same actions over and over but expecting different results. It often comes to mind at the end of the year when I begin deciding on New Year resolutions.
Though, the resolution is always the same. My body isn’t good enough and this is the year I’m going to fix it. Sure, I mix it up a little. One year I’ll resolve to lose 10 lbs. Another year I may resolve to have a “bikini body” by May. The next, I’ll resolve to cut back on carbs. I have yet to achieve any of the resolutions I resolve to keep. I go in to the new year with the best of intentions but it ultimately ends in disappointment, a side of guilt and a year long scolding that continuously replays in my head until I do it all again next December.
Maybe it’s age. Maybe it’s motherhood. Maybe Albert is right again; it’s just my insanity talking. Whatever the case may be, this year is different. This New Year I resolve to be enough, accepting and loving myself just as I am going in to it. I can always eat a little healthier or exercise a little more. If I do, I will accept and love myself as I am. And if I don’t I will accept and love myself as I am. At the end of the day, carrying 10 less pounds doesn’t give the memories I create with my loved ones any more meaning—but being fully present in them does.
My daughter deserves to look back to see me dashing through the sprinklers with her—not searching the sidelines to find her mother hidden beneath a cover-up. Families deserve to photograph happy occasions with everyone present and engaged in the spirit of the moment. Friends deserve to share a toast to their success or to share a piece of cake in celebration of another year wiser. No one needs to hear another self-deprecating joke about counting calories, subtly deflating the happy energy in the room as I speak it.
This is the year I’m not scolding myself for having not lost the extra weight I’ve carried since giving birth. This year, I’m praising my body for creating a miracle. This year I’m celebrating birthdays with a mouthful of birthday cake to stifle any declaration of counting calories I may feel tempted to share. I’m packing my camera for family events, respecting the fragility of life and giving thanks that I have the opportunity to capture these moments with loved ones. This year may be our last.
This year I’m giving the toast to us. With love for who we are, just as we are in this moment and in the years ahead. May we see the beauty in ourselves that we see in those around us.
Do you have a story you’d like to share with our readers? We’d love to hear it! Sign up for our Voices Contributor Network where you can submit your funny, heartfelt and/or unbelievable parenting stories and see them on Tinybeans.com!
Robin Reynolds is a writer, blogger and contributing author for Chicken Soup for the Soul. Her daughter is the inspiration for her blog Dear Jalen where she chronicles her daughter’s childhood in written letters. Robin is on a mission to encourage other parents to do the same. Visit Dear Jalen to learn more. Follow her on Facebook, Twitter, and Instagram.
Luckily for us, Santa really likes visiting Atlanta. Even if you missed the summer sign-up for his visit to Phipps or got word about the appointments at that private photographer’s studio a month too late, you still have plenty of time to load up your sleigh and head out for your one-on-one with The Big Guy. Keep reading for some creative and unique spots to catch Santa, below.
Capture holiday memories and visit Santa and his reindeer, Comet and Cupid, at Santa’s Cottage. Pictures with your camera are included with admission! Santa is scheduled every Thursday – Sunday from 6-9 p.m. Santa WILL NOT be there on November 28th.
Celebrate the Holiday Season in style at the Swan Coach House's Annual Santa Brunch. Santa will be in attendance with some special guests. Tickets include Brunch Buffet and time with Santa, and there will be a professional photographer on site for ordering pictures with Santa.
WINTER HOUSE is a new 16-day event where families can enjoy a welcoming, art-filled holiday experience that reflects our passion for arts education. Daily activities include an Artist Market, Mug & Ornament Glazing, Fire Pits & S'mores, Beer Garden & Library Wine Bar, and History Tours at 1 & 4 p.m. daily. Santa will be in the house on select days (usually the weekend) at varied times. Check the events schedule here to make sure you go when the Big Guy is there!
980 Briarcliff Rd. NE
Atlanta
404-872-5338
Online:callanwolde.org
Skip the malls, avoid the long lines, and come to Rhodes Hall for a fun, easy and enjoyable Santa experience. On weekends from November 20-December 12, 2021, the “castle on Peachtree” will be transformed into a winter wonderland featuring personal appointments with Santa at Rhodes Hall. Purchase a digital image that will be emailed to you within 48 hours of your appointment. Enjoy a craft and the beautiful decorations on the inside of one of Atlanta's most iconic historic homes.
1516 Peachtree St. NW
Midtown
Online:georgiatrust.org
Enjoy a fancy St. Regis tradition of afternoon tea with Santa in the Astor Court. There will be tea, and Santa—of course—and a delectable assortment of cakes and small tea bites that will leave everyone happy and humming holly jolly tunes on the way home. Live music and a funny elf round out the experience for your little ones.
Kick off the holidays right with this cozy family brunch at Milton’s and a visit and photo with Santa! Santa Brunch Sundays this year will be on Dec. 5, 12, & 19 from 10 a.m.-3 p.m., and portraits with Santa are only available with brunch. Visits with Santa and photos will be taken before your brunch reservation.
800 Mayfield Rd.
Milton
770-817-0161
Online:miltonscuisine.com
Santa and his elves are so excited to see you! This year, you’ll find Santa in front of a beautiful Christmas backdrop at the Marietta Museum of History this season, with the beloved Hadley’s Photography team ready to capture your family’s memories. Or, register in advance for a 30-minute one-on-one with Santa and his elves for your entire family.
If you buy something from the links in this article, we may earn affiliate commission or compensation.
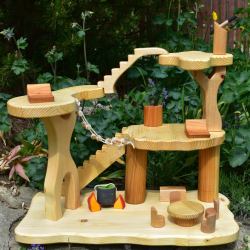
There’s so much about wooden toys that we love: they blend in with grown-up décor so easily and literally last forever (hello, resale value!). Etsy has all of our top picks for wooden toys like the versatile Pikler triangle, too-cute play kitchens, Montessori toys, personalized gifts and more. Consider this your wooden toy shopping list.
If you don't have a Pikler triangle in your home, you need to get on it. Not only are these all the rage for indoor climbing for little ones, but they have a high resale value when you are ready to pass them on.
We love this option for your Montessori-inspire playroom. These wooden peg dolls are hand-painted in rainbow colors with different skin tones, encouraging open-ended play.
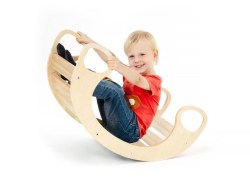
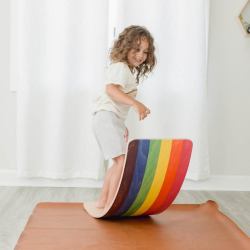
You'll love this multi-use piece for your home as it is functional and aesthetically pleasing at the same time. Kids can rock on one side and then flip it over for a climber/tunnel.
We are totally enamored by this handcrafted play kitchen with oven, cupboard, cooktop, sink, water tap and drawer. Your little one will want to bake a cake in thanks for this gift and you'll love that the dusty green color blends in with your aesthetic. The seller can also customize a kitchen to your specifications and offers other colors like dusty pink and natural wood.
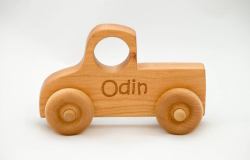
Isn't this just the perfect holiday gift? Get your child's name in this personalized train that includes a steam engine, caboose and personalized name letter cars.
Lacing toys are great for working on fine motor skills and sequencing. You'll especially love this one that is everyone's favorite Very Hungry Caterpillar-themed!
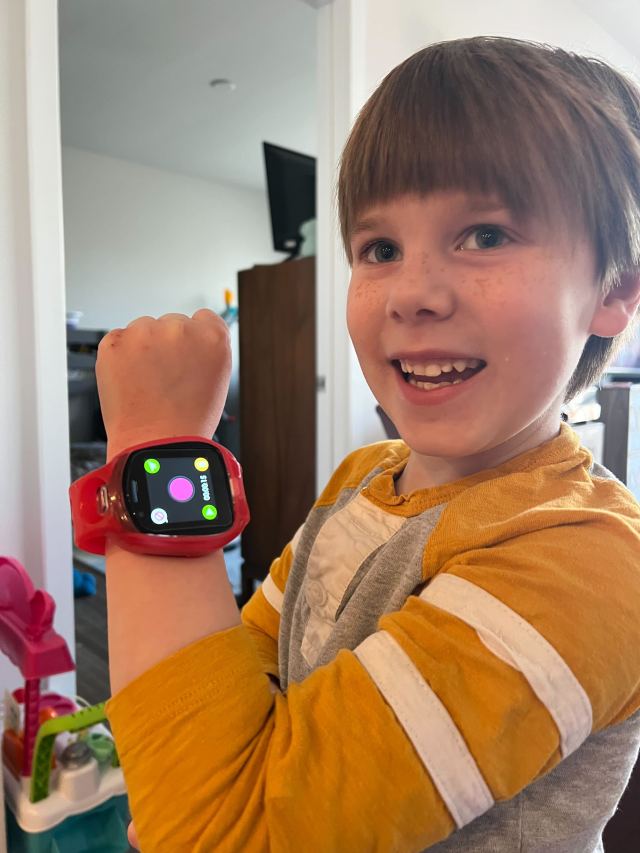
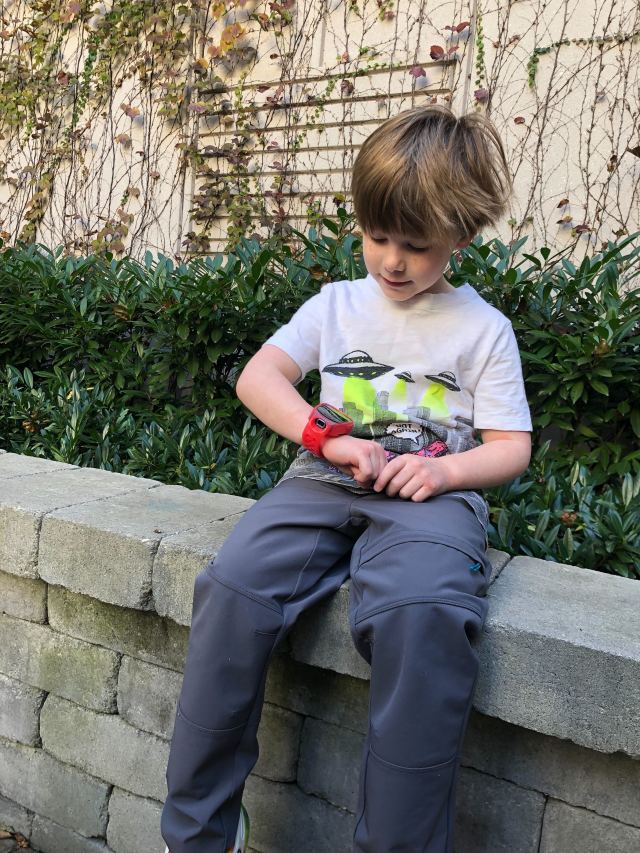
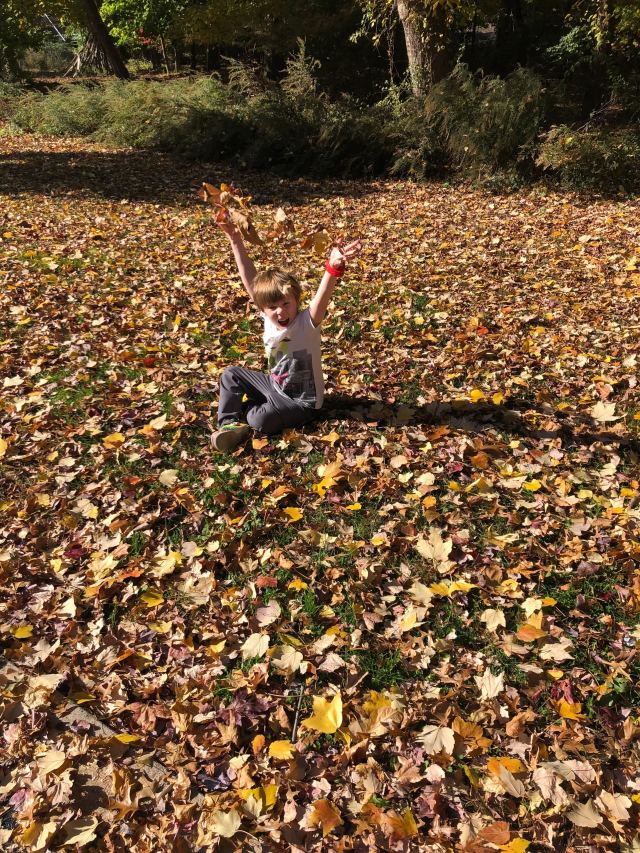
One of our editors, Jamie Aderski, and her son, Watson, reviewed the new Tobi 2 Robot Smartwatch to see what all the buzz is about. Read on to learn more!
My son is in Kindergarten… and he, like most of us, LOVES tech. Like, constantly bugging me for my smartphone or to play with my smartwatch. (They cost more than my first car, so nope, he’s not getting his hands on my precious devices.) But I love the idea of something for him like my smartwatch that I can’t live without. It keeps me honest with my activity level and keeps me connected without being buried in a screen… and BOOM. In walks the Tobi 2 Robot Smartwatch for kids! Dreams are coming true, folks, because this watch is everything and more that we both want. It’s a tech dream for kids who are not ready for their own smartphone, camera, fit device, or even gaming system—this watch has it all, and all just for them! Here’s what Watson and I absolutely loved about the Tobi 2 Robot Smartwatch:
This Cool Robot Interacts!
Okay, Tobi has some serious personality! It’s really cute because Tobi makes all kinds of sounds and even has dozens of different expressions—Watson was giggling along with him like his school buddies—heart melt! Tobi also has little robot arms and legs that pop out and make him come to life, which is a fun surprise every time, and he is just adorbs.
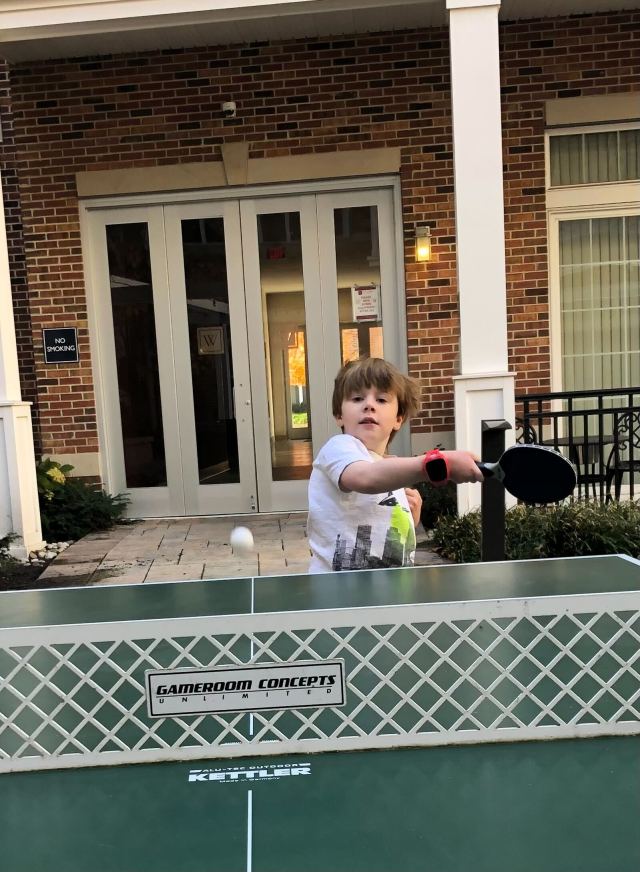
Not Just Games... Fitness Games! Brain Games! Arcade Games!
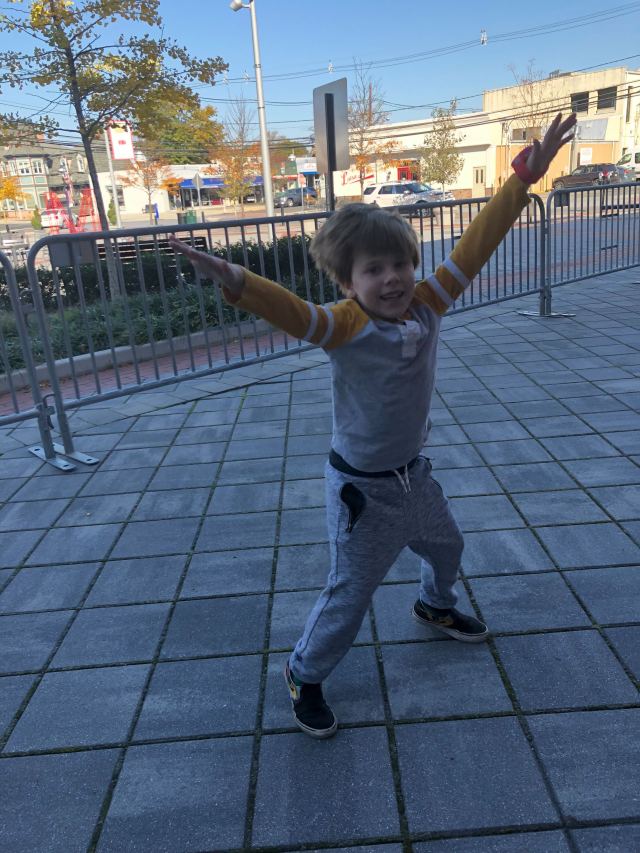
Who doesn't love games? Well, Watson does, but is easily bored, because kids, you know? Not with the Tobi 2 Robot Smartwatch; there are a dozen to choose from, whether it's active games that get you up and your blood pumping, brain teasers or arcade-style games. He kept saying, "This is so cool, mom!". Agreed. Robot-o-Box was his favorite, where you air-box your way to points, and it's addictive in the best possible way. I loved it because instead of sitting on the couch with a game, he wanted to play outside, moving and grooving the whole time. When he was finally ready to chillax, he moved on to brain games, Tic-Tac-Tobi was his favorite, and we strategized together... but boy, that Tobi is brilliant! (We'll get you next time... )
Watson was totally jazzed by the step counter! We even had a friendly competition to see who could get more steps in a day—he basically ran around for another 15 minutes to catch up to my count. (And he slept great that night!) The Walk n' Wonder game is a highlight for sure; it's so unique and cool—it got him wanting to get out and walk around just to play this augmented reality game; really fun. I love how motivating it was for him to keep moving to earn coins—Woohoo! And somehow, I ended up with more steps for the day, too. Thanks, Tobi 2 Robot Smartwatch!
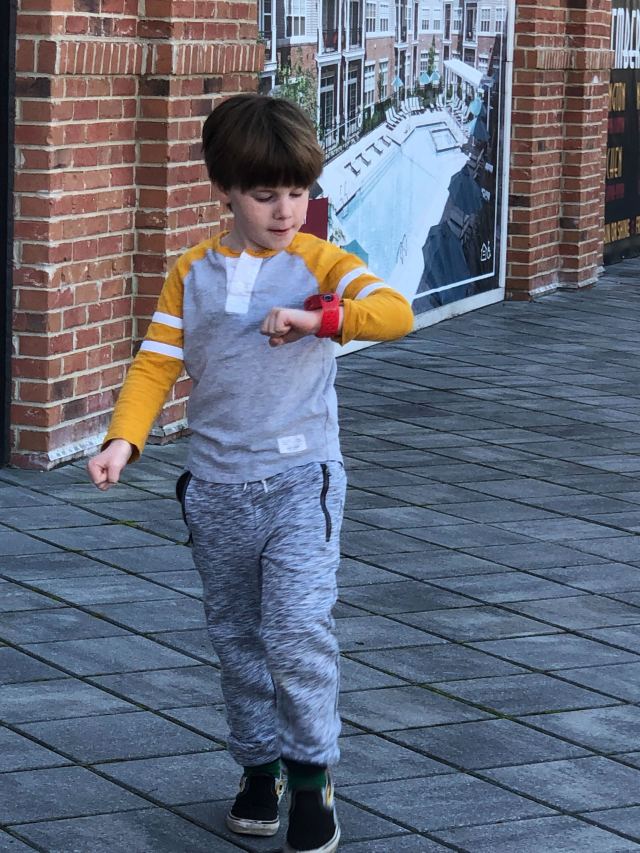
Learn How to Tell Time
So this is something we've been struggling with... learning how to tell time! Guess what? There's a game for that! Now instead of asking me what time it is, I ask him! And having his own stopwatch, alarm and calendar really helps him apply what he's learning. The Tobi 2 Robot Smartwatch is out here teaching crucial life skills while making kids have fun! Not an easy feat.
Not one, but two cameras on this cool robot smartwatch! He loved taking selfies and pics of things he found on his outdoor adventures with his Tobi 2 Robot Smartwatch. Watson can even get creative and add stickers to his snaps, personalizing and making his own art. It's fun for me to see the world through his baby blues.
So Much Creativity Packed Into This Wearable Tech
Bottom line: There is just so much cool stuff for him to discover. When I asked him what his favorite thing about the Tobi 2 Robot Smartwatch is, he said, "Everything!". I haven't seen a smartwatch for kids that has so much to offer, and it's all at his fingertips; it's not a passive screen activity; it's tons of active, creative things for him to explore and do. We give the Tobi 2 Robot Smartwatch an A+ and highly recommend it!