Wondering how to make hot chocolate bombs? It’s easier than you think

One of the best things about the colder months is settling in with a cup of hot cocoa. Rather than waste your tastebuds on a packet of instant mix, why not whip up a batch of something sweeter? Hot chocolate bombs can be made into all sorts of shapes, sizes, and all sorts of flavors, and fillings. Basically, it’s the sweetest afternoon activity. If you’d rather go with a traditional cup of hot chocolate, try these unique recipes!

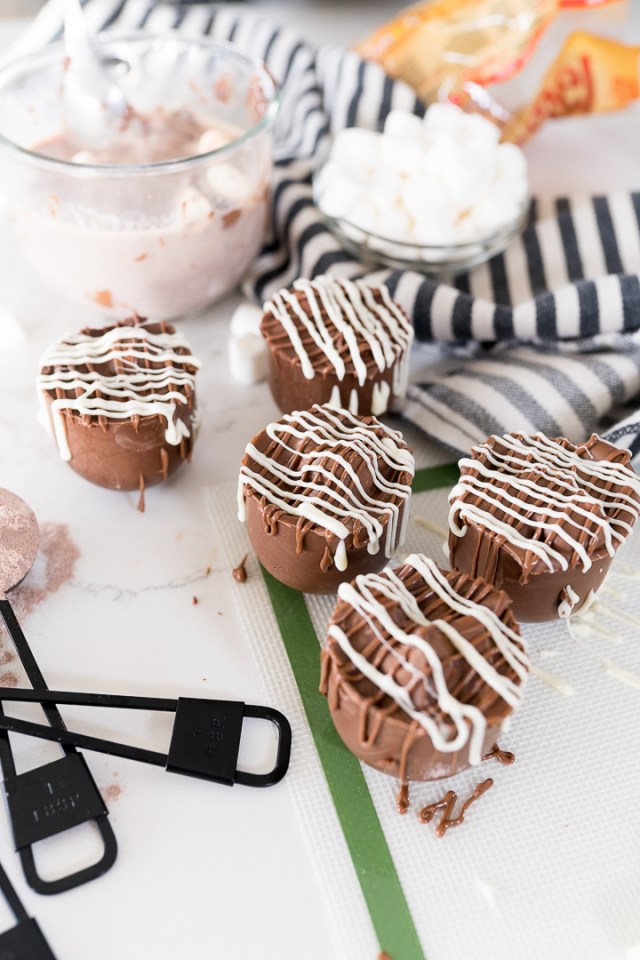
Milk Chocolate Hot Chocolate Bombs

Glue Sticks Blog

Want to start with your basic, delicious hot chocolate bomb? Here's your recipe! It takes just three ingredients and a silicone mold to get your hot cocoa skills moving.

Get the entire recipe at Glue Sticks Blog.

Instant Pot Hot Cocoa Bombs
Cooking with Karli

No need to buy an extra mold when you use this recipe that repurposes that silicone egg mold you have lying around! Grab your hot cocoa powder, marshmallows, and all the fixings you like in your hot chocolate and you have everything you need to make homemade cocoa bombs.

Find the full recipe at Cooking with Karli.

Unicorn Hot Chocolate Bombs

A Magical Mess

These magical treats are almost too pretty to eat. Using some creative icing decorations, unicorn hot cocoa bombs make the perfect treat at a little girl's party or as a gift!

Find all the details at A Magical Mess.

LEGO Man Hot Cocoa Bombs

Mommy Musings

Candy melts are the key to making your own LEGO man hot cocoa bombs. These sweet-tasting treats can be complimented with any number of fillings, especially tons of marshmallows!

Head to Mommy Musings for the complete recipe.

Pink Instant Pot Hot Chocolate Bombs

You can stop looking for a Valentine's Dessert recipe! This adorably pink hot cocoa bomb is kid-friendly, doesn't require sealing two halves together, and uses your Instant Pot!

Find the full recipe at Princess Pinky Girl.

Mexican Hot Chocolate Bombs
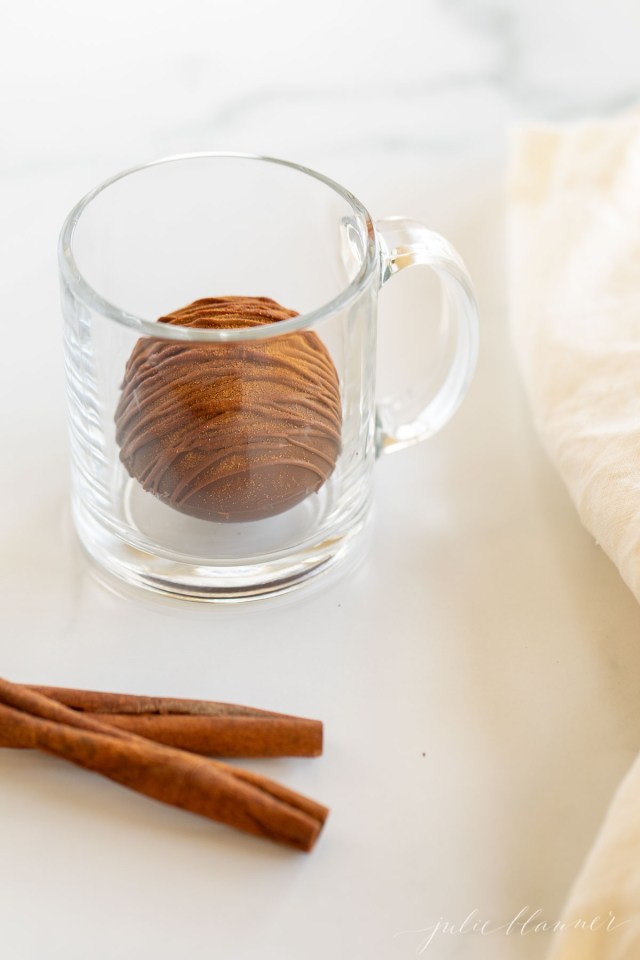
Julie Blanner

Warm spices to the rescue! This recipe pairs cinnamon and cayenne pepper which results in a creamy and warming feeling you'll drink right up.

Head to Julie Blanner for the full recipe.

Snickerdoodle Hot Chocolate Bombs

The Denver Housewife

Snickerdoodle lovers: you're gonna want this recipe. White chocolate, cinnamon, and sugar come together that will not only have you gulping down the entire mug but maybe dipping a cookie in, too.

Check out the recipe at The Denver Housewife.

Frozen Hot Cocoa Bombs

Wondermom Wannabe

You won't want to let this recipe go. Frozen hot cocoa bombs are beautifully blue from candy melts that make the entire process a breeze. These are definitely Elsa-approved.

Find the whole recipe at Wondermom Wannabe.

White Chocolate Hot Cocoa Bombs

Scrambled Chefs

Milk chocolate not your thing? This recipe combines white chocolate, almond bark, and peppermint candy to give that holiday feeling, all year long.

Find the recipe at Scrambled Chefs.

Lucky Charms Hot Chocolate Bomb

Hugs & Cookies XOXO

Well, aren't these the prettiest hot cocoa bombs ever? Made with bright Lucky Charms cereal, they make the perfect option for St. Patrick's Day!

Find the entire recipe at Hugs & Cookies XOXO.

Peanut Butter Hot Cocoa Balls

Everyday Family Cooking

Calling all PB lovers! This decadent dessert pairs the world's best creations: peanut butter and chocolate with a simple process using just your microwave.

Head to Everyday Family Cooking for all the instructions.

Cocoa Powder Hot Chocolate Bombs

Create Kids Club

Need a little extra kick of cocoa? This four-ingredient recipe is easy to whip up and store in the freezer! When you're having a chocolate craving, just pop in your mug!

Find all the details at Create Kids Club.


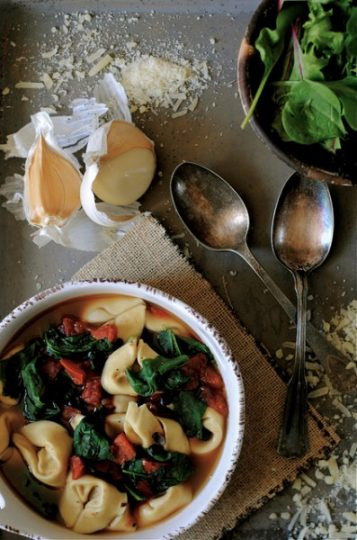
There’s nothing quite like the magic of throwing simple ingredients into a pot and ending up with a delicious and comforting soup. It’s a kind of kitchen magic that never gets old. If you need some inspiration for just such a concoction, we’ve got your back with this hearty tortellini soup recipe from Jen, of How To: Simplify. This comfort soup is sure to warm you up, fill you up, and even sneak some tasty spinach into your picky eater’s bowl.

Ingredients:

32 ounces of chicken stock
1 15-ounce can of fire-roasted diced tomatoes
1 can of black beans, drained and rinsed
1/2 tablespoon of dried basil
1 teaspoon cumin
1-2 dashes of cayenne pepper
Salt and pepper (to taste)
1 9-ounce package of Buitoni Sweet Italian Sausage Tortellini
1 cup fresh spinach

Method:

1. Pour the chicken stock and the entire can of diced tomatoes into a large pot. Add the black beans, basil, cumin, pepper, and salt. Bring to a boil and simmer for 20 minutes.
2. Add the tortellini and cook for 8-10 minutes (according to the package instructions).
3. Add the fresh spinach into the pot and cook for an additional minute.
4. Season with salt and pepper (to taste). Serve immediately.

Recipe courtesy Jen at How To: SimplifyBy day, Jen is a Senior Account Executive and Project Manager at Mom It Forward. In her spare time, she can be found in her kitchen covered in either flour, sugar, or both. Her philosophy when it comes to cooking and baking is “the more from scratch, the better.” Her aim is to share tips and tricks, as well as simple recipes that require very few ingredients (many of which you probably already have in your kitchen) and only a small amount of prep and cook time. Check out the How To: Simplify blog for more great recipes!


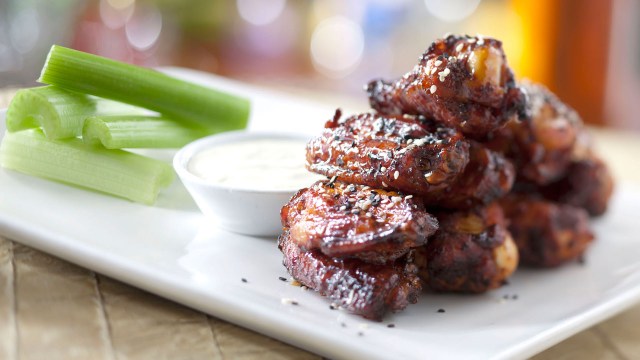
Disney Parks are well on their way to opening but as we gear up for safely returning to the magic, the company is releasing a new recipe that’s perfect for Father’s Day. Get ready to feast on Honey-Coriander Chicken Wings!

The recipe, which hails from ‘Ohana at Disney’s Polynesian Village Resort, is a mixture of spicy, nutty and sweet which means everyone in the family will enjoy. On the stickier side, it’s great served a la carte or with a delightful dipping sauce!

photo: Disney Parks

Some of the flavorful spices in this recipe include paprika, black pepper, turmeric, ground cinnamon and cayenne pepper. Disney has shared the recipe for both the wings plus a honey sauce that is a must.

Click here for a printable version of this finger-lickin’ recipe.

––Karly Wood


RELATED STORIES

Walt Disney World Resort Introduces New System for Reserving Theme Park Visits

Head to Neverland with Minnie Mouse’s June Makeover

Disney’s New Pride Collection Is Here & It’s Bursting with Color

So you want a donut? Well, you could head out to the local grocery store and buy a dozen. Or, if you’ve got a really, really, really extra-large family, you could go to the nearest warehouse club and buy a pallet of them. Oh, but you don’t want just any ol’ donut. Voodoo Doughnut is open at Universal CityWalk, and it’s bringing visitors all kinds of sugary sweet awesomeness!

Along with the warm weather, spring brought us all donuts—at Universal Orlando. Okay, okay. We know Orlando is in Florida. And that means two things: 1. Spring, summer, winter or fall, the weather’s pretty warm all year ‘round, and 2. This is the first East Coast Voodoo Doughnut location.

What can you expect from Universal CityWalk’s newest donut shop? To start with, much more than your typical bakery would bring. Voodoo Doughnut offers more than 50 different choices. And while they’re getting the usual suspects (such as frosted with sprinkles), they’re known for their…um, less of-the-norm flavors.

With donuts such as Tangfastic (yes, it’s topped with Tang), Mexican Hot Chocolate (with cayenne pepper), Grape Ape (with grape dust and lavender sprinkles) and Voodoo Bubble (it has a piece of bubble gum in the middle), you’ll find absolutely everything you never know you wanted.

—Erica Loop

Featured photo: Courtesy of Universal Orlando Resort 

RELATED STORIES:

Ice Cream Donuts Are the Coolest Summer Craze

This Limited-Edition Dunkin’ Donuts Treat Is for All the Royal Wedding Fans

Netflix’s “Stranger Things” Is Coming to Universal Studios This Halloween

Craving something different for dinner? Transport yourself to the islands with by whipping up these yummy sliders from Or Whatever You Do. Grilled pineapple is always a hit, and once you pair it with pork tenderloin and a slathering of teriyaki sauce, you’ve got a dish that’ll please your whole crew.

Ingredients
1 1/2 pounds pork tenderloin
1 can pineapple rings
1 package King’s Hawaiian rolls
6-8 ounces teriyaki sauce
1 1/2 teaspoon salt
1 teaspoon onion powder
1 teaspoon paprika
1/2 teaspoon garlic powder
1/4-1/2 teaspoon cayenne pepper

Method
1. In a small bowl, mix all dry ingredients for your rub together. Apply dry rub to the tenderloin. Make sure it is evenly coated.

2. Place meat on an outdoor grill at medium heat (325 F) and cover. Turn meat judiciously every 3-4 minutes to avoid burning the outside. When the meat reaches a minimum internal temperature of 145 F, it is done. Remove from the grill and let it rest for 5 minutes before slicing into 1/2″ thick medallions.

3. While the tenderloin is cooking, open the can of pineapple rings and place them on the grill. Flip the rings when they have nice dark brown grill marks and remove when the other side is done.

4. At the same time you are grilling the pineapple rings, open your package of King’s Hawaiian Rolls and using a bread knife, cut them in half. Place both halves of all your cut rolls on the grill and leave there until the undersides are toasty brown, then remove.

5. To put your sliders together, first put the bottoms of the rolls down, followed by the pork tenderloin, and pineapple ring on top of that. Next, drizzle some teriyaki sauce on top of the pineapple and finish the slider by adding the top portion of the rolls.

This recipe and photo come courtesy of Nicole Johnson from Or Whatever You Do. A busy mom of seven kids, Nicole shares smart recipes that your whole family will enjoy—check out her blog for more.

In Partnership With Eggland’s Best

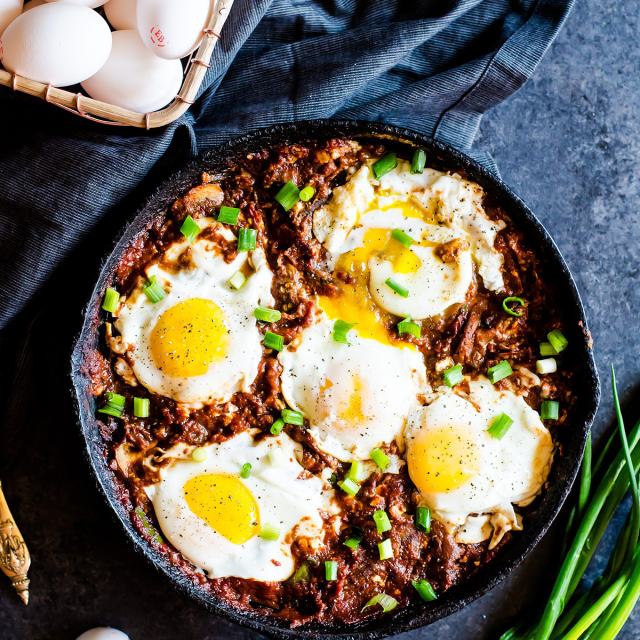
Take things a bit further with your Shakshuka and add delicious vegetables!

Prep Time 10 min  Cook Time 25 min  Yield 4 servings 

You will need:

2 tbsp. extra virgin olive oil

1 medium onion, diced

3 cloves garlic, finely diced

2 tsp. paprika

1 tsp. ground cumin

½ tsp. cayenne pepper (or to taste)

½ tsp. cracked black pepper

½ tsp. turmeric

2 tbsp. tomato paste

1 small eggplant, peeled and diced

2 poblano peppers, diced

1 cup diced Portobello mushrooms

1 28 oz. can crushed tomatoes

Salt to taste

4 oz. feta cheese

5 large Eggland’s Best eggs

Directions:

Heat a large cast iron skillet on medium high.

Add the oil, then the onions, garlic, paprika, cumin, cayenne pepper, black pepper, and turmeric.

Cook just until the spices become fragrant, then add the tomato paste. Cook for about an additional 1 – 2 minutes.

Add the eggplant, poblano pepper, and mushrooms and cook until the vegetables are softened.

Add the crushed tomatoes, and salt (you may not need much as the feta is quite salty) then cook for another 4 – 5 minutes.

Add in the feta cheese in small clumps throughout the mixture. Make sure the cheese is submerged into the tomato sauce.

Create 5 wells in the pan and add the eggs into the wells.

Lightly run your spatula into the whites to break it slightly and allow it to incorporate some of the tomato. Leave the yolks whole.

Cook for about 2 – 5 minutes, depending on how hard you want the egg whites.

Cover and cook for 1 minute to lightly cook the top of the egg whites, but not much longer, or else you risk cooking the yolks.

Sprinkle a pinch of salt and pepper over the eggs and serve hot with a side of bread.

 At Eggland’s Best, their commitment is to produce a more nutritious egg, which is also the finest, freshest, and most delicious egg possible. From unique hen feed and strict quality standards to their network of USDA-inspected local farms all over the United States, you can be confident that a classic, organic, or cage-free egg with the EB stamp on the shell is a nutritionally superior egg that delivers farm-fresh taste.

RELATED STORIES

Weeknight Meal: Veggie Pasta Bake 

Open Faced Egg Sandwich with Avocado & Pesto

Quick Broccoli & Red Pepper Egg Bake

Easy Veggie Stir Fry with Sesame Scrambled Egg

Weeknight Meal: Mini Egg Pizza

If you want the taste and crispiness of fried chicken, but aren’t thrilled with the idea of actually deep frying your meal here’s a tasty alternative: oven baked crispy chicken from one of our favorite food bloggers, Marin Mama Cooks. The chicken is packed with flavor thanks to the brine (good to know: you’ll need to plan ahead to make this as the chicken requires 3-4 hours to brine before baking). So if you have the time to plan ahead this recipe is a sure winner. Check it out below!

Serves 4-6

Ingredients:
6 chicken drumsticks and 2 thighs (bone-in, skin-on) or 4 thighs and 4 drumsticks – see my above note on chicken quantities – You can use any combination of chicken pieces for this recipe, even bone-in, skin on breasts. We just prefer the darker meat, as it has more protein and way more flavor.
3 tablespoons sea salt – Don’t use table salt! Table salt contains iodine, which doesn’t work with brining.
1 tablespoon honey – honey adds a depth of flavor
1-2 quarts warm/room temp water – you want enough water to cover all of the chicken
For the breading:

1 cup almond meal flour – I used Bob’s Red Mill
2 teaspoons celtic sea salt – I love this brand as it’s unrefined and chock-full of minerals
1 tablespoon nutritional yeast – I love this brand from Bragg
1 teaspoon chopped fresh thyme leaves
½ teaspoon cayenne pepper
½ teaspoon smoked paprika
In a large (large enough to hold all the water and chicken) stainless steel or glass bowl, (don’t use plastic) whisk together 3 tablespoons sea salt, 1 tablespoon honey and 2 quarts warm water to create a brine.

Method:
1. Place chicken drumsticks and thighs into the brine, cover, and transfer to the refrigerator. Let the chicken marinate in the refrigerator for 3-4 hours. Make sure that there is enough water to submerge the chicken, if not, add more water.

2. When the chicken is finished brining, preheat your oven to 350 degrees, and line a rimmed baking sheet with parchment paper.

3. Take out the chicken drumsticks and thighs and pat each piece of chicken throughly dry with a paper towel. Drying the chicken drumsticks and thighs will keep your chicken from getting soggy.

4. In a shallow bowl, gently whisk together the almond meal, seal salt, nutritional yeast, thyme, cayenne pepper and smoked paprika. Dredge the chicken drumsticks and thighs in the seasoned breading until well-coated on all sides. Arrange them presentation side down in a single layer on the baking sheet.

5. Bake for 20 minutes, then turn over each drumstick and thigh, and then increase the oven temperature to 425 degrees and bake for an additional 10-15 minutes, or until the chicken’s internal temperature reaches 165 degrees. Increasing the oven’s temperature to 425 helps to ensure a crispy skin.

Note: If your chicken is finished cooking, but not browned to your liking, then you can place the chicken under your boiler for a few minutes to brown up the skin.

NOTE: Baking times vary as chicken cuts vary in size. My chicken cuts were on the smaller side, so my total baking time was roughly 30 minutes. Don’t worry if you overcook the meat, brined dark meat chicken is very forgiving and still tastes great even if it’s overcooked!

Have you tried brining meat before? We love this method! Tell us your thoughts below!

Recipe and photo courtesy of Jacquelyn of Marin Mama Cooks. Visit her website for more tasty kid-friendly recipes.

Did you know that homemade taco seasoning is as easy to make as heading to the store and buying the packet yourself? Take it from food blogger and mom of two, Amy of Wholesomelicious who makes her own taco seasoning for these slow cooker ground beef tacos. The best part? After mixing everything in the crock pot, dinner is ready in a mere 4-6 hours!

Serves 4

Ingredients:
2 lb Organic Grassfed ground beef
½ cup chopped white onion
1 cup chicken broth
5 tbsp tomato paste
For the Seasoning:
1 tbsp Chili Powder
3 tsp cumin
2 tsp paprika
2 tsp ground coriander
2 tsp minced garlic
1 tsp oregano
1 tsp salt
1 tsp chipotle powder (optional)
¼ tsp Cayenne Pepper (optional)

Method:
1. Mix the ingredients for the taco seasoning in a small bowl.

2. Add ground beef to your slow cooker. Top with onions and tomato paste. Mix in the Spices. Finally add in chicken broth.

3. Stir the mixture around to coat most of the meat.

4. Cook for 4-6 hours on low heat.

5. Serve with your favorite tortillas, and any other taco toppings.

Do you ever make your own taco seasoning? What did your family think of this recipe? Tell our community in the comment section below.

Amy who blogs over at Wholesomeilicous is a foodie, busy mom of two, wife and nutritionist. Visit her blog for more great family meal ideas that are simple and delicious. And, don’t forget to follow her on Facebook for even more great updates.

Fish Tacos

Skip the battered fish tacos and try these fresh tilapia tacos instead from food blogger, Marissa of OMGFood. You’ll say, “OMG this is so good” after taking a bite. Read on for the full step-by-step recipe.

Ingredients:
2 tilapias, about 1lb
2 tablespoons extra light olive oil
juice from half a lemon
½ teaspoon kosher salt
1 teaspoon coriander
1 teaspoon cumin
½ teaspoon cayenne pepper (optional)

Toppings:
8 corn or flour tortillas*
shredded cabbage
red onion, finely chopped
cilantro leaves (optional)
lime wedges (optional)

Good to know: Warm your tortillas by preheating a small skillet over medium heat. Place a tortilla in the pan one at a time for 30 seconds to a minute per side; until the tortillas are soft and warm. Set aside in a tortilla warmer or foil covered plate until ready to use (I warm my tortillas as the fish is cooking).

Method:
1. Combine olive oil, lemon juice, and spices in a small bowl and whisk until well blended.

2. Place the fish in a large bowl or ziplock and coat with the dressing. Let it marinate for at least twenty minutes or up to two hours.

3. Preheat skillet over medium-high heat.

4. Add fish to skillet and cook three minutes per side. Discard the remaining marinade.

5. Shred the fish with a fork.

6. Assemble tacos with toppings. Enjoy!

Do you have a favorite type of fish for fish tacos? What do your kids think of this recipe? Leave a comment below!

For more fantastic recipes visit Marissa’s blog, OMGFood and don’t forget to follow this Boston write and foodie on Facebook by clicking here

It’s just sauce, it’s just sauce – and wow, this buffalo sauce is addicting. For a meal with a peppery kick and juicy crunch, make this easy version of a buffalo chicken wrap. This slow cooker recipe cuts out the unnecessary butter in buffalo sauce, but keeps all the yummy flavor. Kids will scramble for seconds of this scrumptious meal – all while getting their daily portion of veggie and fiber.
Ingredients:
 
For the chicken
24 oz boneless skinless chicken breast
1 celery stalk

1/2 onion, diced
16 oz fat free low sodium chicken broth
1/2 cup hot cayenne pepper sauce (I used Frank’s)

For the wraps:
6 large lettuce leaves, Bibb or Iceberg
1 1/2 cups shredded carrots
2 large celery stalks, cut into 2 inch matchsticks

Method:
  1. In a slow cooker, combine chicken, onions, celery stalk, and broth (enough to cover your chicken, use water if the can of broth isn’t enough). Cover and cook on high 4 hours.
  2. Remove the chicken from pot, reserve 1/2 cup broth and discard the rest.
  3. Shred the chicken with two forks, return to the slow cooker with the 1/2 cup broth and the hot sauce and set to on high for an additional 30 minutes.–Makes 3 cups chicken.
  4. To prepare lettuce cups, place 1/2 cup buffalo chicken in each leaf, top with 1/4 cup shredded carrots, celery and dressing of your choice. Wrap up and enjoy!

Allyson is a wife, mother and writer of the blog, Domestic Superhero. As a career nanny, she is vibrantly creative and constantly working on her own projects. Check out her website for more recipes and inspirational posts.