If you have yet to unleash this culinary treat on your kiddos, then you’re in luck, because kids go absolutely crazy for it!
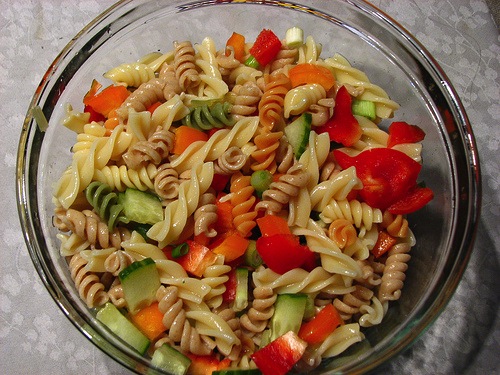
As if pasta couldn’t get any better, this dish takes the multi-colored pasta and makes it a more complete and hearty meal with the addition of veggies. This tri-color pasta salad recipe is very adaptable, so don’t be afraid to mix it up with whatever you’ve got in your pantry or in your refrigerator. Serve with French bread and enjoy either hot or cold.
Tri-Color Pasta Salad Recipe Ingredients:
2 tbsp olive oil
1 small red or yellow onion, finely chopped
1/2 tsp dried herbs (basil, marjoram, oregano, thyme, plus a squeeze of lemon juice)
2 garlic cloves, finely minced
1-2 c soft vegetables (sliced bell peppers, corn, chopped and salted eggplant, sliced mushrooms, peas, chopped spinach)
1/4 tsp salt
14.5-ounce box of tricolor pasta
1-2 c cut-up hard vegetables (carrots, celery, zucchini, broccoli, or cauliflower)
2 tbsp sour cream
1/2 c grated Parmesan cheese
1 tbsp fresh basil, finely chopped
Preparation Method:
1. Heat the olive oil in a large skillet over medium-high heat. Add the onion and cook, stirring occasionally, until soft, about 3 minutes.
2. Stir in the dried herbs and the garlic and cook for about a minute, and then stir in the soft vegetables and 1/2 tsp salt. Cook, stirring occasionally, until the vegetables are tender, about 4 minutes, stirring often. Turn off the heat and set aside.
3. Boil a pot of water, and cook pasta for 3 minutes. Add the hard vegetables and continue to cook until the pasta is al dente. Reserve 1/2 c of the pasta water, then drain the pasta and vegetables and return them to the pot.
4. Stir the sour cream and 1/2 tsp salt into the pasta, then add 1/2 c of the Parmesan, the basil, and 1/4 c of the pasta water.
5. Stir to combine, add the cooked soft vegetables or leafy greens, and add more pasta water if needed. Serve with more Parmesan on the side.
Sure, you’re hot and sweaty. But don’t let being pregnant in summer get you down. Next time you’re struggling with your summer bump, stay cool, think of your mocktail as half full, and remember these reasons why a summer pregnancy is actually pretty great.
photo: iStock
1. You don’t need as many maternity clothes. Forget the bump-friendly jackets and hard pants. You’ll be rocking flowy dresses. Buy a stretchy bikini and you may not even need a maternity swimsuit.
2. All that delicious summer produce. Get your nutrients thanks to in-season fruits and veggies like sweet corn, watermelon, berries, zucchini, tomatoes and stone fruits. Most you don’t have to cook, so meals come together fast.
3. Exercise is easier to schedule. Longer days and comfortable temps mean you’ll be looking forward to taking a long walk at dusk or going for a swim.
4. Vitamin D, baby. This powerhouse vitamin is important both for you and the baby, and those long, sunny summer days help you get your daily dose.
5. It’s the season for dressing down. Forget trying to stuff your pregnant self into jeans or sweating in your sweaters. Summer is all about easy-to-wear maxi dresses, flowing linen tops, and comfortable cotton tanks and shorts.
6. You can fit in relaxation time more easily. Summertime is synonymous with vacation, so many workplaces slow down and the living is just more easy. Lay in a hammock, lounge by the pool, or take a babymoon with your sweetie.
7. You have an excuse to see all the summer blockbusters. When your body is working overtime, stepping into an air-conditioned theater is considered self-care. If theaters aren’t your thing, buy a projector and watch movies on a wall at home or, better yet, out in the backyard.
8. Dare to bare your bump. Gone are the days of having to hide that you’re growing an amazing person inside of you. Being pregnant in summer is the perfect excuse to show off that baby belly, so break out those fitted outfits.
9. Claim you’re eating ice cream for the calcium. Your baby’s need for bone-building calcium gives you the perfect excuse to grab a cone. Or two. Healthy pregnancy smoothies are also on the menu.
10. Swollen feet are a great reason to wear flip-flops 24/7. Thanks to pregnancy hormones, a gal’s feet can grow half a size, not to mention that fun pregnancy swelling. Swap out painful footwear for cushy flip-flops to give your feet a break.
11. You’ll have easier access to swimming pools. Submerging yourself in water gives you instant relief from the heat as well as aches and pains. Plus, there is no more gentle (but effective!) exercise than swimming or water aerobics when you’re working out for two.
12. Your snuggly, warm cuddle buddy will arrive just in time for cooler weather. Having your baby in your arms as the days turn cooler is an excellent reward for being pregnant in summer. Baby snuggles are always special, but there is something particularly wonderful about cuddling a newborn wrapped in a fuzzy blanket in the fall and winter months.
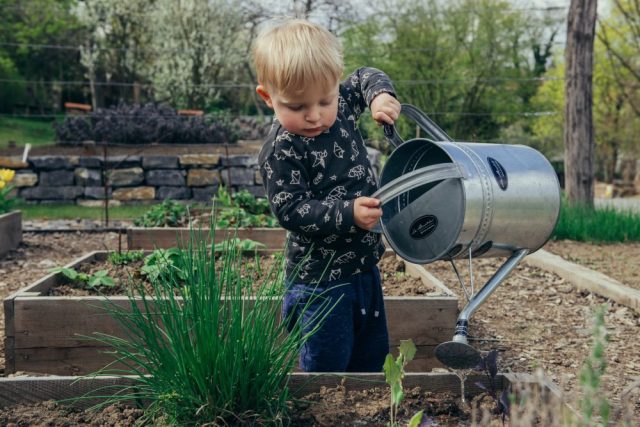
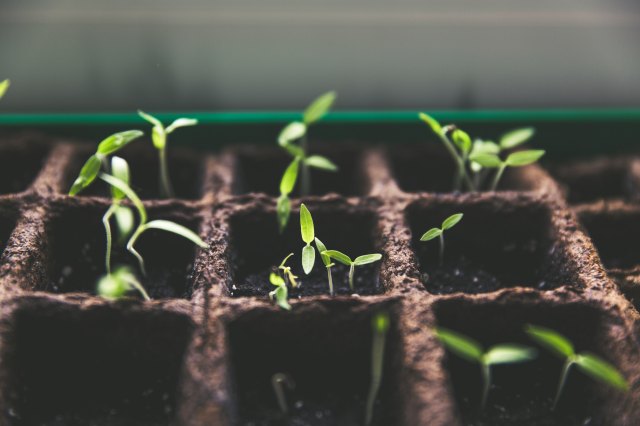
Never mind the snow: spring is coming! It might seem early to be making plans to garden with the kids, but the truth is, it’s almost time to start seeds indoors! (A cool, educational thing to do with kids in the final days of winter.) Lots of families learned the joy of urban gardening when it swept NYC last year, and rest assured: anyone can grow and nurture plants with some research and the right advice. We spoke to local experts about how you can garden with kids in NYC whether you have a windowsill or a wide open field. Read on to get growing!
You know this from grammar school—heck, your kids know this from grammar school—but just to review, these are the key ingredients for happy, healthy plants.
Emily Carter, Brooklyn Botanic Garden's Children’s Garden Assistant Coordinator, stresses that getting these basic plant needs right will lead to a good experience for both your family and the plants: "Remember that sun, water, and nutrients (healthy soil) are the fundamentals of happy plants, so focus on how you can provide those basics."
Location, location, location First, some good news: You can grow many things indoors, as long as you pick your plants carefully. If you're gardening for the first time, that's the first thing you'll need to consider — your available space.
Where will you put your plants? You can grow plants indoors, grow them in-ground or in pots outdoors, use a window box, or some combination of these. The space you have for your little garden will determine what kinds of plants you get, so give it some thought before you go seed shopping!
Sunlight Another important factor to consider is the sunlight available in your space.
Does your place get a lot of natural light throughout the day, or are you working with a square foot of direct sunlight for an hour in the morning? (That's the experience of this writer, and we still managed to get some plants to grow, so don't be disheartened!) Even if you have outdoor space, think about how often it's in shadow. Depending on the amount of sunlight you have at your disposal, you can consider supplementing the natural sunlight with some grow lights, but it's often easier to choose to grow plants that suitable to the conditions you have.
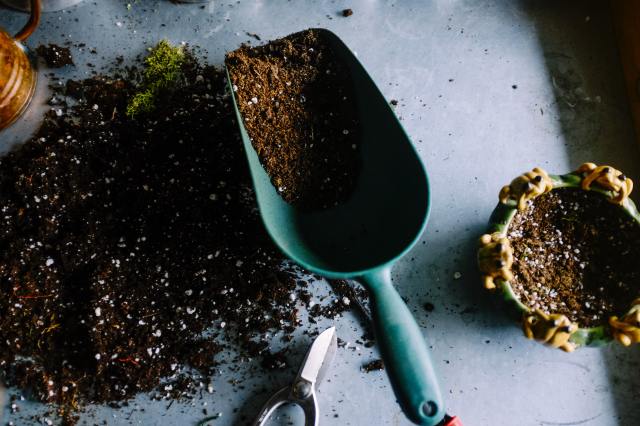
Quality soil Not all soil is made equal! The NYC Parks Department describes the best potting soils as containing "peat, sphagnum moss, perlite, and vermiculite." Stay away from the dollar store stuff and invest in a quality soil that contains those components listed as primary ingredients. It really makes all the difference!
Water Once you get your plants situated, you'll need to water them, of course. You don't need any special sources or water here: Tap water — and NYC tap water in particular — should be perfectly safe for your plants, though it's recommended that you leave the water sitting until it's room temperature to reduce the chances of shock from the temperature shift in the soil.
You might think that the more water, the better but the truth is actually closer to the opposite: Many first time plant owners tend to overwater their plants, causing them to die! Juliette Vassilkioti, founder of NYC-based indoor plant experts My City Plants, recommends that you make sure top of soil is completely dry before watering your plant. (You can stick a finger into the top inch of soil to make sure it's dry — a task the kids are sure to love taking part in!)
Are you getting plants because you think they’re beautiful or delicious? Do you want your kids to actively participate or do you plan to turn the experience into a full teaching moment? Your reasons for starting a garden (indoor or out) will guide your plant- and seed-purchasing decisions.
Set yourself up for success by picking plants that are more forgiving of beginners.Here are some of the best starter plants for first-time gardeners and budding young botanists.
”
Vegetables & Herbs
Davor Denkovski via Unsplash
Both Carter from the BBG and the gardeners at Wave Hill recommend leafy greens and culinary herbs for growing plants with kids. Plants like lettuce, arugula, mesclun, mustard greens, basil, thyme, mint, and oregano are not only easy to grow, but they also "put on growth that kids can harvest at any stage and don't have to wait for a whole season," point out Wave Hill experts.
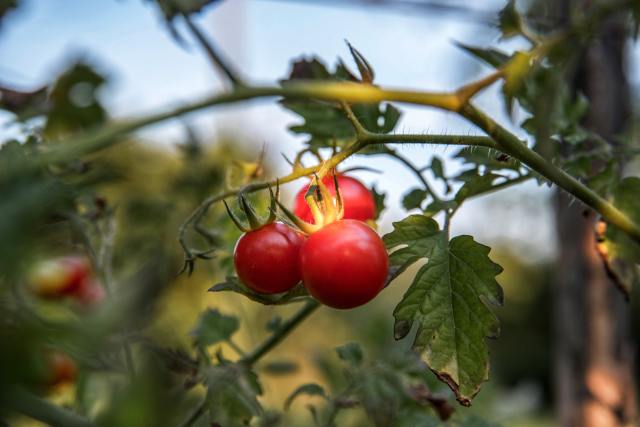
Carter notes that "These plants have edible leaves, which means they require less solar energy and time to be edible. Plants like tomatoes require much more solar energy and time to grow leaves, flowers, fruits, etc. Therefore, they are not the best match for small indoor spaces." (In general, vegetables and fruits need a lot of direct sunlight.)
If you do have an outdoor space that gets six to eight hours of sun available, Wave Hill and the BBG name eggplant, pepper, and tomato as good plants to start indoors. Move them outside when the weather warms, whether your plan is to replant them in the ground or into larger pots. You can either start these from seed (more on that below) or buy "starter", or smaller plants at your local garden center. If you do plan on potting your plants in containers, know that some varieties have been developed specifically for growing in containers, which means you'll likely have more success with them.
If you have the luxury of a patch of sunny soil, Carter recommends radishes and carrots. "If you can grow in-ground, many radish varieties have a quick harvest turnaround and carrots come in lots of exciting colors."
Beans and other legumes are a good choice for beginning botany. Per Wave Hill, "[They are] a fun crop because they offer an introduction to seed biology and plant structure. The large seeds produce cotyledons and roots that help kids visualize how seeds can transform into full-grown plants."
You can also settle somewhere in between by planting the BBG's recommended choices for large outdoor pots, whether that's in your garden or in a window box: Herbs like rosemary, lavender, lemon balm, cilantro, and dill. (Hot tip: cilantro often "bolts" or produces seeds, especially as the weather warms; one way to maintain a supply is to periodically seed throughout the season.)
Flowers
Robert Zunikoff via Unsplash
If you're looking to brighten up your space and attract wildlife and insects, flowers are a great choice. BBG's Carter recommends marigolds (shown above)— their seeds germinate easily indoors and they can be moved into larger outdoor pots later in the spring. Nasturtium are also a good choice— you'll need to soak their seeds overnight then start them indoors or plant them directly outside in May. (Once they flower, you can add their vibrant flowers to your salads!) "And don’t forget your giant sunflowers," adds Carter. These are definitely outdoor plants, as they can grow up to 16 feet tall depending on the variety! (Smaller varieties are available as well.)
Planting flowers native to this area is also a good bet, as they are more likely to thrive in conditions here. For outdoor containers like window boxes, balcony pots, or gardens, NYC Parks suggests planting native perennials, which return every year, such as milkweed... bee balm, and native grasses which are great for bees, butterflies, and moths."
A mix of flowers and herbs can also be used to create a sensory garden with plants that stimulate the senses with "Strong smells (basil, mint), unique textures (nasturtium, snap dragons), beautiful colors that attract pollinators (zinnias, marigolds, and other flowers)."
When to plant inside For plants you plan to move outdoors, start them from seeds about six weeks before the last frost, which typically occurs in NYC in April. So if you plan to move your plants outdoors in early May (past May 7 is officially listed as a "safe" time to plant without fear of frost), you'll need to start your seeds around late March.
Wave Hill's gardeners add that "many warm-season vegetables such as tomatoes and eggplant benefit from transplanting seedlings. But most vegetables and flowers that are recommended to be started indoors can also be direct-sown, you just have to be a little more patient. The most important factor in timing seed starting is your area’s last, frost-free date and the specific needs of each plant."
Some seeds may need extra help Know what your plant needs to do its thing. For example, some plants like basil, tomato, and pepper can only germinate when the soil is warm (between 65- and 85-degrees Fahrenheit), so if you're planting inside to get things started, consider buying a heat mat or placing the seed tray above your heater.
When to plant outside If you're planting your seeds directly in the ground outdoors, they'll require a bit more care. In addition to choosing your planting time based on the need of each plant, you'll also need to consider compost, mulch, and pest control.
Mid-April to mid-May is a good time to start planting outdoors, since you're likely to be safe from frost by then. According to NYC Parks, April and May are also when you'd typically plant flowering plants like dahlias, sunflowers, and cosmos.
But at the end of the day, each plant has its own needs and requirements. "Remember," says Carter, "The back of seed packets and a quick internet search of the plants you hope to grow will let you know exactly what each plant needs, to better guide your decisions."
Additional food for thought Whether you're sowing outside or starting your seeds indoors, Carter also has some more intuitive advice if you want your little garden to yield vegetables and other edible goodies: "If you are hoping to grow outside, a good way to gauge timing is to think about what is 'in-season' in your grocery store throughout the year. Radish peas, beets, and arugula are the freshest in the spring, which means that starting your seeds in late winter will allow you to have a harvest several months later. Tomato, pepper, zucchini, beans, and eggplant is fresh and abundant at the farmers market in the summer. They like to grow in warm temperatures, which tells you that starting those seeds may be best in early to mid-spring so that they can grow big in the summer heat."
"Again," says Carter, "refer to your seed packets when you are thinking about timing for your plants! Agricultural extension webpages can give more specific seed starting times for the region that you live in, but it’s also exciting to think intuitively and follow the weather patterns of your area."
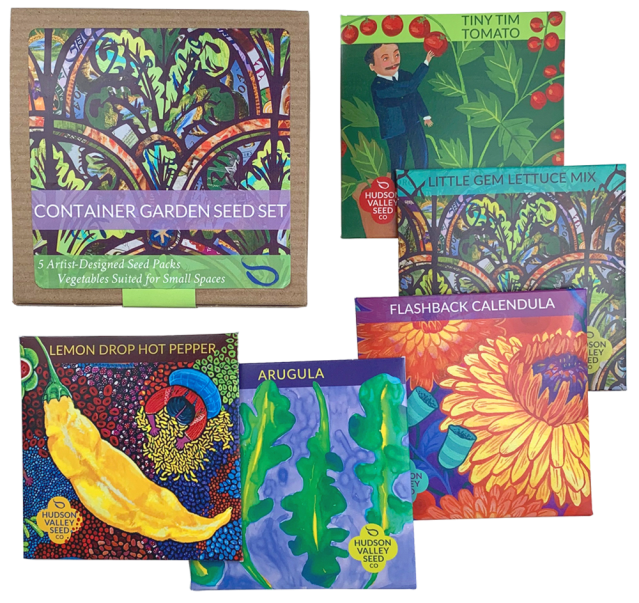
The easiest places to get seeds and starter plants are plant nurseries, hardware stores, and garden centers. There are also many, many seed resources online (packages from one of our favorites Hudson Valley Seed Company shown here), but it can be fun to go to a store and pick out the seed packets with the kids. Know that the hard-core gardeners are already snapping up packets online and some seeds are selling out.
Beyond shopping around, there's one other excellent place where you can get some great plants to start with: Your kitchen. "Get creative!" says Carter. "You can use kitchen scraps to experiment with regrowing plants, try planting nuts and seeds you find outside, and reuse milk cartons or plastic drink containers to house your plants." Be sure to punch drainage holes at the base of recycled containers.
See What Works
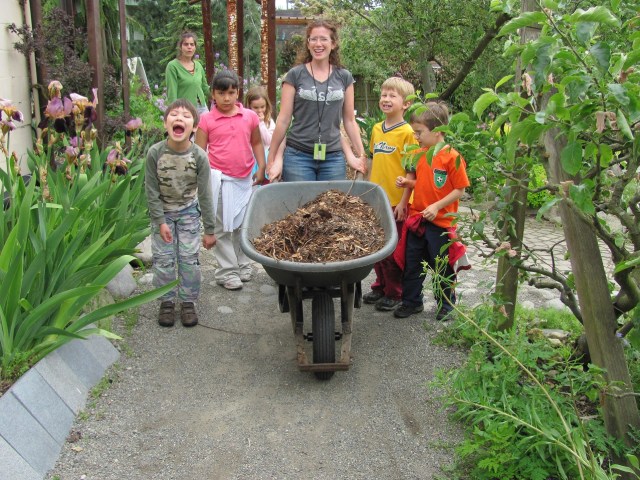
Tilth Alliance @ Good Shepherd Center, Children's Garden
In the end, it's important to remember that while science is a big part of gardening, it's not an exact science. Any seasoned gardener will tell you that trial and error is part of the process; it often takes seeing what doesn't work to find out what does. "The best lesson that we have learned in our gardening journeys is to 'give it a try!'," says Carter of the BBG. "Plants are very resilient and the best way to learn is to put a seed in soil and keep track of what happens. Some may die and others may thrive, but diving right into the experience is the best way to learn."
À la carte works on date night, but when you’re feeding your crowd, sometimes it’s better to minimize the ordering mayhem. From tacos to tofu, we’ve picked our favorite family style meals that you can carry-out from Atlanta’s best restaurants. Keep reading for the more on these magical mealtime bullets, below.
Shh. Don't tell anyone, but you can pick up a lobster taco take-out kit (feeds four) for $24. Not into shellfish? No worries. Choose from a taco pack or a roasted chicken pack, both served with salsa verde, chips and your choice of 3 sides for $39.50.
3802 Roswell Rd. NE Buckhead 678-871-8226 Online: bartaco.com
Also available at Inman Park and West Midtown locations
Who says pizza delivery has to just be the pie? Go all-in with Blue Moon Pizza's four-course family pack, which includes an appetizer, salad, entree, and dessert for a family of four for $40.
325 E. Paces Ferry Rd. Buckhead 404-814-1515 Online: bluemoonpizza.com
Also available at Marietta, Sandy Springs, and Smyrna locations
Healthy and delicious, this North Buckhead spot serves up inspired salads, build-your-own bowls, lots of Gluten-free options, and quick pick pantry and fridge staples in their restaurant. And, they offer family meals, designed from their existing menu items, for four or eight people.
3872 Roswell Rd. North Buckhead 404-855-2240 Online: brackskitchen.com
Just when you think cruising through the drive-through at Chick-fil-A couldn't get any easier (or more pleasant), they go and do this: Build Your Own Family Meals are bundles of menu items that allow you to quickly build out a meal to serve four people (or more) by mixing and matching 13 different menu options. And guess what? You can get it carry-out, delivery, or pre-pay for easy drive through pickup.
You can pretty much make a family meal by ordering a couple of entrees from Gu's and sharing them; however, you can't go wrong by ordering Hungry Gu's, which includes a full order of pork dumplings, spicy crispy beef, stir-fried string beans, and chicken fried rice. And for vegetarians, you can adapt this for a full order of veggie dumplings, stir-fried string beans, spicy dried eggplant, and spring rolls.
Yes, you can take out the Tollhouse Pie, but if you're feeding a crowd, grab one of their family meals for four (you can eat the pie on the way home, and no one will know). Choose from a roasted chicken, brisket, casserole, meatloaf, and other family meals, which includes a salad, two sides, entree, and cookies.
Tuk Tuk's 3-course Family Menu serves up to 6, with incredible Thai goodness and generous helpings. Choose one appetizer, one soup or salad and two entrees for $80.
1745 Peachtree St. Suite Y Brookwood 678-539-6181 Online: tuktukatl.com
Congratulations, you’re making a human! Pregnancy is one amazing journey. And trust me, you’ll want to remember these moments. You are cute AF right now, a glowing goddess of motherhood, nausea, swollen feet and all! Here are creative ways for documenting your pregnancy in pictures. Take pics monthly—or wheneverly, whatever schedule works for you.
Celebrate your growing bump with these super adorbs fruit tees. This three-piece set includes one shirt for each stage of your pregnancy, with a fruit that shows baby's size during that time: peach (12 weeks), eggplant (24 weeks) and pineapple (36 weeks).
Available at producetees.com, $105 for three-piece set; individual shirts are $35.
You are all about the details. We have a great way to document all the things: a weekly board to update your progress! This handmade board makes it easy with fun prompts about baby's size, your cravings and other news of the week.
Simple (and practical!). One stretchy dress for every photo. I love this one; I wore it through both pregnancies. It’s a perfect fit for all maternity stages, and even postpartum. The 3/4 Sleeve Shirred Maternity Dress from Ingrid & Isabel comes in seven neutral colors and cute stripes.
The couple that plays together, stays together! We love this idea from Anette Dittgen. For a series, just draw the loading image further along each time. It's the perfect way to commemorate this gift that's worth waiting for.
See this image and more on the Anette Dittgen Instagram account.
"Monthly milestone marking." Try sayingthat three times fast! We are loving these cute stickers! In addition to showing how many weeks your bun has been in the oven, they give fun facts like baby's size and when they develop certain skills (17 weeks—baby can hear music you play!).
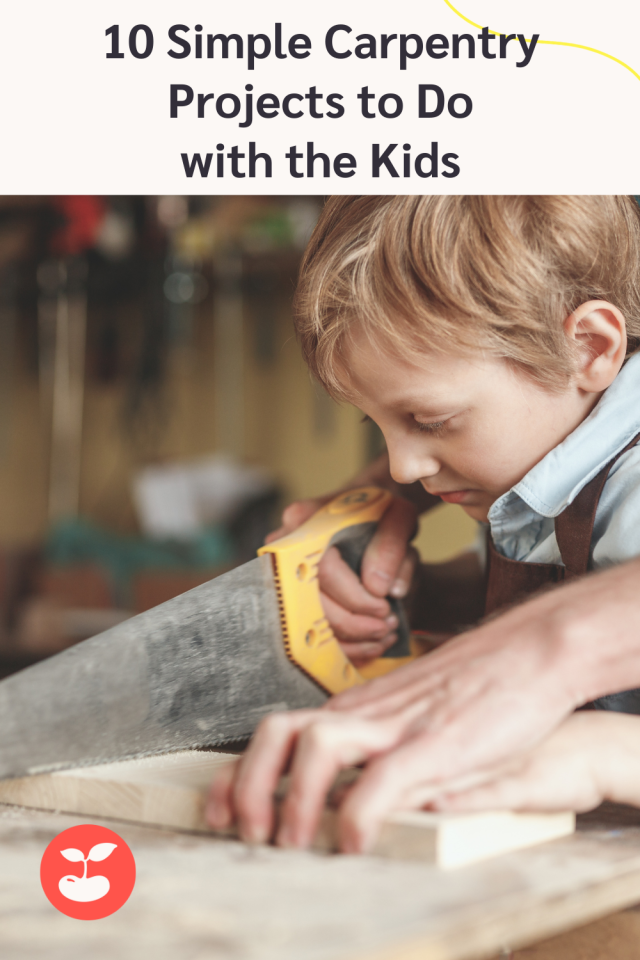
Looking for a fun way to entertain the kids while teaching them important life skills like planning, crafting and building something with their hands? Then look no further than these kid-friendly wood projects. These DIY projects are simple enough for all beginner woodworkers (even those adults who may have never wielded a hammer before). The best part? These easy woodworking crafts will bring joy, a sense of accomplishment, some good-old-fashioned quality bonding time and hours of fun long after the saw has been put away. See them all below.
It doesn't get much easier than fastening a piece of board and rope together for a beginner wood project. The beauty of this project is how quickly it comes together—resulting in hours and hours of immeasurable fun.
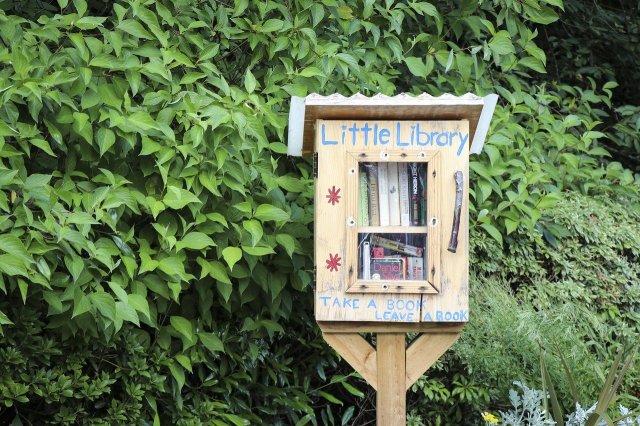
Do you love books and want to pass along your love of the written word to your community? You and the kids can easily build a free "Little Library"—a small, waterproof "bookshelf" where books are exchanged with fellow bookworms for free!
Get the DIY free Little Library instructions here: Red Tricycle
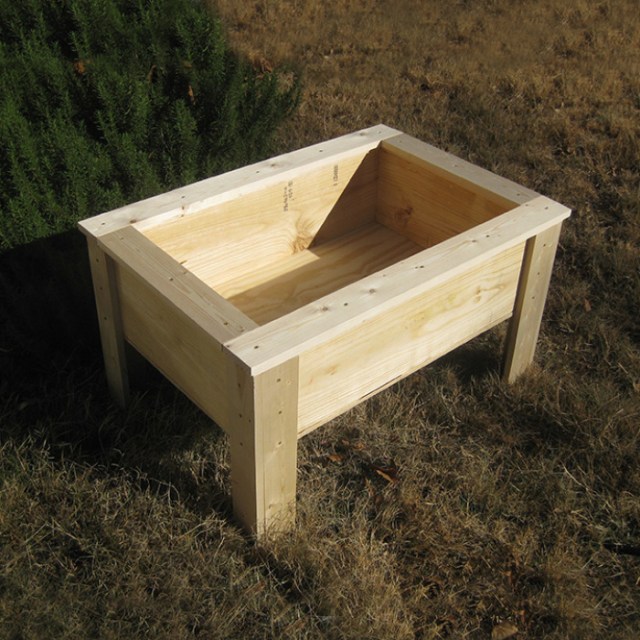
Gardening is having a moment, and we couldn't be happier. To teach kids about growing seeds, plants and harvesting, start by building a raised garden bed or wooden planter box that they can then be responsible for. Who knows, your picky eaters may even try that eggplant or zucchini if it comes out of their special garden box.
Get the DIY raised garden bed instructions here: Fine Gardening
Storage is always in short supply, but this clever DIY with casters for easy mobility will get everyone in the house excited about clean-up time. Customize the crates with paint that matches your decor or have your kids paint their name on the side, so everyone knows whose storage box is whose.
Get the DIY wooden toybox instructions here: A Night Owl
Dollhouses can get big (and complicated) real fast, but not with this plywood version that takes the simple concept of hinges to differentiate the rooms, all while providing an easy fold-away option when not in use.
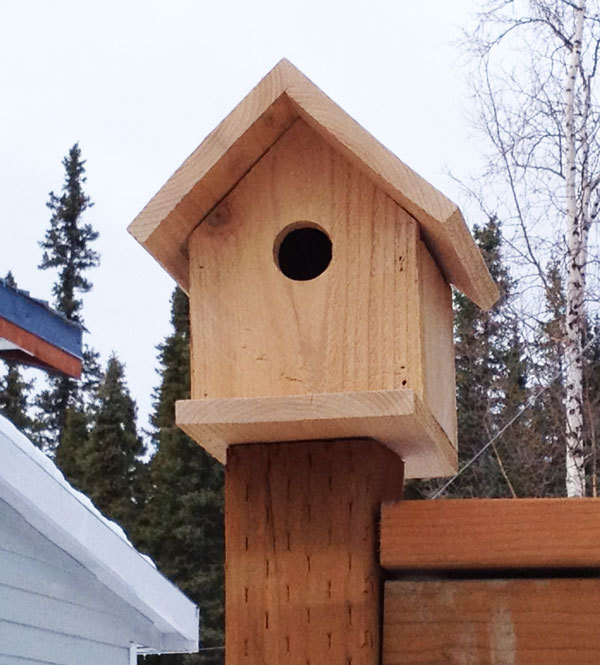
This DIY wooden birdhouse project is awesome for two reasons. One—it's cheap. As in, you won't spend more than a couple of dollars. Two—depending on your kid's age and skill level, this project can be as easy or as hard as you'd like. If the kids are young, have them glue the parts together, or if they're older, they can assist in finishing nails.
Is modern design more your speed? Check out Ana's modern birdhouse DIY that's even cheaper to make!
Get the DIY birdhouse instructions here: Ana White
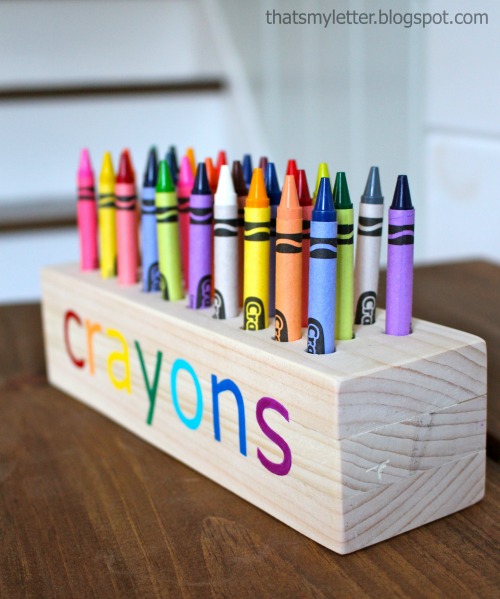
This sweet desktop accessory will help keep your coloring-obsessed kid neat and organized. Using just three pieces of wood, a drill bit, glue and sandpaper, this DIY can be finished in less than a couple of hours. Don't forget to personalize the exterior with paint or stickers!
Get the DIY crayon holder instructions here: Jaime Costiglio
This easy DIY takes only a couple of hours to make but is all but guaranteed to provide hours and hours of fun. Want to extend the life of this wood project? Make this indoor tent all-weather by choosing materials like exterior paint and waterproof fabric.
Get the DIY A-frame tent instructions here: Dunn Lumber
Remember walking on cans? This version is more "clompy" than our "clanky" version but just as much fun. This easy project can be completed in less than an hour and with materials you probably already have at home.
Get the DIY walking blocks instructions here: Instructables
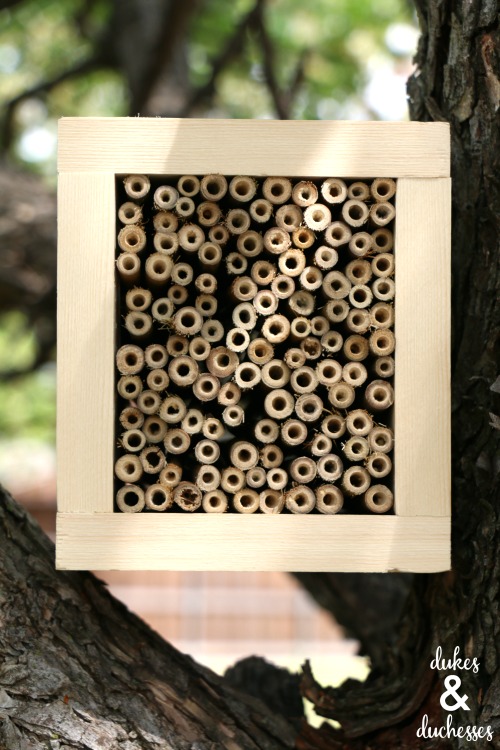
Add an environmentally-friendly woodworking craft to your repertoire! This bee hotel encourages solitary bees to chill out and pollinate your garden (unlike honey bees that require more space). This is a great addition to that raised garden bed you made the weekend before!
Food is such an amazing source of comfort and nourishment––and cooking or baking together and sharing meals as a family can be a treasured part of time spent together at home. With that in mind, we’ve rounded up delicious recipes from some our favorite local chefs and founders of San Diego based food brands. Read on for easy recipes for dinner and lunch as well as yummy snacks, breakfast, and a Disneyland dessert!
Katie Farina of Katie's Healing Kitchen has a recipe that provides a bright start to every day or can be a filling snack or even a healthy dessert! Whip up her Chocolate Covered Strawberry Smoothie Bowl topped with raw chocolate sauce to bring a smile to the face of everyone in your family. Katie offers an array of amazing cooking classes at San Diego's Wine Vault & Bistro, so when life goes back to normal, be sure to treat yourself to a class. In the meantime, you can order her cookbook, Katie's Healing Kitchen, Healthy, Plant-Based Recipes for Every Kitchen, to bring Katie's delightful recipes to your home kitchen.
Chocolate Covered Strawberry Smoothie Bowl: Katie offers, "This delicious breakfast bowl is the perfect way to start your day when you want to enjoy the decadent flavor combination of chocolate and strawberries in a healthy way!"
YIELD: 2 Servings
Ingredients:
-2 cups unsweetened plain or vanilla non-dairy vegan yogurt (like coconut or cashew)
-1 peeled and frozen banana, cut into chunks, thawed 15 minutes
-Thaw frozen banana and strawberries for 15 minutes at room temperature.
-Make Raw Chocolate Sauce (see recipe below)
-Blend yogurt, banana, and strawberries in a blender or food processor until smooth, adding a splash of water or non-dairy milk if a thinner consistency is desired.
-Sweeten to taste with maple syrup
-Divide mixture between two bowls. Top with desired garnishes and drizzle over raw chocolate sauce.
Chef's Tips: Leftover chocolate sauce can be stored in a plastic squeeze bottle in the refrigerator. It will harden when refrigerated, but to re-liquify it, simply place the bottle in a bowl of warm water for a few minutes.
Raw Chocolate Sauce: Katie says, "This is the quickest, easiest, and healthiest way to get a quick chocolate fix. It's perfect drizzled over desserts. Leftovers can be made into a raw chocolate bark. Simply pour onto a parchment-lined baking sheet and freeze for about 20 minutes. Break apart and enjoy, or store in the freezer for a chocolate emergency."
YIELD: 1 Cup
Ingredients:
-1/2 cup raw cacao powder
-1/2 cup maple syrup, at room temperature
-1/2 cup coconut oil, melted
-pinch of salt
Whisk all ingredients together until smooth.
Chef's Tips: The coconut oil has to be completely melted and the maple syrup at room temperature for this to be the best consistency sauce.
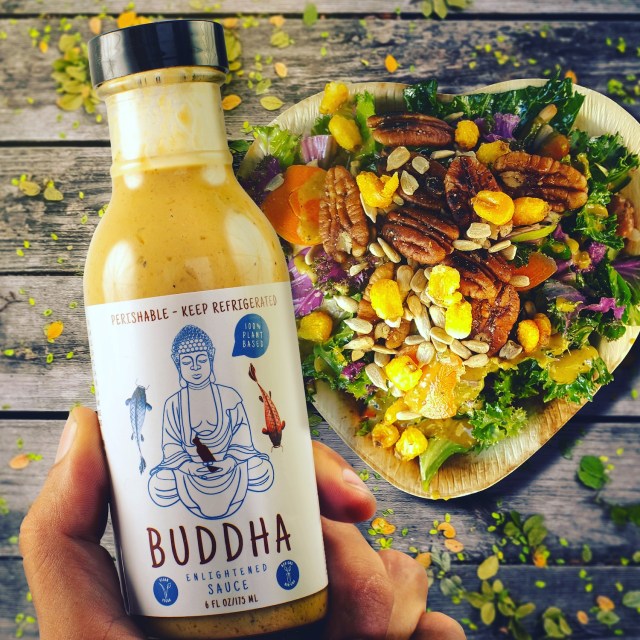
Jai Wurfbain created his 100% plant-based and absolutely divine Buddha Sauce to pair with the wildly popular salad & grain bowls he sells at SoCal farmers markets.
His signature raw vegetable salad has a tasty bed of grains that really makes the salad a nice filling nutritious meal that is brimming with protein, fiber, anti-oxidants and minerals. It's a healthy base for the raw vegetables and life that the Buddha Sauce bring to the party in a bowl.
The gluten-free ancient grains he uses consist of quinoa, millet, pinto beans and red rice. He cooks the Pintos separately and mixes them into the other ingredients at the end. This mix can be cooked in bulk and can be added to any meal. They can be frozen and reheated easily without loss of taste or texture. Beautifully versatile and delicious, warmed up or cold.
Veggie Salad & Grains with Buddha Sauce
1 cup of Millet 1/2 cup of Quinoa 1/2 cup of red rice 4 cups of water 1 tbsp of coconut oil 1 tsp of salt
Use a rice cooker to cook these for 15 minutes. If you don't have a rice cooker, you may need to add a little water to a regular pot which you bring to a boil (covered), and then reduce to a low simmer for a further 10 minutes after which you can turn the heat off and then let the pot rest for another 15 minutes.
Cook 2 cups of pinto beans separately which, after draining, add to the cooked grains.
Top the grains with any assortment of raw veggies and even some nuts you have on hand and that your family enjoys. Next, drizzle Buddha Sauce on top, which elevates the entire meal to a truly enlightened next level!
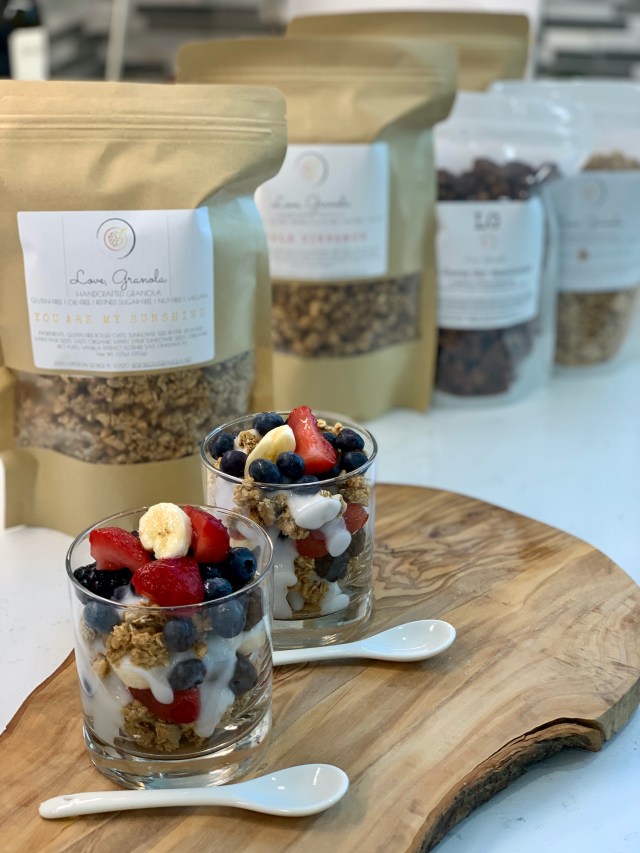
Next you can make Jolic's delightful, healthy and filling Berry Yogurt Parfait using your Love, Granola. Kids will think this nutritional snack is a dessert, and they will love helping you make it (or can even make it themselves), so it's a winner all around!
Berry Yogurt Parfait
Serves 4
Ingredients:
- 2 cups of yogurt
- 2 cups of Love, Granola
- 2 cups of fresh or frozen berries
- 1 banana
Directions:
In a bowl or glass, scoop 1/4 c. of granola. Layer 1/4 c. of fruit, and then 1/4 c. of yogurt. Repeat. Enjoy!
Notes: Have fun creating new flavors with different fruits, flavors of yogurt, nuts/seeds, and of course, Love, Granola!
Love, Granola is offering a 15% off promo code to Red Tricycle readers: (RedTricycle15) that's good until May 1.
Follow, shop or contact Love, Granola via the links below:
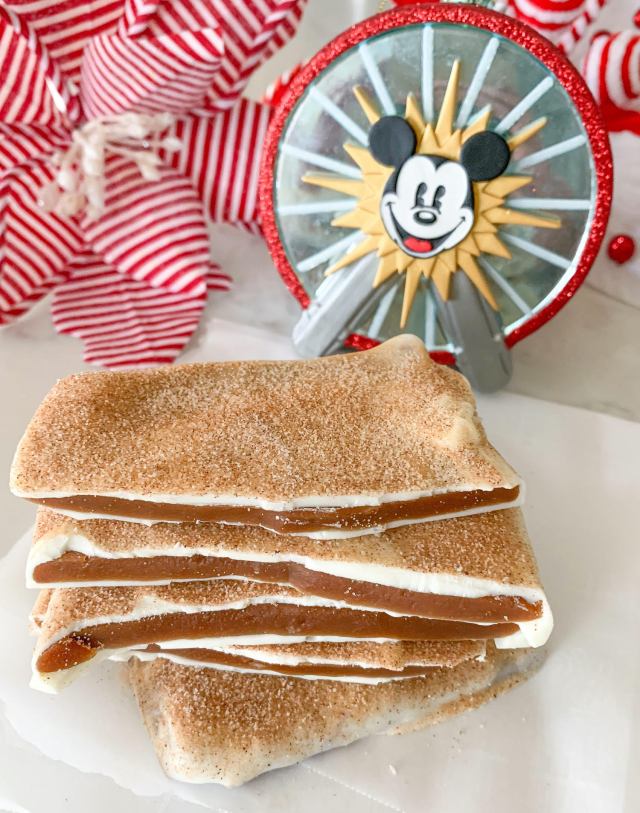
Think you have to wait until Disneyland reopens to sink your teeth into their delicious Churro Toffee? Think again! Disney blogger Jenny Flake of Disney Hungry has graced us all with her copycat recipe of this swoon-worthy treat! Her Churro Toffee Disneyland Copycat recipe instructions are detailed on her website Picky Palate. There's also a video at the end of the post detailing the process further.
Be sure to follow Jenny on her wildly popular Instagram account, Disney Hungry, for all the latest and most tantalizing news on all of the epic food that's offered at Disneyland Parks. Her Instagram feed is a feast for the eyes and good for the soul!
Eggplant Meatballs with Marinara Sauce/Melissa d'Arabian
Melissa d'Arabian
Did you catch our interview with local celeb chef Melissa d'Arabian? Be sure to check it out to learn about all her fave culinary delights in San Diego. Then make this yummy dinner with your family. Kids love shaping meatballs––and their hands are the perfect size to do so!
Melissa says, "Who says meatballs have to have meat? After being roasted in the oven, the eggplant takes on a meaty, hearty flavor that is an excellent foundation for “meatballs.” In addition, I flavor them with the traditional basil, garlic, and bread crumbs (whole wheat, in this case). I do have one other unusual twist up my sleeve, though: I add some smashed white beans for texture and an extra boost of protein. Pair these meatballs with your favorite marinara sauce and I bet no one will even know the difference!"
1 large eggplant (about 12 ounces) 1 large egg, lightly beaten ½ cup cooked white beans, such as cannellini or navy (homemade, page 00; or rinsed, if canned), smashed with a fork 1 large garlic clove, very finely chopped or pressed through a garlic press ½ cup finely chopped fresh basil leaves or flat-leaf parsley ½ cup finely grated Parmesan cheese, plus extra for sprinkling (optional) ¾ teaspoon kosher salt ½ teaspoon ground black pepper 1 cup whole wheat panko-style bread crumbs Olive oil mister or nonstick pan spray 2 cups marinara sauce (homemade or store-bought)
1. Preheat the oven to 375°F. Line a rimmed baking sheet with aluminum foil and place the eggplant on top. Use a fork to prick the eggplant 4 times, then place the eggplant in the oven and roast it until it has completely collapsed and a paring knife easily slips into the center, 40 to 50 minutes. Cool the eggplant for 20 minutes. Leave the oven on.
2. Slice the eggplant in half lengthwise and use a spoon to scoop out the flesh (discard the skin). Place the roasted eggplant in a medium bowl and stir in the egg and beans. Add the garlic, basil, ½ cup Parmesan cheese, the salt, and pepper and stir to combine, then mix in the bread crumbs.
3. Again, line the rimmed baking sheet with a clean sheet of aluminum foil and lightly mist it with spray. Shape the eggplant mixture into balls about the size of a golf ball (you should get about 16). Place them on the prepared baking sheet and lightly mist the top of the balls with spray. Bake the eggplant balls until they are golden-brown and firm, about 20 minutes.
4. While the meatballs cook, warm the marinara sauce in a small saucepan. Remove the meatballs from the oven, sprinkle with a little extra Parmesan, and serve with the marinara sauce.
Per Serving: Calories 304 / Protein 14g / Dietary Fiber 10g / Sugars 14g / Total Fat 11g
Miss your visits to the USS Midway Museum? Now you can savor a piece of the Museum's history at home by baking up a batch of USS Midway Chocolate Chip Cookies to eat chocolate chip cookies like the USS Midway sailors used to eat! Use this recipe that dates back to 1945.
1 lb. butter, cream well
2 cups granulated sugar & 2 cups brown sugar: add both to butter and cream together
2 eggs, 2 tsp. vanilla: add both to mixture
2 tsp. baking soda, 1.5 tsp. salt, 4 cups and 8 tbs. flour: combine these and then add to the mixture
1 bag chocolate chips (large): stir into batter
Spoon onto sheet and bake in preheated over at 375 degrees for 8-10 minutes.
Pho Ca Dao Owner Duke Huynh shared a recipe for a tofu soup, and included a twist of adding eggs to the broth for more nutrients.
Canh Cải Bẹ Xanh or Mustard Green Firm Tofu Soup/Recipe from Duke Huynh of Pho Ca Dao
Serves 2 as a main or 6 as part of a meal of many dishes
100g/1 cup cubed fresh tofu
2-cm/1-inch piece of fresh ginger, julienned
1 spring onion/scallion thinly sliced
1 vegetable stock cube
Dash of cooking oil
A pinch of sea salt
A pinch of black pepper
A pinch of sugar
300g/10.5 oz. Chinese mustard greens, chopped
Bring 1 litre/4 cups of water to the boil in a saucepan. Add tofu, ginger, spring onion/scallion, stock cube, oil, salt, pepper and sugar. When ready to serve the soup, add the Chinese mustard greens to the pan and bring to a boil again. Serve hot by itself as a main meal or with an array of other dishes and rice.
*A little twist I do at home before serving, while it’s still on the stove, break 2-3 eggs and stir into the soup (this will make the soup look more like egg drop soup, but much more healthy).
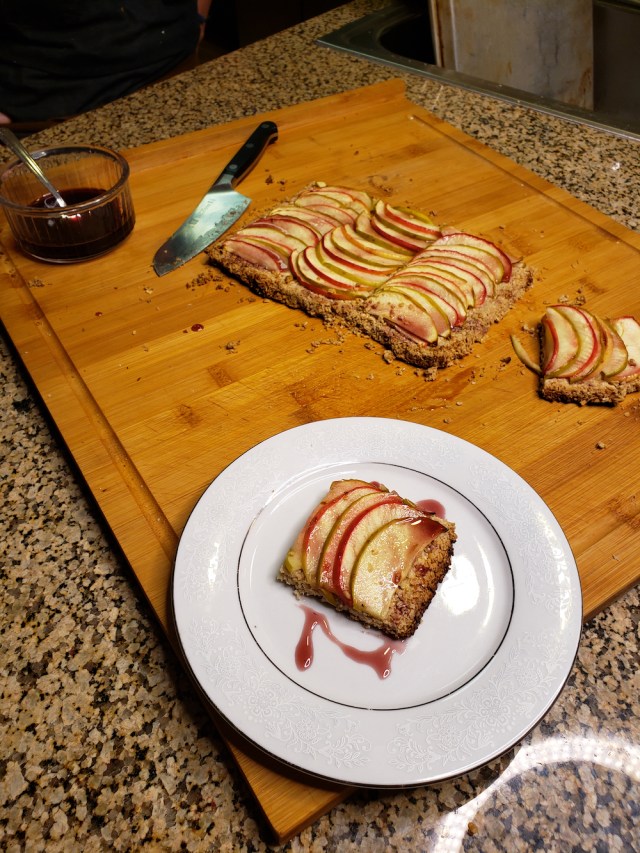
Rustic Apple Tart Recipe from Roanna Canete of The Gluten Free Baking Co.
2 Tablespoons sugar (Coconut or date sugar are great alternatives)
2 Tablespoons lemon juice
Preheat oven to 400F. Take 2 apples, and decide if you like them peeled or not (if so, peel them now.) Thinly slice them (or use a mandolin) about ¼ inch thick. Combine slices plus lemon juice and sugar. Stir to coat all apples, and set aside.
Crust:
215 grams oats or oat flour (if you are celiac these MUST say gluten free on the packaging)
2 Tablespoons sugar (Coconut or date sugar are great alternatives)
½ teaspoon salt
¼ cup coconut oil
If using whole oats, place in food processor and grind into flour. Combine all crust ingredients, using either your hands or a spatula. If the dough seems too crumbly, add 1 tablespoon of water at a time until it feels right. It needs to reach a doughy consistency, but not too sticky.
To assemble the tart:
Using a piece of parchment paper, press out the dough into a 9.5 inch square with your hands. Move the crust with its parchment paper onto a baking sheet. Take your apples, and starting at one end, arrange them in an attractive pattern over the top of the tart. If there is liquid left in the apple bowl, drizzle it over the tart. Bake 25 minutes at 400F. Using a fork, pierce the apples to see if they are soft. If so, remove from oven. If not, add a few extra minutes.
Options for serving:
Find your favorite jam, and combine 2 tablespoons jam to 2 teaspoons water. Drizzle over tart.
Combine 1 tablespoon sugar + 1 teaspoon cinnamon. Sprinkle lightly over tart.
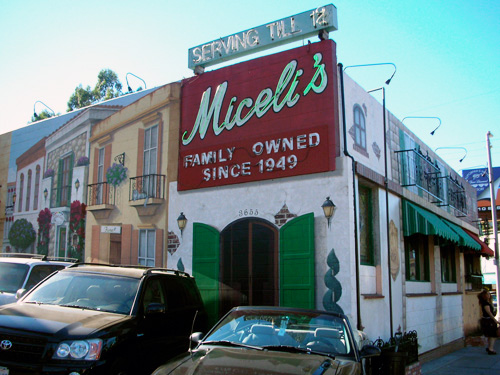
Sometimes you need a little entertainment with your dinner—and we don’t mean your 2 year-old dumping macaroni on their head when they turn their bowl into a hat. We have the perfect spot for food that will get devoured, singing waiters straight from Broadway and an atmosphere that will make you think you’ve magically been transported to Little Italy.
This is the kind of Italian comfort food that appeals directly to still-forming palates: spaghetti and meatballs in a sweet red sauce, pizza kept warm over candles, and the rolls, oh, the rolls! Kids eating here have been known to fill up on baskets of the doughy, warm rolls before orders are even placed. Yep, this place knows kids, and understands that you don’t want to have to pull out the bags of cheerios to keep them quiet till the food comes; milk or lemonade arrives in no-spill plastic cups and baskets of hot rolls and butter appear like magic while you wait for your entrees.
Chianti bottles hang from a ceiling strung with twinkly lights (if you order a straw basket bottomed bottle of vino for yourself, you or your artistic little ones can leave your mark on it with a sharpie and it too will dangle from the ceiling) and checked red and white cloths cover the tables. But the highlight of the evening is the singing waiters and waitresses that take turns belting out songs that run the gamut from arias to showtunes (including all the Disney classics). They take requests, and there is always at least one ingénue in the house with Disney classics in her repertoire, happy to sing directly to your little princess.
In addition to being the perfect place for kids, it’s a good spot to entertain out of town guests. More than one mother-in-law has swooned after being the recipient of a serenade from a handsome waiter with a booming voice.
You Say It’s Your Birthday?
It’s the perfect place to celebrate a birthday, because you know the waitstaff can carry a tune when they bring you a dish of spumoni with a candle in it and sing to you on your special day.
What to Order
Come with your expectations correctly set: this isn’t the upscale northern Italian cuisine of Angelini Osteria or Mozza. While your kids may love the sweet sauces, most grownups have slightly different tastebuds. Menu standouts for grown folk include the chicken Marsala, the house salad that has plenty of garbanzo beans and olives to give it a kick, and if you’re feeling old school & hungry do indulge in one of the parmigiana selections (vegetable, eggplant, veal or chicken) that’s dripping with gooey cheese.
Nearby Fun Universal Citywalk is just across the street, so if you need the bright lights, movies, bowling, shopping, arcades and fun, have an early dinner and head over. Or if you’ve spent a long day at Universal Studios, this is a perfect spot to get away from crowds, sit back and be entertained.
Finding It
There are two Miceli’s… the one on Cahuenga (at 3655 Cahuenga Blvd W.) is the one you want. The restaurant opens at 11:30 a.m. for lunch and stays open through dinner, but don’t get here too early as the singing doesn’t start until 6:00 p.m. Valet parking is free in the attached lot.
Any tips to add for a fun family outing to Miceli’s? Leave us a comment below!
Trader Joe’s is filled with pumpkin goodness this month—including Pumpkin Pie Spiced Ginger Brew, Pumpkin Cold Brew, Pumpkin Spice Coffee, Pumpkin Spice Almond Beverage, Pumpkin Pancake and Waffle Mix and so much more.
Along with these tasty treats, TJ’s also has a pumpkin “tree” to add to your Halloween holiday decor!
If you’re wondering what kind of horticultural geniuses are behind a pumpkin tree (pumpkins grow on a vine on the ground), these aren’t actual pumpkins. Even though they look just like mini versions of the real deal, the tree is made from ornamental eggplants.
Based on recent posts popping up on Instagram, you can score TJ’s pumpkin tree for $7.99 right now. According to the “tree’s” packaging, just “Cut stems, place in water, enjoy!”
In the world of plant-based proteins that appeal to people of all ages, hummus is a perennial favorite—and rightfully so. It’s an always flavorful sandwich spread and a dip for the ages (as we all know, kids just love to dip). And, yes, you can pick it up at a store and it will serve its purpose just fine.
Once you’ve blended your own chickpea chowder (catchy, right?), it might be hard to go back. So, how do you make hummus? There’s more than one way! All it takes is a blender (or a food processor) and a few minutes. Here’s our no-fail guide on how to hummus like a chickpea champ.
The Basic Ingredients
A pretty classic take is chickpeas, tahini, lemon juice, olive oil, garlic, salt, pepper and paprika, but here’s another one that’s easy and delicious!
Put this in a blender (or food processor) and adjust amounts to taste:
Roasted eggplant (4 Japanese)
Tahini, about 1/3 cup
1 can garbanzo beans with about half of the liquid
2 cloves crushed garlic
1 tbsp sea salt
Juice of 1 lemon
Olive oil (about 1/4 cup)
Mint leaves (about 30 leaves)
Turmeric, 1 tsp
Blend until smooth, surround with whatever you want to dip–pita bread, crackers, vegetables—there you go!
How to Take It Up One Pinkalicious Notch
And now, for something gorgeously garbanzo, not to mention spectacularly easy. Who doesn’t want to eat something pleasantly pink that’s healthy and plant-based? Beet hummus checks all the boxes. It tastes fantastic, its full of protein and it makes quite the design statement.
Here’s the drill: Roast one small beet—yes, just one—or even boil it. (Cook for 30 to 40 minutes either way.)
Toss it in the blender with basic hummus ingredients: chick peas, tahini, lemon juice, olive oil, garlic, salt and pepper (see above). Add your ingredient to taste.
If you’re allergic to tahini or you don’t like it lemony or garlicky, drop one of those ingredients. It’ll be alright. And it’ll be pink.
We're Shelley Onderdonk and Rebecca Bloom. A veterinarian and a lawyer-turned-writer walk into a kitchen… We aren’t chefs and that’s exactly the point. We have a lot to share about food-smart living with our own young-adult children and other people and their children, too. Together, we wrote The Anti-Cookbook: Easy, Thrifty Recipes for Food-Smart Living.