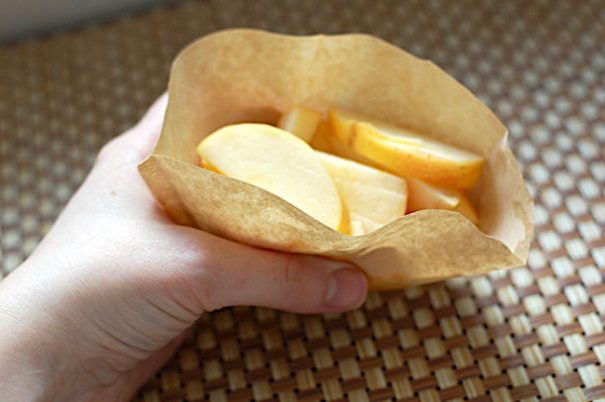
Frozen carbon dioxide, a.k.a. dry ice, is frozen at a temperature of negative 109 degrees Fahrenheit
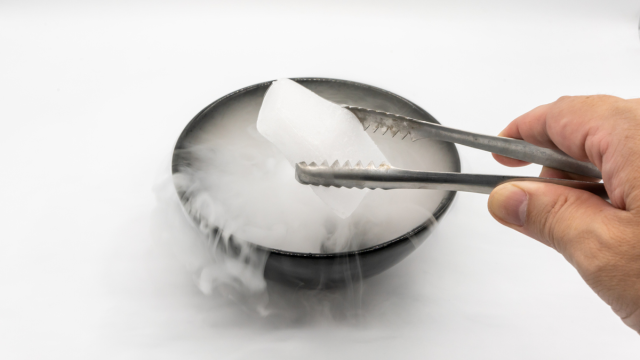
Experimenting with ice is cool. But dry ice experiments are even cooler! Unlike the ice cubes in your freezer, dry ice doesn’t melt into liquid. Instead, these blocks sublimate, which means instead of transforming from a solid to a liquid, dry ice goes from a solid to a gas. With the proper precautions, this type of science experiment for kids is safe—so grab gloves and tongs, open a window or take the CO2 outdoors, follow these guidelines from the National Weather Service, and check out these awesome dry ice experiments.
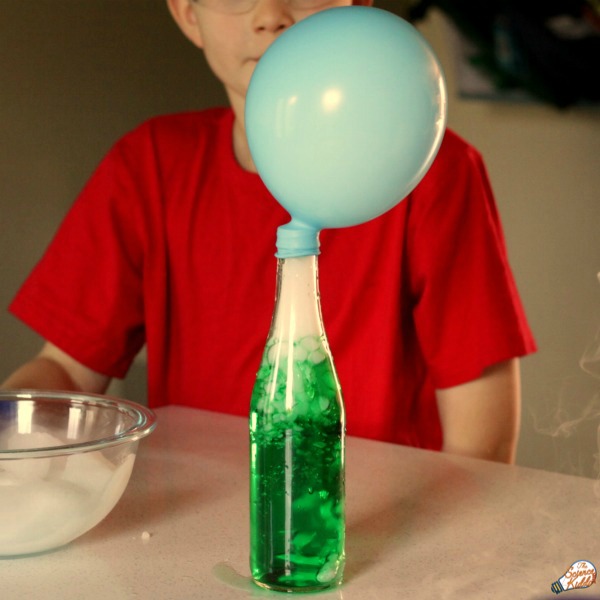
The air from your lungs isn’t the only way to blow up a balloon. This chilly experiment from Science Kiddo helps your budding scientist explore the properties of dry ice.
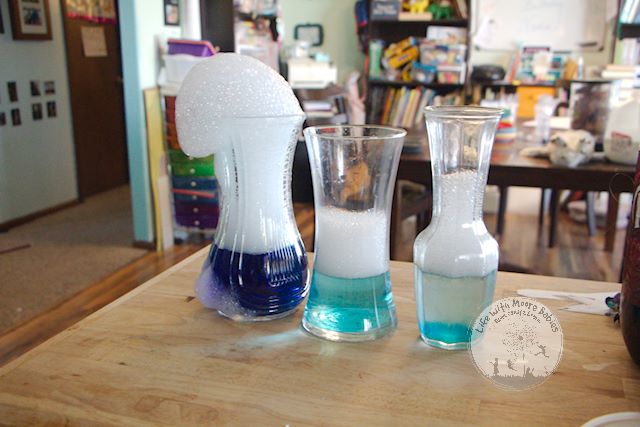
Check out this awesome overflowing dry ice volcano experiment from Life with Moore Learning! As if this isn’t enough fun, you'll also get a step-by-step guide to help your kids compare regular ice with dry ice and other freezing explorations.
Plan a Potion
iStock
Whether you want to make a witch’s brew for your family's Halloween monster bash or you just want to mix up a cool (literally) concoction, Our Best Bite’s Mad Scientist Potion has everything you need to make a mocktail that’s overflowing with fog.
Make your own at-home outdoor fog machine with two ingredients—dry ice and hot water. Remember, dry ice doesn’t melt into a liquid. Instead, it sublimates or turns into a vapor. Place blocks of dry ice into a glass or bucket of hot water and then stand back and watch as the fog pours across your yard!
Can dry ice help extinguish a candle quickly? Your littles can easily blow out their bday cake candles, but have they ever used dry ice to make a flame go away? Head over to Life with Moore Learning for the how-to steps to this easy science exploration.
How can your kids make a crystal ball? Gather a few pieces or pellets of dry ice, a bowl, dish soap and a kitchen towel. Put the dry ice into the bowl, add hot water and watch the fog show begin. Even though this is exciting, it’s not where the experiment ends. Dip the dish towel into a soapy solution, and spread it around the rim of the bowl. Gently pull the soap-soaked towel across the bowl and watch as a ball-like bubble emerges in front of your eyes.
Compare and Contrast
Erica Loop
How does dry ice melt? The answer isn't regular ice. While you might already know this, your child doesn’t. Freeze water, juice, soda, milk, and any other liquid you want. Put the frozen liquid cubes on plates and create a comparison plate with dry ice. Watch each ice option carefully. Your child can jot down what happens to each piece of ice and when.
If you have boxes of plastic or latex gloves hanging around your home, forget about cleaning. It’s time to put these gloves to scientific use, as they are a great substitute for balloons. Drop a shred of dry ice into the glove, tie the end and watch it magically grow. Hint: Don’t use too much dry ice for this experiment. A pellet will do. Overdoing it with the frozen CO2 might create too much gas, causing the glove to burst.
You’ve covered dry ice with water and watched it fog. But what happens if you put the frozen CO2 into a bath of bubbles? Use your kiddo’s paddling pool or fill the sand table with a water and bubble solution or dish soap mix. Ask your child to predict what will happen as the dry ice sublimates. Observe the bubbles as the CO2 gas fills the water and moves into suds.
Magical Disappearing Ice
iStock
When regular ice melts it leaves behind a puddle, but the same isn't true for dry ice. Again, the sublimation process causes it to turn into a gas state. Help your child learn more about the states of matter with easy observation-based science exploration. Place a piece of dry ice in a bowl outside on a warm day or in the sun. Ask your child to predict what they think will happen to the dry ice. Go back later in the day and take a look at the bowl. Like magic, the ice is gone, and nothing is left behind. Discuss what happened. Your child can hypothesize where the ice went and why there is no water in the bowl.
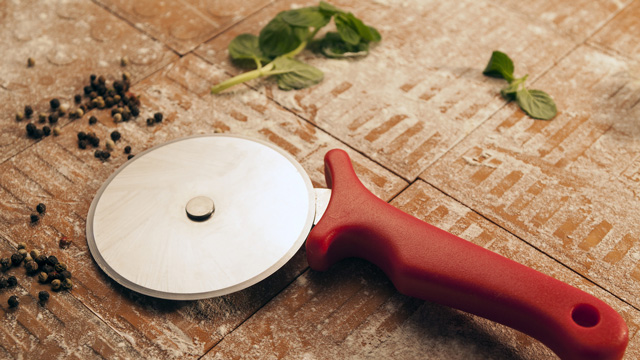
Here’s a hint: a pizza cutter can be used for more than just pizza
When it comes to feeding a crew of hungry kids, we’ve never met a shortcut we didn’t like. This is why, it being the season of busy weeknights and early bedtimes, we want to give you as many cooking hacks (scooped from resourceful parents everywhere) as possible. From meal-prep advice to the easiest way to get an egg that peels with ease, here are 36 clever food and cooking shortcuts that’ll save you tons of time.
Pizza Cutter for Herbs
iStock
Having fresh herbs in the house is nice for creating marinades, dressings, and more, but finely chopping those herbs can be difficult. The good news is, there’s a way to make the process easy. Place the herbs on a cutting board, and roll a pizza cutter through them. Don't worry about cutting in a perfect line, just roll through the bunch as many times as you want.
The skin of a mango is pretty thick, and the peeling process usually involves careful knife skills. We found another way to get that pesky skin off with ease. All you need to do is slice the mango in half and grab a tall glass. Using the rim of the glass, get between the skin and the fruit at the bottom of the slice. Push down, and the skin will slide right off. Voila! You've got a perfectly peeled mango.
If your onions are on the verge of burning, throw an ice cube into the pan. It'll evaporate quickly and give the veggies a hint of moisture to avoid being overcooked.
Have you ever just chopped half a stalk of celery or bulb of cauliflower, and had to put it back in the fridge where it immediately starts to wilt? If you want to keep your partially chopped veggies fresh, we recommend putting them right in the freezer. This locks in the freshness, and they’ll be ready to jump into the frying pan after a little defrosting time.
Shred Chicken in Your Food Processor
Shutterstock
From tacos to salads, casseroles, and beyond, shredded chicken is a staple for family meals. But shredding it all by hand or with a pair of forks can take forever! Amazingly, there’s a quick fix for that—just toss boiled or baked chicken breasts in your mixer, and you’ll have expertly shredded chicken in seconds.
Put Water in Your Microwave to Preserve the Moisture
iStock
Whether it’s leftovers or meal-prepped treats, your microwave is a powerful tool. But you’re always at risk of drying out your food when you use it. We’ve got a simple way to avoid that. Toss a glass of water into the microwave with your food to give it a little extra moisture.
Freeze Sauce in Ice Cube Trays
iStock
We’re all about making cooking easier. With this meal-prep hack, you’ll be able to create perfectly portioned sauces days or weeks in advance and use them whenever you want. Just mix up your favorite sauces, put the liquid in your ice trays and freeze. Keep the portions frozen until you're ready to use them.
From fries to mashed potatoes and chips, everybody LOVES potatoes. But, for a lot of recipes, peeling the potatoes is a must, and using a potato peeler or knife can be time-consuming and difficult. We have an easy fix! Boil the potatoes, let them cool, and the skin will peel off in seconds.
Do you hate cleaning cookie sheets? We know that cleaning them can be difficult because the grease and grime are baked in deep. Using a silicone baking sheet, which makes removing all of your tasty morsels as easy as pie, will change your life. We like this one.
Your filet of salmon will stay intact much easier if you line it with slices of lemon. Plus, the juices will seep up, making a flavorful dinner. See one of our favorite recipes here.
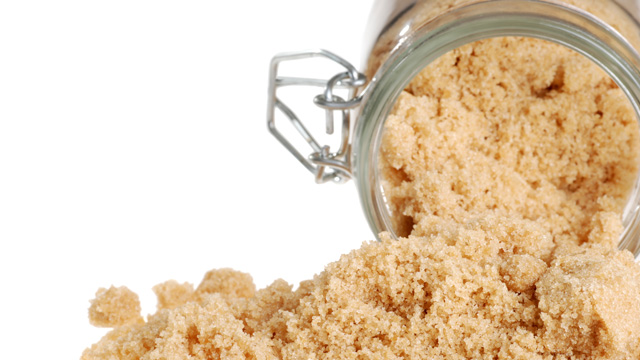
Put Marshmallows in Your Brown Sugar
Shutterstock
Brown sugar is a baking necessity for cookies, cupcakes, and pies, but unlike white sugar, it can dry out very quickly, which means you’ll be stuck breaking up hard blobs of sugar when you want to use it. But, there’s an easy fix for this. All you need to do is throw a few marshmallows into the airtight container with your brown sugar to conserve the moisture and make it easy to scoop.
Strawberries are healthy and delicious. But chopping the green tuffs off the top of every piece of fruit takes so long! Use this fun trick to get them off without a knife: Take a straw and push it from the bottom of the fruit to the top in one swift motion—it'll pop those little green leaves right off.
Flatten Ground Meat
iStock
No matter how hard you try, it seems like there’s never enough freezer space. We have a fun way to help you create extra room. Take your ground beef out of its package, put it in a Ziploc bag, flatten it, and put it back in the freezer; you'll be surprised by the extra open space. You can also write the expiration dates on the bags to make sure your meat is always fresh.
Let’s face it, chopping fresh corn is a pain, mostly because the kernels get all over the counter. But there’s a way to make sure it never happens again. Grab your bundt cake tin, flip it upside down, stand the corn up in the middle, and slice the kernels off; they’ll fall perfectly into that round tin, so cleaning up is a breeze!
Slicing and dicing are a big part of cooking, which means you’re always reaching for the cutting board. But it’s important to make sure that it isn’t slipping and sliding all over the place, so make it stable by putting a damp dishtowel underneath it. It'll keep it in place and make clean-up even easier.
Cupcake Liner Catches Popsicle Drips
Allison Sutcliffe
Popsicles are a childhood fave, but they can turn into a bit of a sticky mess. Prevent all of that dripping by slipping cupcake liners onto the bottom of your kids' popsicles. Slide the liner up so that it cups the bottom of the popsicle to make sure it catches all of those little drips.
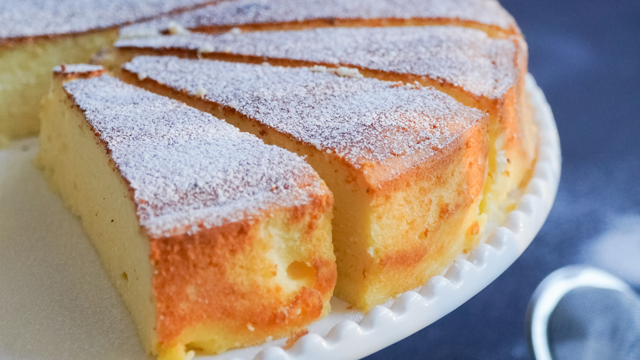
Cheesecake is a dessert that kids and parents love, but cutting it equally can be difficult. Well, we've got an easy way to slice it perfectly every time. Try using dental floss. Just make sure the dental floss is unscented, so you don’t get a minty surprise with your dessert.
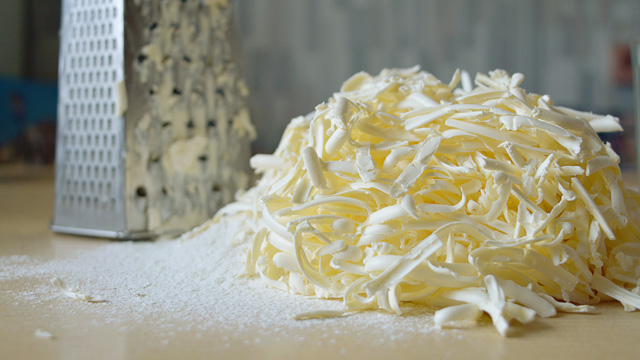
Grate Your Butter
Shutterstock
Softened butter is a staple for all bakers out there, but putting solid butter in the microwave isn’t always the best way to get that soft consistency you're looking for. Try grating it with a cheese grader instead.
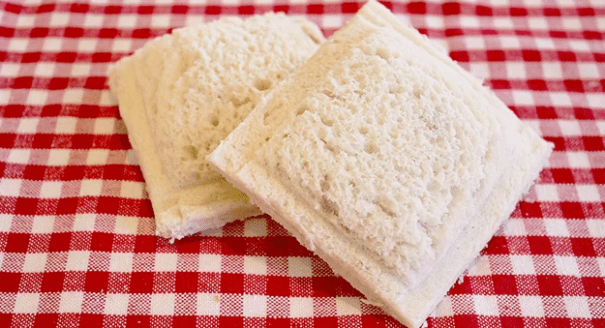
Use White Bread on Your Birthday Cake
iStock
Birthday cake is yummy, but when the party’s over, you're left with half a cake that'll be stale by tomorrow. What if there was a way to preserve this delectable sugar overload? Try putting slices of white bread on the interior sections of the cake where you cut into it—the bread locks in moisture.
No matter what time of year it is, you can always use cookie cutters. And they can be used for much more than just cookies. You can also use them to create pancakes or eggs with designs like flowers, cartoon characters, and more.
Oatmeal is a warm alternative to cold cereal, but it does take a little more time to make in the morning. Try using your rice cooker to make the oatmeal instead. This way, you don’t need to worry about watching, stirring or remembering to turn off the stove. Just put everything inside, and within minutes you’ve got scrumptious oatmeal.
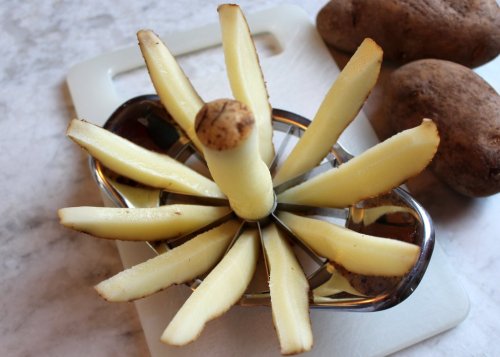
An apple corer/slicer can instantly transform a plain potato into everyone's favorite side. That's right, you can make homemade fries in a snap with a utensil you may already have in your kitchen drawer. Grandma's Brief has all the delicious details.
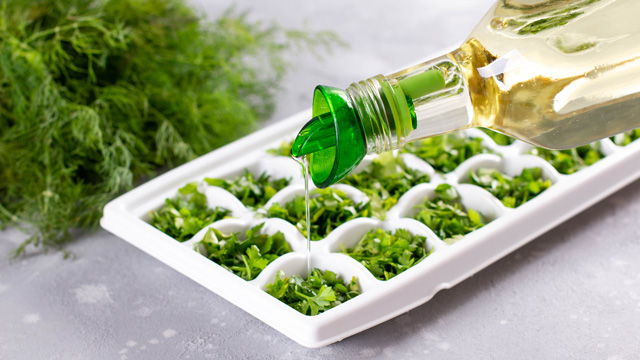
Freeze Herbs in Ice Trays
Shutterstock
Want fresh basil, thyme, and rosemary all year long? No problem. This cooking hack is worthy of Martha Stewart, sans the effort. Just put fresh herbs in ice trays, add oil, and freeze. Freezing the herbs in oil also prevents them from turning brown or getting that dreaded freezer burn.
Wedges are so 2022. No, not the ones you wear on your feet; those are still fabulous. We're talking about watermelon wedges. Instead of slicing the melon into wide wedges that inevitably get juice all over everyone's face and chin, cut the fruit in half, then slice it in a grid. You'll get evenly sized slices that each have just enough rind on the bottom for little hands to grab.
It is a literal Egg McMuffin. Nick of Macheesmo shows us how to make a breakfast sandwich even more amazing by simply baking the eggs in a muffin tin. Best part? You can add other ingredients to the eggs (think spinach, ham, cheese) and then freeze the whole thing for busy on-the-go mornings. Find the original recipe here and the updated version here.
Pop grapes into the freezer for a sweet and crunchy treat that tastes like candy. A refreshing snack any time of the year, this is also a great way to make sure you always have fruit on hand.
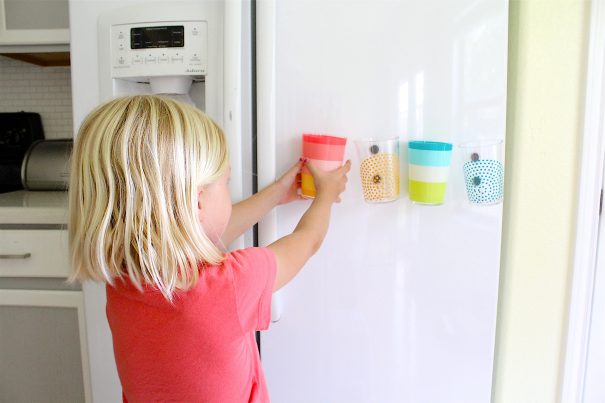
Talk about having a “why didn’t I think of that” moment. If your kids are anything like ours, then you probably go through a few water cups every day. Cut down on needless dishes with this awesome cup hack from Dana over at Made Everyday.
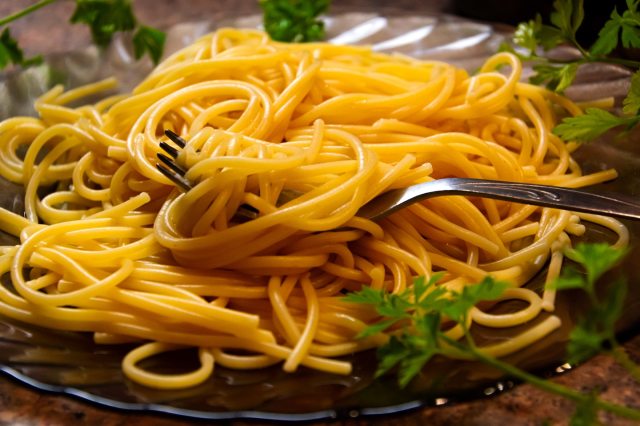
Use your noodle: Cut up spaghetti, linguine, and ramen with scissors. Smaller bites and shorter bits will ease frustration at the dinner table and make after-dinner clean-up easier.
You like the idea of making PB&J (or some "other butter" and jelly) ahead of time but don't really know how to make a good freezer version. Good news! One Good Thing by Jillee explains the how-toand shows you how to seal that sandwich—no fancy gear needed.
A brilliantly simple idea from The Nourishing Gourmet, swap out plastic baggies or even bulky reusables in favor of a biodegradable coffee filter. Psst! If you’ve gone Keurig, we’re betting you’ve got a box of these collecting dust somewhere in your kitchen.
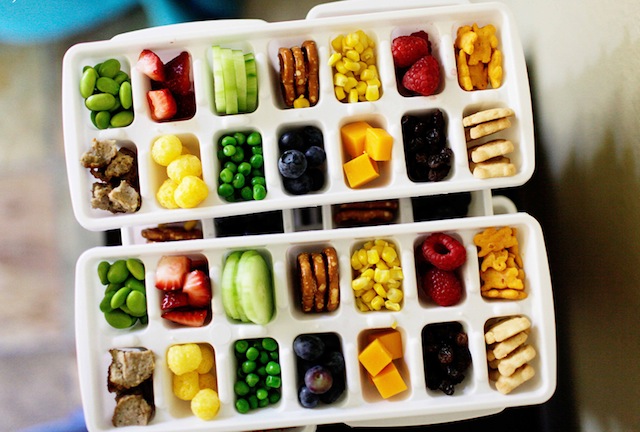
Having a stash of snacks is a must for every parent. But, having a bunch of different canisters, bags, and boxes on hand is difficult for travel and storage. Well, we’ve got the perfect hack for you! Try using silicone ice cube trays as snack trays for at home or on car trips.
Use Binder Clips in the Fridge and Freezer
If you need an easy way to keep all of your favorite munchies fresh in the fridge, may we suggest binder clips? Yes, you read that right. Grab some binder clips, and clip all of your bags of food directly onto the rungs of each shelf. This saves space and keeps everything nice and fresh. This works for bags in the freezer as well.
If you’re looking for a snowflake science experiment, you’ve come to the right place
Whether your sidekick playfully carves out angels in the snow or sits at the window longing for some of that white stuff to actually fall, she’s all about the frosty flakes. And while play is her main motivation, she’s got serious questions about this wonderful winter phenomenon. Like, how do snowflakes form and what do they really look like up close? Dig deep with a flurry of experimental activities we’ve outlined below to find answers to all her snowflake science questions.
Piece It Together
Allison Sutcliffe
We hate to break it to you, but those adorably sweet snowflake cutouts your kid has been bringing home from school this winter don’t pass scientific muster. Because even though folding paper to make four or eight-sided flakes are super easy, Mother Nature’s snowflakes showcase six-sided symmetry exclusively.
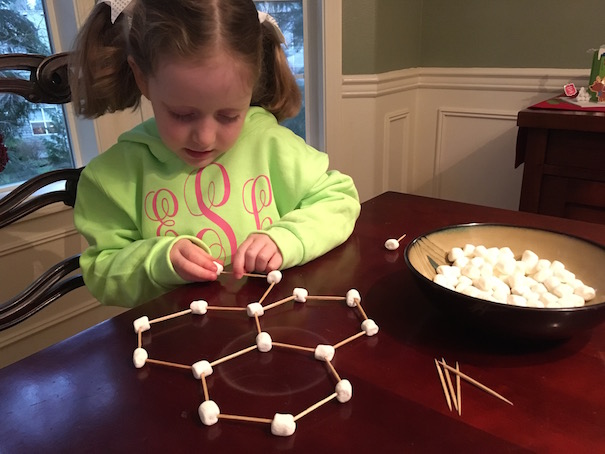
Before diving into your own masterpiece, introduce your scientifically-inclined sidekick to the principle that helps explain why six is the magic number for snowflakes: When the water/oxygen molecules bond during freezing they make hexagons. Recreate this microscopic lattice phenomenon on a larger scale using mini marshmallows and toothpicks with your kids (Click on the link above to find a handy-dandy diagram from Ohio State University!).
Cut It Out
Allison Sutcliffe
Now that your kiddo’s got the six-sided thing down, it’s time to make some of your own scientifically accurate snowflakes from paper. We’ve found an easy way for the tot lot to get the signature six-sided look they’re going for (hint: it’s all about the fold). Simply follow this illustrated tutorial to make paper snowflakes that are true to life. And if you’re looking to bypass the mess, the Make-A-Flake digital option is definitely the way to go. Your tech-savvy tot can cut and save all her frosty creations and save trees too!
Observation is the next step when it comes to snowflake science. If you don't have fresh snow on the ground, you’ve got to get creative and make your own: Leave your freezer door open for a couple of minutes and then close it for 20. When you open it again, your inquisitive cutie should find frosty snowflakes lining the interior.
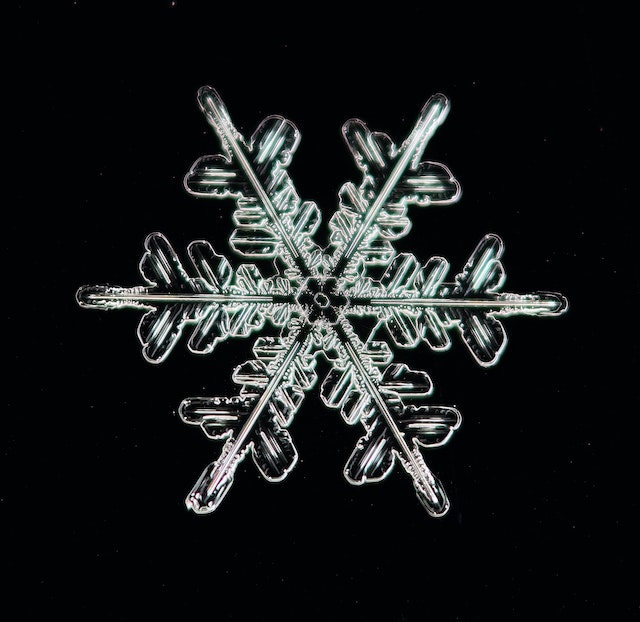
Now that you’ve got snow to work with, it’s time to get an up-close look at some of Mother Nature’s most delicately beautiful creations. To do this, you’ll need a magnifying glass and a dark piece of paper or, if you’re outside, you can also capture snowflakes on clothing like your gloves or jacket sleeve. Gather a few fresh flakes and use the magnifying glass to examine them in detail (If you’re working with freezer snowflakes, melting is an issue, so leave those tiny miracles in the freezer while you magnify.).
Reassure your little scientists that it’s true, no two are alike, and let them know that just one can be made up of over 200 tiny ice crystals! While you’re looking, have your mini-me count up the sides and use this chart to match what you’ve got in hand with standard ice crystals.
You’ve figured out a snowflake’s molecular structure, cut out creative and accurate examples of your own, and examined the real deal through a handheld magnifying glass. Now it’s time to take it one step further. Go behind the scene with rad videos that explain a ton of science behind snowflakes, like their formation and life cycle.
Science Friday’s Snowflake Safari follows Kenneth Libbrecht—CalTech’s resident snowflake expert—a scientist who’s spent a lot of time looking into these chilly chips, as he examines snowflake basics. Be sure to augment your own magnifying experience by flipping through some of Libbrecht’s spectacular snowflake slides online. They’re a great way to demonstrate many of the concepts you and your kiddo have already explored.
Finish up your viewing session with the National Science Foundation’s video about photographing snowflakes. It starts with the man who pioneered the field, Wilson “Snowflake” Bentley, and ends with the discoveries made by the Present Weather Imager, a high-tech camera that captures snowflakes in action. Lights, camera, learn!
Make Your Own
Allison Sutcliffe
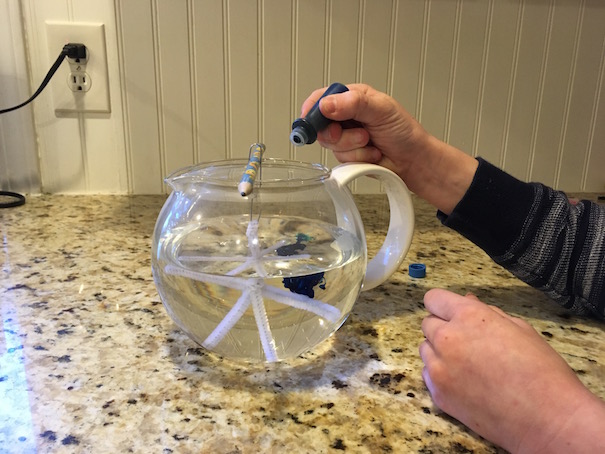
Wrap up what you’ve learned about snowflake science by making a crystal snowflake of your own. Use pipe cleaners to create a six-sided snowflake that gets suspended in a Borax solution overnight. What’s created is a larger-than-life snowflake that’s just as sparkly as the ones that fall from the sky.
When it comes to the best Christmas lights Portland has to offer, these displays are totally lit
The City of Roses should be renamed the City of Lights during the holidays, as far as we’re concerned. Starting right after you finish up Thanksgiving dinner, running throughout the month of December, Portland is ablaze with fun and unique light displays that will brighten up anyone’s day. So after you’ve picked out the perfect tree for the season, fill your thermos with hot chocolate (maybe a hot toddy for the parents), bundle up the kids, and check out these holiday light displays that will brighten your season.
Portland International Raceway Christmas Lights - Winter Wonderland
If you're looking for drive-thru Christmas lights in Portland, head down to the Portland International Raceway for a one-of-a-kind holiday experience. Recognized throughout the Pacific Northwest as the “Largest Holiday Light Show West of the Mississippi,” the 30th annual Safeway Winter Wonderland is unlike any light show you’ve ever seen. Spectators become part of the show as they drive through the track, taking in more than 250 set pieces and animated displays along the course. Plus, all proceeds from the event will benefit Sunshine Division's year-round hunger relief efforts.
Good to Know: Tickets range from $48 - $155 depending on vehicle size
'Tis the season to check out one of Portland’s most popular light experiences: ZooLights at, you guessed it, the Oregon Zoo. This larger-than-life display has more than a million and a half lights, plus all your favorite animals, too! You can take it all in two ways: on a classic walk through the grounds or from the comfort of your car during their drive-through experience.
Good to Know: All tickets are timed-entry and must be purchased in advance online. They range from $21-$29, and drive-thru tickets are $65. Remember, Zoo members receive discounted admission.
Dates: Nov. 23, 2022-Jan. 5, 2023 (Closed on Christmas Day)
The Christmas ships are coming! A fleet of ships have sailed down the Willamette and Columbia Rivers every year for 67 years. Grab a perch with a view (restaurants along the route book up quick), pack your thermos and blankets, and watch the floating lights go by. This is a great parade, and the best part is, you can catch it almost every night in December for free. Be sure to check online for when they’ll be closest to you, as the route changes. It's the perfect winter evening activity for tiny boat enthusiasts (and their parents).
The Grotto’s Christmas Festival of Lights features more than two million lights and is the largest Christmas choral festival in the world. Enjoy the amazing sounds of local schools, churches, and civic groups as you explore the beautiful property. Concerts are scheduled each evening and families can also enjoy outdoor caroling, puppet shows, and storytimes.
Good to Know: Kids 2 and under are free at this display.
8840 N.E. Skidmore St. Portland Online:thegrotto.org
Christmas on the Campground
Drive by or stroll through the Apostolic Faith Church’s campground to enjoy thousands of lights with the kids this year. The lights are on from dusk to dawn at this free display, and music plays at two different times throughout the night. In addition to the life-size nativity scene, the coolest part of the display is hands down the ginormous Christmas tree at the heart of the display. It's the tallest in Southeast Portland, and it's one reason to bring the kids to see this festive display.
Add Lightopia in Hillsboro to your light tour this year. Families can take in all the beautiful sights as you drive along a half-mile winter landscape. This free display is open for visitors on Sundays through Thursdays, from 5 p.m. to 9 p.m. and on weekends until 10 p.m. One thing to note, you'll need a reservation to drive through, so snag one while you can.
Dates: Dec. 3-31, 2022 (Closed Christmas Day)
Gordon Faber Recreation Complex (Hillsboro Stadium) 4450 N.E. Century Blvd. Hillsboro, OR Online:hillsboro-oregon.gov
Clackamas County Winter Fair
Head over to the Clackamas County Event Center for the 3rd Annual Winter Fair and Holiday Market. Not only can you enjoy more than 200,000 lights and scenes, but the kids can meet Santa while you check off people on your Christmas list. Admission to the experience is just $10 for adults and $5 for kids ages 3-12. Bring your 3 and unders for free.
One street you absolutely cannot skip is Peacock Lane—known as Portland’s Christmas Street. Located in S.E. Portland, each house on this little street has been taking Christmas cheer to the next level since 1932. From nativity scenes and rotating trees to re-enactments of your favorite holiday characters and movies, Peacock Lane continues to delight visitors from near and far. You can find this super sweet displays along S.E. Peacock Lane between SE Stark and Belmont Streets.
Insider Tip: Families can walk the display without car congestion on pedestrian-only nights. This year they're scheduled for December 15-17.
Nearly anywhere you drive in Portland, you are likely to see stunning and creative light displays by local families. Holding true to our city's reputation for creativity, you are guaranteed a bright and magical holiday when you live in the City of Roses. Don't forget to pack some hot chocolate and candy canes, to add to the seasonal magic when you head out to one of Portland's many neighborhood light displays. Pile everyone into the car and head to these neighborhoods to see some of the best home grown displays in town. Some of our favorite areas include the Pearl District, Downtown Portland, Alberta, and the Sellwood/Moreland area.
“Anybody have a really good babysitter you can recommend? Available at the last minute?” This group text popped up on a Friday afternoon and was quickly drowned in a sea of “nopes!” and “good lucks!” and teary emojis from unrecognized numbers. No one lets go of that number lightly. None of these people, other than the sender, were in my contacts. None of these people, including the sender, will get a response from me.
I could say it’s because this person wasn’t a close friend or that I didn’t have the time while hauling my kids around in the sub-freezing darkness that January evening. But the truth is, I just cannot give it up. Because I only have one number.
Other than family, I have one number, one person, I can call to babysit my children. I’m not being picky; I am being deadly serious. I have a five-year-old with cerebral palsy whose 40 pounds might as well be 100 when you’re carrying him up the stairs or lifting him out of the van and into his wheelchair or changing a diaper on the floor. He also has limited speech, so you must be part psychic, part lip reader, to intuit his needs. His babysitter is an employee at his preschool and has known him since he was two. I can’t afford to give away the one person I trust.
I know it’s tough to find someone older than 14 and responsible and available and consistent and friendly and cheap-ish to watch your kids. But for us, it is so much more than that. It takes a background in working with children with disabilities, a secret handshake, a personality test, and some serious magic for me to feel comfortable leaving my children in the hands of someone I’m unrelated to.
That number on my phone with “babysitter” in parentheses is sacrosanct. The days of protecting it began in infancy. When we first brought our son home from the hospital, he came with a tracheotomy, suction machine, oxygen monitor, and g-tube. I barely left the room, much less the house. Date nights were not a priority.
And just before I went back to work, we said goodbye to the daycare we had lined up a year in advance. How could we ask them to hook him up to a feeding pump or suction out the snotty gunk from his trach hole? Not to mention pitting him against the invariable sicknesses that pass from kid to kid. A registered nurse or my mother watched him instead.
Thankfully, the trach and the g-tube and all the most precarious of his medical issues faded away with age. We no longer need a nurse. But we do need someone physically strong enough and trained enough to meet his needs.
And did I mention I also have twins? They are insane, in all the natural ways threenagers are, and require just as much eyes-on time—if not so much hands-on time—as their older brother. They will empty the entire roll of toilet paper into the toilet and lock themselves in the bathroom in under 30 seconds. Date nights are happening again, but they are still rare enough to make me feel giddy just backing out of the driveway.
This is why I let the text go unanswered. This is why I let someone else fill in that blank. Our family situation calls for a very particular set of skills. We need the Navy SEALs version of babysitters. And I don’t know another mother with a child with special needs who doesn’t feel the same. We already get less free time, much less time away without worry over our children’s safety. We can’t afford to hand out freebies.
It’s nothing personal. It’s business, the business of running our family. We need the people we trust. And so we keep them close.
This post was originally published in January 2018.
Jamie Sumner is the author of the book, Unbound: Finding Freedom from Unrealistic Expectations of Motherhood. She is a writer for The Washington Post, Parenting Special Needs Magazine and Scary Mommy, and an editor for Literary Mama. She is mother to twins and a son with cerebral palsy.
Lots of time outside; the kids all splashing happily in whatever water-filled container you have.
Lots of unscheduled time, with no particular places to be or things to do.
Your kids get to just be kids for a while.
But here’s what’s also part of summer:
The crying and whining.
The endless repetitions of “I’m booooooored…” interspersed with refusals to help around the house.
And your triggered feelings.
What Happens When You Have a Big Reaction to Your Kid’s Feelings
When your kids don’t cooperate (which happens a lot when you’re together a lot), you probably go into one of four ‘modes’:
1. Fight Mode: You get combative! Your child might as well be an attacking bear that you’re fighting for your life. You will dominate them…through words (you can probably out-logic them), through your physical presence (towering over them) and/or through swatting or spanking them.
2. Flight Mode: You’ve got to get out of here! Your child might as well be an attacking bear that you’re running away from, and quickly. You check out mentally, or you physically leave the room—and when your child follows you it makes everything ten times worse.
3. Freeze Mode: The bear’s attacking, and you can’t figure out what to do. You’re mentally and physically frozen: should you counterattack? Should you run and hide? It is simply not possible for you to make a decision—about anything—at this moment.
4. Fawn Mode: Most common among people who have experienced abuse, this involves getting the difficult behavior to stop at all costs. You placate the child; reassure them; say they can have the thing they want…anything to make the crying/screaming/whining stop.
It doesn’t seem like any of these things should be part of any parent’s summer plans…and yet, here they are.
Summer isn’t over yet.
Are you gonna make it?
Here are 5 tips to help you not just survive but actually enjoy the time you’re spending with your kids this summer:
1. Don’t Multitask.
Whenever your attention is split, there’s a good chance you’re going to get frustrated. Have designated times to play with your kids—and put the phone away. Focus on nothing but being with them. At other times, tell them you’re not available now but you will be in 30 minutes/after lunch/when the timer goes off.
2. Slow Down & Simplify.
Do you need to go to every birthday party? Must you take something homemade to every gathering, or would a bowl of cherries be just as welcome? Could you eat take-out one more night a week, or cook twice as much on the nights you do cook, and eat leftovers every other night? Can you plan just a little further ahead so you don’t have to go shopping as often? The more you can slow down and simplify, the less overall stress you’ll feel, which will leave more gas in the tank to deal with the children’s meltdowns.
3. Be Realistic about What Your Child Can Do.
We hear a lot about having ‘developmentally appropriate’ expectations, but many parents expect their children to be able to do way more than they really can. A survey by respected organization Zero to Three found that over half of parents think that children under three can reliably resist the desire to do something forbidden when actually this starts to develop between ages 3.5-4. And 42% of parents think that children should be able to control their emotions—like not having a tantrum when they’re frustrated—by age 2 when again this develops between the ages of 3.4-4. If you’re expecting too much too soon, you’ll get frustrated when they can’t meet your expectations.
4. Embrace the Drop-off (Outdoor) Playdate.
If you have any access to the outdoors, and there are other families in your ‘pod,’ take turns hosting outdoor playdates. If you have a garden, the other child could bring a lunch and then you just turf them outdoors for the day—they can collect rocks, make ‘houses’ for imaginary friends; build things out of cardboard…Even traditionally indoor-based toys like LEGO and Magnatiles that they’re bored with using indoors can be fun again outdoors. Chances are having another child around will actually keep yours occupied for longer…and then your child goes to the friend’s house another time, giving you several hours off. Even if you go to the playground or park instead of your house, you could work for the life of your laptop battery, or hang out with a book. Win-win!
5. Pay Attention to What’s Going on in Your Body.
In our culture, we have an idea that everything worth paying attention to happens in our brains. But very often our bodies tell us when something’s up—like when we’re getting resentful because our child has been asking us to do things for them all day. We might feel a tightness in our shoulders, heat across our chest, nausea, or a headache long before we yell at our child, walk away from them, freeze, or fawn. We can learn to pay attention to these signals and act on them early in the day rather than letting the frustration build until we explode.
Navigating kids’ big feelings is challenging for every parent. It can be doubly challenging when you can’t stay calm in these moments, perhaps partly because you are remembering difficult events from your childhood. But just because you’ve responded with frustration up to now doesn’t mean it always has to be that way. You might think that your child needs to change their behavior but none of the ideas here involve doing that. When you change the way you show up with them, they most likely won’t do as much of the behavior you find so difficult.
Jen Lumanlan fills the gaps in her parenting intuition through research, via a Master’s in Psychology (Child Development) and another in Education. Her podcast, Your Parenting Mojo, provides rigorous yet accessible information on parenting and child development to help parents tame the overwhelm and raise resilient, thriving children.
The year’s almost over—what was your favorite part? Have your kids ask themselves that question and others with this easy DIY time capsule. Of course, while building a time capsule makes a fun New Year’s Eve craft project, it can be done any time of year. Give your kids the gift of nostalgia! Read on for the simple instructions.
What you’ll need:
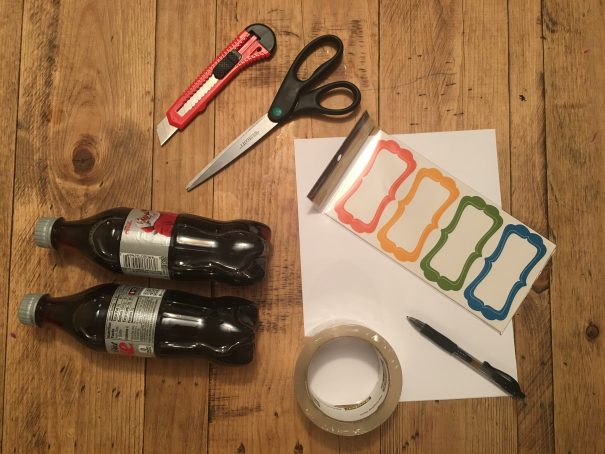
Two 16 oz plastic soda bottles
Box cutter or craft knife (XActo knife)
Scissors
Labels
Clear packing tape
Paper, pens, paint, ticket stubs, knickknacks, etc. to help fill your time capsule with memories
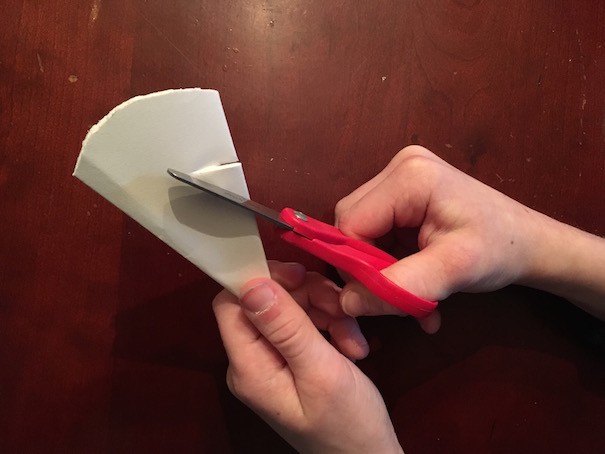
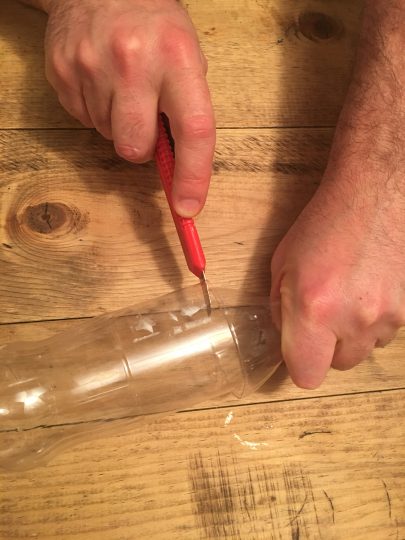
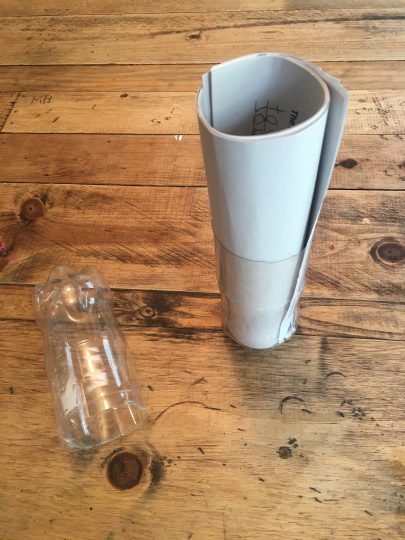
Step One: Cut your “capsule”
Remove the labels from two clear plastic soda bottles. Then, using a box cutter or X-ACTO knife, (parents!) cut the bottles where the flat side meets the sloped top as shown.
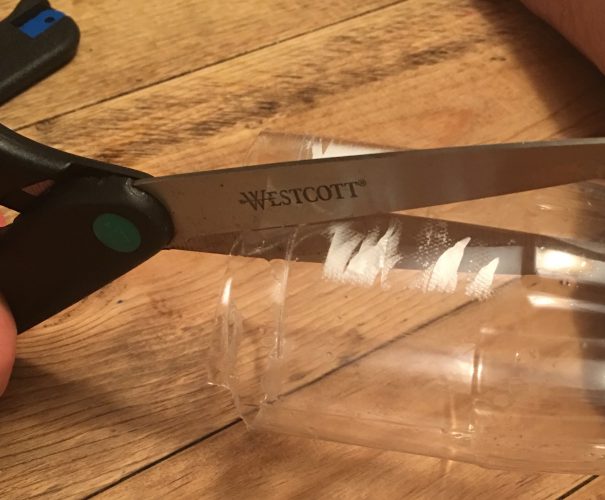
Step Two: Cut notches in one of the bottles
Use scissors to cut four notches in the rim of ONE of the bottles. This will make it easier to squeeze one bottle into into the other to make the capsule shape.
Step Three: Now, freeze time!
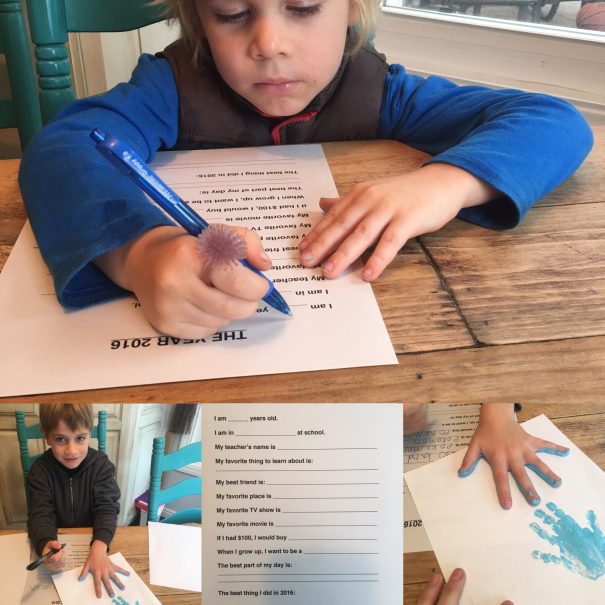
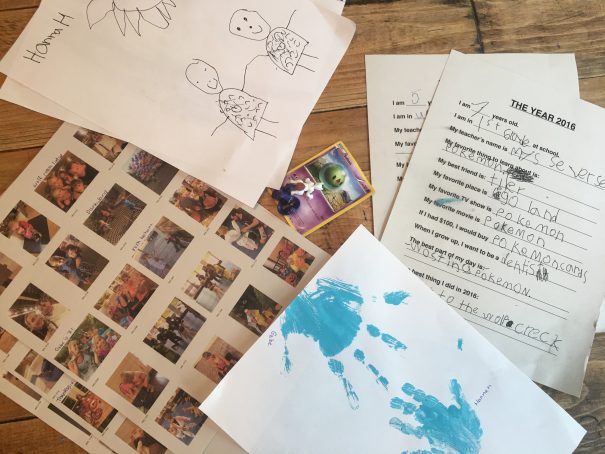
Now that the capsule is prepped, it’s time to find ways to fill it. Talk to your kids about their favorite moments from the year — then see if you can find small items or photos to represent those moments. Some recommendations: Have your little memory-makers put their handprints on paper; it’s a fun way for them to see how they (and their hands) grow from year to year. Also: A simple questionnaire is a must for recording your kids’ current faves. Not sure what questions to ask? Try this easy printable from Uncommon Designs Online.
You could also have your kids write a letter to their future selves, give advice to their future selves, or make a hypothesis as to what their future selves will be doing in exactly one year (or whenever you’ve decided to open your time capsule). Have fun with it!
.
Step Four: Gather all your materials
Make sure you’ll have enough space to fit all your year-end goodies into your capsule. Our capsule included: Handprints of all three kids; a 2016 questionnaire; four pages of thumbnail-sized photos of our year; some Pokemon cards and figures; and two self portraits.
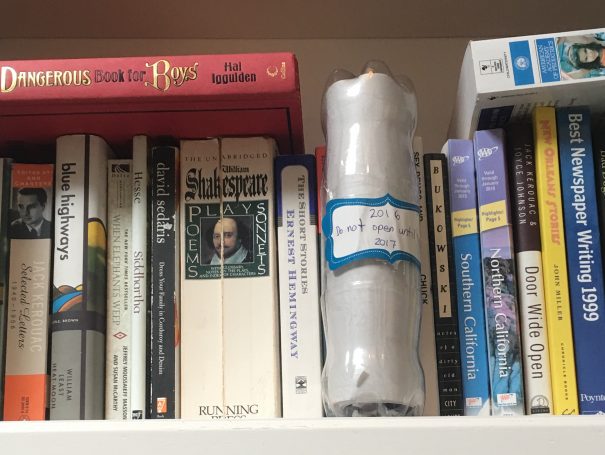
Step Five: Pack it up!
Roll up your papers and photos and slide it into one end of the capsule. Insert any small items in the middle. Then, close the capsule by sliding the two bottles together (the notched side should squeeze right into the other side). Seal your capsule with clear packing tape.
Step Six: Label and decorate
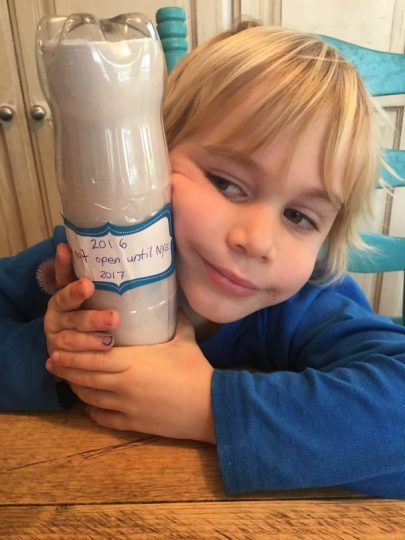
Label your time capsule with the year and the appropriate instructions as to when the capsule can be opened.
Step Seven: Hide (or bury) it somewhere until next year
Want to bury your time capsule? Go for it! As long as your capsule is completely sealed, it should last underground for a year or two without a problem. Not up for digging, or don’t have the proper yard for burying? Place your time capsule high on a shelf or drawer, out of reach of prying hands. Open it next year… in five years… whenever you’re ready for some instant nostalgia.
Christmas is so much. It’s busy, it’s loud, it’s joyful, it’s frustrating, it’s a lot. I love it though. I love it for religious reasons, I love being with family, I love yummy treats, and I love presents. I get so caught up in it.
I have so many deep-seated memories when it comes to Christmas that I want to recreate them for my kids. I want them to have it all and sometimes I forget to slow down.
My five-year-old son Johnny is on the autism spectrum and is a sensory seeker. This often slows us down. He wants to stop and touch everything. He touches the walls, grass, everything on the shelves at the store, he’s been known to lay on the ground in public and rub his hand over whatever is below him. He appreciates the little things, he feels and sees the world through the smallest details.
I often get sad he doesn’t get excited about Christmas in the traditional ways. He likes it. He likes to say “Santa” and sing “We Wish You a Merry Christmas” but when it comes to the actual day he’s not a big fan.
Johnny doesn’t love hustle and bustle. He’s not big on people coming and going. It’s a loud day with too many expectations. He’s not big on Christmas morning, because he knows he’ll have to sit through opening presents, one of his least favorite things.
This year though instead of pushing the things children usually enjoy on him I’ve been celebrating through him. Watching how he enjoys all the small things.
Johnny examines every branch on the tree. He touches and feels each ornament. He lays under the tree and takes it all in. His favorite thing to do is watch the toy train go around and around the tree.
He loves decorations. Especially the big tacky ones I can’t stand, he knows where all the inflatables are in the neighborhood. He stares out the window and looks at all the beautiful lights on people’s houses. He loves his grandmother’s little nativity set and listing all the major players.
He loves snow. When we get that first heavy snow with the big flakes he and I go stand outside and watch them fall. We stare up and watch as each one of them hits our faces. Johnny will jump for joy and then become completely relaxed. I have to limit him so we don’t freeze but he would stand there forever. It is his heaven on earth.
He may not like us loud but he loves his family being together. You can see he loves everyone else’s excitement. He’ll come to me to point out who’s there whether or not he dare ever greet them. He feels the spirit of family and friends.
So this year I am loving seeing the Christmas season through his eyes. Slowing down to take in every detail. I am finding a new way to celebrate and a new way to create memories. I can’t make him enjoy it the way I did and do, but I can join him in enjoying it in the way he does.
This post originally appeared on Johnny’s Spirit. Photo via Jaime Ramos.
Jaime Ramos, is a mom from Colorado. She's married to Isaac and has two kids, Amelie and Jesse. Jesse, her Johnny, is on the Autism Spectrum. She went to school to be a filmmaker, but now spends her days mainly as a stay at home mom.
It’s time to get excited: Polar Bear Week is almost here! Running from Oct. 31 to Nov. 6, the special time coincides with the annual gathering of hundreds of polar bears on the shores of Hudson Bay where they wait for the sea ice to freeze so they can start hunting seals out on the frozen ocean.
Polar Bears International will also be doing a live, family-friendly concert to kick off Polar Bear Week for the first time. The concert will host a performance by Kishi Bashi (multi-instrumentalist, singer and songwriter) with bears in the background, and families can tune in this Wed., Oct. 27 at 1:30 PST / 4:30 EST (it’s free, just RSVP here).
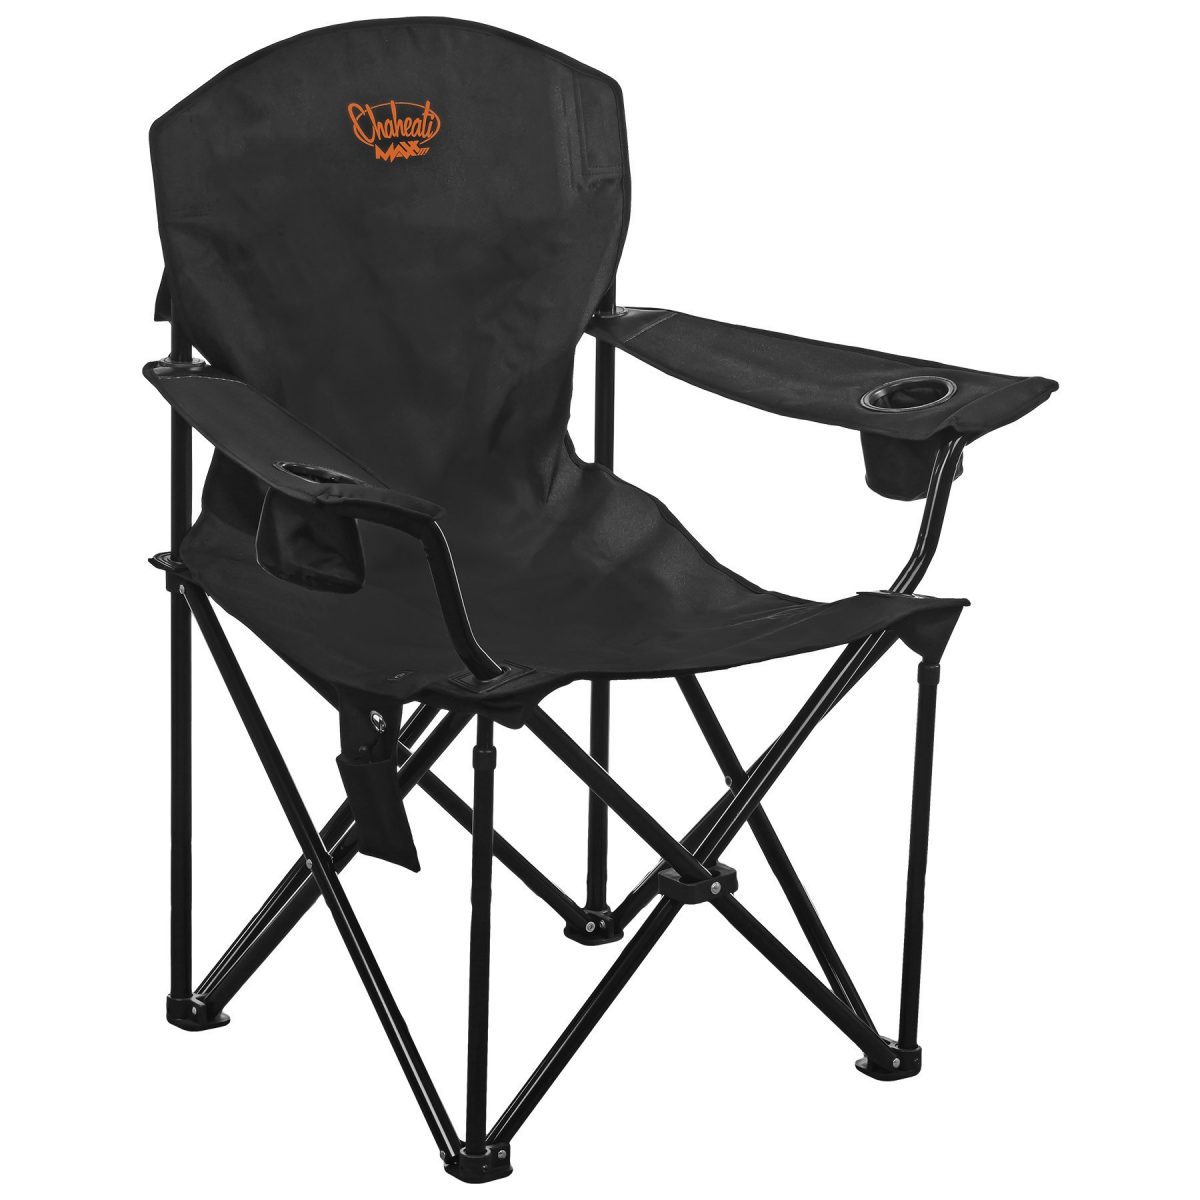
Sports parents can attest to the fact that even though they love cheering on their favorite club team, they don’t enjoy standing outside in the freezing cold. Those days of shivering on the sidelines may be over.
The Chaheati Maxx Heated Chair looks to be the answer to this problem! Starting at $110 (there are a few versions available), the chair has four temperature settings, rechargeable battery and convenient carrying case.
Whether you spend your weekends at your neighborhood’s soccer field or camping with your kid’s scout troop, this chair is key to keeping your rear end warm all fall.


