Did you know the Wright Brothers’ path to flight started with a toy?

Do you know when the first airplane was flown, and where? Known as the pioneers of modern flight, the Wright Brothers were inventors from a young age. In fact, their road to being the first to launch a controlled, engine-powered airplane began with a toy from their dad. Read on for 18 cool facts about the Wright Brothers you might not already know. 

learning interesting facts about the Wright Brothers
Library of Congress/Wikimedia Commons

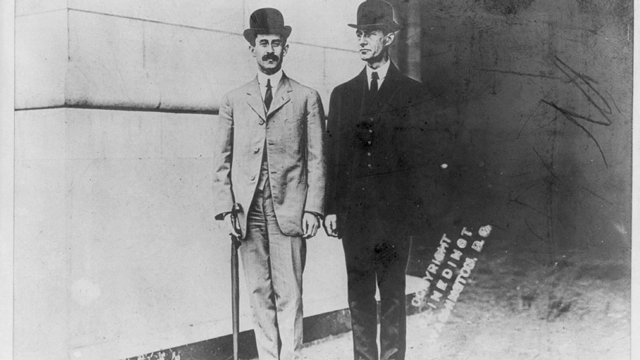
1. Yes, they were actually brothers. Wilbur Wright was born on April 16, 1867, and Orville Wright was born on August 19, 1871.

2. They decided who would fly first with a coin toss. Wilbur won the toss, but his first attempt failed. Orville went second and managed to fly for 12 seconds. 

3. Their mother, Sarah, was very mechanically inclined. Her own father was a carriage maker, and she spent a lot of time in his shop. She made her own appliances as well as toys for her children. The Wright brothers consulted their mother’s advice regularly as they designed their own machines.

4. In 1878, when Wilbur was 11 and Orville was 7, their father gave them a helicopter-like toy to share. It was based on an invention by Alphonse Pénaud and was made of paper, bamboo, and cork with a rubber band to twirl the motor. The brothers later said this toy was the beginning of an obsession with flying machines.

5. A little-known fact about the Wright Brothers was that neither brother ever married.

Wikimedia Commons

6. In 1889, Orville and Wilbur started a newspaper printing business. In 1892 they opened up a bicycle repair shop. They designed their own bicycle with custom features like an oil-retaining wheel hub and coaster brakes, things still used today in modern bikes. 

7. One of the newspapers they printed, The Tattler, was for the African-American community in Dayton, Ohio.

8. The Wright Brothers made life-sized copies of their beloved helicopter toy with the intention of making an aircraft that would hold them both.

9. They also made gliders of increasing size, which they tested over several years and flights. These glider planes put to test theories about wing-warping. By twisting the wings in different directions, they began to see how an airplane could be controlled.

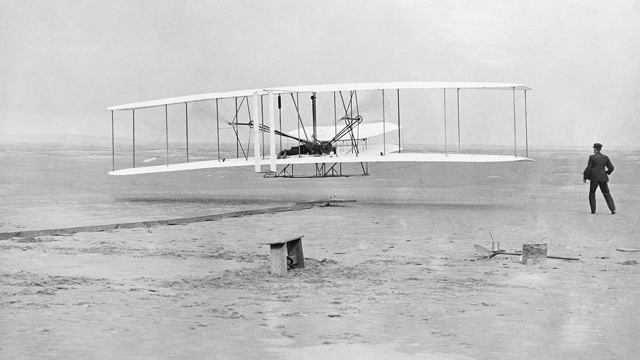
10. On Dec. 17, 1903, the brothers successfully launched the world’s first airplane. The Wright Flyer I. It was made of spruce and had propellers and a specially designed engine cast mainly from lightweight aluminum. It was the first controlled and powered flying machine that could fly with the weight of humans. From this design, the modern airplane was born.

ohn T. Daniels [Public domain], via Wikimedia Commons

11. The Wright Flyer I cost about $1000 to make.

12. They tossed a coin to see who would fly first, and Orville won. 

13. The Wright Brothers only flew together once (though both piloted the planes individually): on May 25, 1910, they took a six-minute flight piloted by Orville with Wilbur as his passenger.

14. On that same day in May, Orville took his 82-year-old father, Milton, on a seven-minute flight. They flew at a height of about 350 feet.

15. The Wright Brothers established the world's first test flight facilities (which is now known as Wright Patterson Air Force Base) near Dayton, Ohio. 

16. One fact about the Wright brothers is that neither brother attended college or even obtained a high school diploma.

17. When Neil Armstrong took his world-famous trip to the moon, he had pieces of fabric from the 1903 flyer in his spacesuit

18. Ohio and North Carolina often battle over which state is truly the "birthplace of aviation."

Related: 47 Quirky & Fun Science Facts for Kids


Hey Mamas (and of course Papas) out there!

Let’s talk about crafting with your kiddos.

I know, as parents, we always like non-screen activities for our kids. And one of the best ways to do that is to help them with simple arts and crafts!

However, you may be thinking, “UGH. What a mess it will make.” Or, “I’m sure they’ll fight with each other while sitting at the table together.” Or “I wonder if I have all the supplies I need?” And, “How can I help all of them at once?”

And if you are thinking these things, let me tell ya, I’m right there with you!

However, there are a few simple ways to make crafting with your kiddos a bit easier, and a more calm, enjoyable experience.

1. Plan the Craft Ahead of Time

So, if you’re like me, I’m not a big planner by any stretch of the imagination. I watch in envy as organized people get things done calmly and perfectly.

However, I do try to hone these organizational skills at least a little. One way you can do this with crafts for kids is to plan ahead. And by this, I mean, pick maybe 2 or 3 crafts to do with your kids for the week. Pinterest is a great place to research easy crafts.

Then look at the supply list which is usually provided in the instructions, and make sure you have all the materials you need. And if you don’t just add them to your supermarket list for when you go out next time. Or order from Amazon! Hey, even easier, head to your neighbor’s house and see if they have some supplies to share.

Just be sure to have all your supplies handy and ready to make your crafts for the week.

2. Set Up Your Craft Area

Next, it’s time to set up your craft area. You could choose a space on your countertop, dining room table or some people even have rooms dedicated for crafts.

Just clear off the area you are going to use, mine is usually the dining room table. Stuff somehow, every day, every minute, every hour, gets accumulated on there. So the first thing I do is to clear off the stuff that’s somehow piled up on there. Must be gremlins or something.

Then, once you have a clear surface to work on, set up a designated station for each of your kids. Place all the supplies out that they will be using, in the order that they will most likely be using them in. This is so they have their own station with supplies to use, and they’re not fighting over each other’s stuff. I tell mine if a dirty, stinky old sock was on the ground and one wanted it, then the other ones would insist on having it too! ;)

So set up those nice, neat craft stations—just don’t expect them to stay neat for long.

3. Enlist a Craft Helper

Ok, so it really is nice to have another adult on hand to help, especially if you have multiple, preschool-age children. So if grandma is coming to visit maybe plan the craft for that day.

Or, if it’s a more in-depth activity, maybe plan it on a weekend when your partner may be there to help out.

However, if there are no other adults available, I have my older children help a younger one. They may not be thrilled but it will be a good experience for them, teaches them about helping others, am I right?

Also sometimes if I explain the craft or experiment before starting, then the older kids can complete it independently. This allows me the freedom to help the younger ones. And don’t worry, once they get into a “craft routine” the process will go much more smoothly!

4. Expect a Mess

Ok, parents, so this is where we lower our expectations. Those beautifully staged photos of kids doing crafts, laughing merrily, clean and well-dressed, with their mom standing over them smiling happily and calmly helping? Well, let’s face it, that’s (usually) not the way it works.

Mine are usually completely covered with paint or glue, the table is also strewn with the same sorts of materials. So make sure if it’s a messy project, to put some newspaper or plastic table cloth down to protect your surface. Make sure they are dressed in old play clothes too.

An easy-to-clean rug or hardwood or tile floor under your workstation helps too because some of the craft and activity supplies are bound to sneak their way to the edge of the table and fall onto the floor.

Remember, it’s easy to be annoyed by messes but it really doesn’t take all that long to clean up. Don’t forget to get the kids involved in the clean-up process as well!

Crafting with Kids

Have I convinced you to check Pinterest for craft ideas, gather your kids up and get your crafting supplies out yet?

I certainly hope so!

And remember it’s ok to lose your mind sometimes…just as long as you find it again. ;)

But, in all seriousness, I hope these steps will help make the crafting and activity process a little easier for both you and your little ones

Have fun, and as I’m sure you’ve heard before…time goes by fast and they’re only little for such a short amount of time. So make the most of it!

RELATED STORIES:

Hey there! I'm a wife, mom, homebody and lover of all things home and family. I'm also the author of the blog Dappled Skies and Diys. Over on the blog I share simple DIY projects, kids' crafts and activities, and gardening tips along with a few mom-life stories for fun!

Looking to capture baby memories for your family? Try out these creative ways to preserve those special moments

Almost from the minute you learn you’re pregnant, you want to remember every detail. But babies grow quickly, and it can be easy to forget how things used to be. Here are six ways to capture what life with your child is like and preserve those special baby memories.

iStock

Photo Book
Creating a photo book ensures you can show your child what life was like when they were a baby, not just tell them! You are probably already taking tons of photos of your little one. Make it a point every year to print out some of those photos in an annual book. Tinybeans makes it easy to print a photo book using the photos you upload on the site. Choose a specific date, such as your child's birthday or Christmas, as the day you'll create your photo book so you don't miss a year. Find out more in our photo book FAQs.

Video Montage
Moving pictures also make great memory-keepers. You don't need to be a professional director to create a great family video. Use an app like 1SE to capture just one second a day to create a short video with a big punch at the end of baby's first year and beyond. The basic app is free, but the pro version allows you to capture longer snippets of video and add features like music. Otherwise, most phones contain basic video-editing software that will allow you to stitch together several short videos to create a great, moving memory capsule.

Related: 20 Baby Memory Books & Journals You’ll Love

baby memories
Harry N. Abrams

Letters
Even in the digital age, there is nothing quite like an old-fashioned handwritten letter. Notes from the heart in Mom and Dad's own handwriting will be treasured forever. A weekly letter to your child, even if it's short, will provide your child with warm memories of their childhood. Some parents choose to write letters to their child on their birthdays to highlight the previous year's major events and recap some of the day-to-day activities their child enjoyed that year. Some parents add letters on special occasions such as graduations. Collect your letters in a sturdy box and add photos or letters from siblings and other special people in your child's life. Or, wait until your child is 18 and collect the letters in a book. 

Journal
Keeping a journal gives the same ultra-personal feel as handwritten letters but with the convenience of having all of your notes to your child bound together in one place. Some parents-to-be even start journals to their baby when they are still expecting. We love the Baby journal from Write to Me. If you think you might get writer's block, try a guided journal like Stories for My Child: A Mother's Memory Journal, shown above. These types of journals provide prompts to guide you through what to write.

Related: Take Your Baby Memory Book to the Next Level

baby memories
istock

Keepsake Box
There are things you will probably want to keep to help tell your baby's story. It might be a hospital bracelet, the front page of the newspaper from the day your baby was born, the first time they met their grandparents, an early drawing or a lock from their first haircut. After you designate a box as the place to store these keepsakes, make the items come to life for you (and, in the future, for your child), by writing a small note to go with each one. Over time, you may add another box or two to your collection. This is a great way to keep all of these small but important things together to ensure they don't get lost. That way, when you walk down memory lane, you will have some tangible reminders of those long-ago days and the special stories to go with them.

Email
A simple way you can preserve memories of your baby is to create an email account for them. Send an email to your child to read in the future describing the events of that day or week. Include milestones but also details about your day-to-day life as a family, their friends, and how you feel about watching them grow. Some parents give their child the password to their email account when they turn 18, but there is no rule saying you need to wait that long. Be sure you log into your child's account at least once a month to keep it active! 

If you’re looking for a thoughtful story about the power of love and what it means to be a family—snag a copy of A Secret Shared, by Newberry Medal-winning author Patricia MacLachlan. Perfect for readers ages 8-12 (or those transitioning to chapter books), this middle-grade book centers around the theme of adoption, specifically how a family navigates living with a secret and bringing the truth to light.

The story centers around twins Nora and Ben, and their little sister Birdy. When their mother takes A DNA test for her work as a newspaper columnist, they learn a shocking secret—Birdy doesn’t share the same ancestry as their parents. The twins begin to wonder what their parents are hiding… and how they’ve gone about their lives never knowing.

This beautifully written book delves into why people keep secrets, who to go to for help and how to move forward with openness and honesty. The parents’ love for each other, as well as their children, paints a heartwarming picture of what makes a family, no matter the circumstances that brought you together.

A Secret Shared is on sale now!

If you’re a fan of Spiderman, LEGO, or a challenge in general, you’ll love the newest set from the beloved brick company! The LEGO Daily Bugle set just launched and it’s a complex construction of the classic comic’s newspaper building. It’s also the tallest LEGO Marvel set yet, with over two and a half feet tall, with a whopping 3,772 pieces.

LEGO spared no detail with the newest building, featuring three floors, the front street and back alley. You’ll find J. Jonah Jameson and Peter Parker’s offices, the newsroom with donuts and 25 minifigures. Look for Spiderman, the Green Goblin, Gwen Stacy, Venom, Mysterio and many more.

Mark John Stafford, the LEGO set designer, said “One of my favorite elements is the Green Goblin flying inside the building through the window. Being able to design a moment of frozen action like this in a LEGO set has always been a dream and I finally got to make it happen!”

Round up your partner or some adult friends to take on building this massive set. It’s available to LEGO VIP members online and in stores starting May 26 and to the general public on Jun 1 for $299.99.

—Sarah Shebek

Images courtesy of LEGO


RELATED STORIES

LEGO’s New Apartments Set Is a Must-Have for “Friends” Fans

You’ve walked by that newspaper stand hundreds of times, but did you know there’s a treasure box tucked under it? Millions of hidden “caches” (containers) worldwide are hiding, waiting for discovery. This worldwide outdoor treasure hunt is called Geocaching, and it’s an exciting—and totally addicting—family adventure. We’ve got a how-to guide that’ll tell you everything you need to know, so keep reading and get ready for fun!

What’s Geocaching?
Originally called “The GPS Stash Hunt” in 2000, founder Dave Ulmer was the first person to start a treasure hunt using GPS coordinates. His idea: “take some stuff, leave some stuff.” Two people on the internet found his container, and the geocaching game was born. Now, over 2 million caches are hidden around the world and over 6 million people are on the hunt to find them.

Girl-and-Mom-Geocaching

Geocaching is for everyone, everywhere
Geocaching is a whole family adventure that can be done anywhere from near your home to around the world you travel. Kids as young as toddlers can help find caches, but it’s absolutely perfect for kids 5+ who’ll also get educational value out of the finds, locations, and creating a log of where they have been.

How to get started:
1.  Download the free app from geocaching.com to get the GPS, log, and hints on cache locations. With the app open, you’ll quickly see the nearest caches to you. Follow the arrow until it gets within twenty feet, then put it away and start looking around. Upgrade the app (currently $9.99 for three months or $29.99 for a year) to unlock premium-only caches, advanced mapping, custom searches and more.

2.  When you’ve found your cache (yipee!), write your geocacher name—this is a cool handle you’ll use for every find you make — and the date on the log in the container. You can keep anything you like from the stash, as long as you replace it with something of equal or greater value. Log the find on your app (include a picture or any notes you’d like to put in for future finders), and put the box back where you found it.

3.   Once you get the feel of standard geocaching, try some of the more advanced treasure hunts. Multi-Caches tend to have higher quality treasures, and you have to go through a number of stops for clues to find them. Puzzle Caches also lead you through multiple stops, but you have to solve a puzzle to figure out where to go next.

Want to hide your own caches? You totally can! Just follow the rules of setting one up.

geocaching-app-container-rock

Define “treasure”—what’s inside?
“Treasure” is a subjective word, isn’t it? Especially to toddlers who collect things like dirty shoe strings and empty snail shells. Caches are categorized by size—you could be looking for anything from a large shoebox to a small fake rock with a secret compartment. Inside you’ll find things like coupons, stickers, crayons, lotto tickets, and shell necklaces—the mystery is part of the fun! But the real “treasure”, according to long-time geocacher Larry Hazeltine of Colorado Springs (who has found over 3,700 treasures with his four kids!), isn’t the prize itself. “It’s all the cool places you’ll see while hunting—parks, historic buildings, amazing views—the geocaches are just what bring you there.”

geocaching-girl-bridge-mom

Tips and tricks before you go:
• For your first few times out, search for “regular” size caches, as they’re easier to spot than smaller ones (you can see the size in the cache description).

• Bring a pen or pencil! Some caches don’t have anything to write your name on the log with.

• The best cache trades are unique and personalized to you or the place it’s hidden.

• If you’re stuck on a cache, email the cache owner for guidance or help.

For more information and to get started, visit geocaching.com

— Shannon Guyton

All images courtesy of  geocaching.com,Featured image: Tim Gouw via Unsplash


RELATED STORIES:

Why You’ll Dig Geocaching (& 14 Stunning Destinations to Get Your Start)

Free & Easy At-Home Scavenger Hunt Printables for Kids

While the world has been social distancing, family units have been getting a healthy dose of together time. Siblings especially have spent an extended amount of time together without friends or activities. Some days have probably been amazing. Others may look more like a WWE match. Hours upon hours of sharing and interacting can begin to wear any friendship thin.

Either way, it is normal for siblings to fight. Siblings rarely share similar personalities despite being raised in the same family. Differing ideas, preferences, goals, wants, needs, temperaments, and personality traits are going to create friction. Maybe even cause a few little fists to fly. Rest assured, there are things you can do to help your kids get along better, and also to change any behaviors that might trigger a tussle.

When your kids start to royal rumble, try these 6 strategies:

1. Let them work it out. The first thing to do if your kids are arguing is to wait and see if they can work it out themselves. Depending on the age of your children, sometimes they can come to a conclusion on their own. Do this only if the argument is verbal, never if it’s physical. If kids start physically fighting, stop it immediately and help them to calm their bodies.

2. Separate and calm. If you have a little one who immediately lashes out physically by pushing, hitting, or kicking, offer them something else to make contact with when they are mad. It’s never okay to hit, but you can punch a pillow, rip up a newspaper, or kick a bean bag chair. Then take some deep breaths and calm down.

3. Let them tell their story. Giving kids a chance to tell their side in an argument can be empowering. Even though to us it’s ridiculous to fight over the same stinking orange LEGO when a zillion other Legos are sitting right there, it’s a big deal to them. Feeling heard is essential. Often when my kids get a chance to tell their story, they can even catch a glimpse of how their actions added to the problem.

4. Verbalize feelings. Kids often react to emotions quickly and don’t always know what they are feeling. Saying the feelings out loud for them helps to ground them at the moment, and help identify what is going on internally. “Jimmy, it sounds like you are really mad that Lucy took that LEGO when you wanted to use it.” And “Lucy, you are feeling jealous of his LEGO house, and now your feelings are hurt because he said yours is dumb.” So often, when my kids hear me spelling it all out with their feelings, instead of telling them what to do, they feel validated and can move on. Sometimes they even apologize to each other without being prompted.

5. Pay attention to the need, not the negative behavior. When kids repeat the same frustrating behaviors that cause fights and friction, it is likely because they are trying to meet a need. For example, if a child is picking on their younger sibling to bug them, they are probably bored, jealous, or feel hurt by that child and want to pay them back. When we see negative behavior, we instantly want to give a consequence to make it stop. But when we do that, the child’s need fails to be met. The conflict will likely return. It is much better to ignore the behavior and pay attention to the need. When kids are fighting, say something like, “I wonder if you’re doing that because you’re mad/sad/worried/hurt?” This identification gives the feelings attention, not the negative behavior. Offer positive ways for the child to get attention, such as asking the sibling to play, for a hug or time together.

6. Shake some love. I remember a video I saw a few years ago where a mom talked about her “love shaker.” It was a can she had put rice in and taped up. Anytime her kids seemed like they were having a hard time, she would shake it over their heads and say she was shaking love all over them. I thought it was the sweetest idea, and while I still haven’t made a can of my own, I do something similar when my kids are bickering. Without teasing them or minimizing their problem, I start hugging them and telling them how amazing they are. I gush about how special and kind and thoughtful and gorgeous and funny they are. Sometimes I even use a silly accent. They giggle and roll their eyes and forget what they were fighting about in the first place. Sometimes kids are feeling bad about themselves and don’t know what to do with those big feelings, so they take it out on siblings. Shaking love on them and reminding each kid how awesome they are helps them feel good, like they want to share the love too.

Arguments between siblings are incredible learning lessons for how to interact and argue in healthy, appropriate ways within various relationships throughout their entire lives. Siblings fight, but they can learn to work it out, makeup, and get their needs met. The important thing is to stay calm and help each child verbalize feelings without throwing a fit or a fist. Godspeed, my friend. 


Krissy Dieruf is a licensed marriage and family therapist. She lives in Minnesota with her husband and three children, loves to sing and dance around the house and has a soft spot for rebels and crazy hair. 

Your baby’s birth certificate. Medical records. The family’s passports. Social Security Cards. Your will or trust. Family photos and mementos. Do you know where to find them? It’s always a good idea to keep your important documents safely stored, but even more so after you have a baby. Between mombrain and lack of sleep, you may struggle more than usual to find things when you need them. And that’s where these document bags come in super handy.

If you’ve ever asked yourself what you’d grab in the event of a fire or flood at your home, here’s your answer: Grab your Secure My Legacy bag. These fire-resistant and water-resistant document bags can hold about 300 documents each and are compact and easy to take with you in an emergency. You already have enough new-mom anxiety. Give yourself the peace of mind that you have all of your documents organized and easy to find when you need them.

What It Is

Made from silicone-coated fiberglass and secured with both a zipper and VELCRO flap, each bag is large enough (11 inches by 15 inches) to hold all sorts of important documents. The company suggests storing things like a contact list, passports, financial documents, insurance papers, medical records, legal documents and family documents.

Have a lot to keep track of? Each bag is imprinted with a specific term (including Emergency, Medical, Legal, Business, Real Estate) so you can get a few and store items separately.

Why You Need One

When faced with an emergency, you don’t want to have to search for your important documents or waste time finding them them. As a new parent, you’ll want to focus on your baby, not trying to remember where you put important paperwork. If you keep all of your documents organized in these document bags, you’ll find what you need in a snap. Plus, you’ll have kept them protected from fire, water and smoke damage. And that means you’ll be able to get your life back on track more quickly.

Keep separate bags for the family’s legal papers, real estate documents, medical records and wills. Cards from Grandma, photos and newspaper clippings of dearly departed ancestors and birth mementos are also worth tucking into a bag to keep them as safe as possible.

We love the bundle that comes with one bag and a notebook for logging important information about your contacts, medications, finances and more family and household information. The notebook is key for parents who use babysitters regularly or have caregivers in the home. It ensures they’ll always have access to important information if they need it.

Available at securemylegacy.com and amazon.com, $17.99 for 1 bag plus a notebook.

—Eva Ingvarson Cerise

RELATED STORIES:

New Health & Safety Innovations for Babies & Toddlers

Be Sun Smart: 10 Sun Safety Tips to Follow with Babies & Toddlers

Money-Saving Mom Hacks: Creative Uses for Old Baby Items