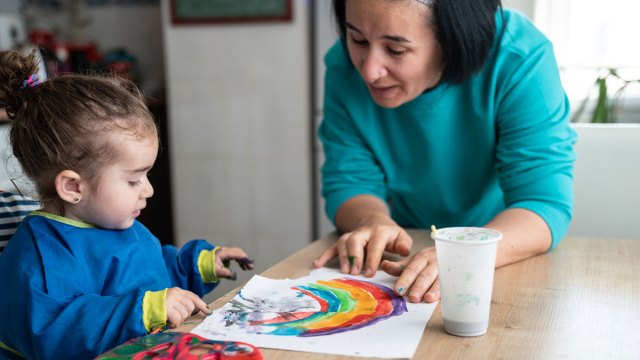
Get crafty with your child this Mother’s Day. While your little one may not be able to create a masterwork of art just yet, that doesn’t mean they can’t add a special touch to the perfect gift for you or Grandma this Mother’s Day. Whether you and your baby make a mess or not, you’ll be making memories with these Mother’s Day infant crafts.

Looking for other things to do for Mother’s Day with your baby or toddler? Check out our favorite ways to celebrate your first Mother’s Day with a baby, easy Mother’s Day cards kids can make at home, and easy toddler crafts.

Smile Blossoms

Paging Supermom

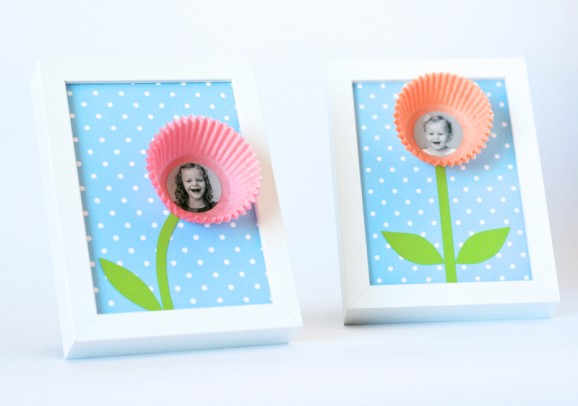
A cupcake liner adds a 3D effect to these framed smile blossoms, and all your little one needs to add is the beautiful smile for the photo. Visit the Paging Supermom blog for the tutorial and a free printable of the blue polka-dotted background.

Bouquet of Love

Toddler Approved

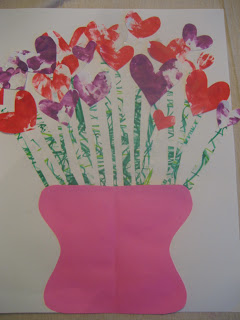
Heart-shaped, finger-painted flower petals are the centerpiece of this bouquet of love from Toddler Approved. Once the finger painting is done, test out your mini artist’s scribbling skills for the stems and then cut and paste to create a beautiful arrangement.

Papier-Mâché Bowls

Happy Hooligans

An admittedly messy craft for the slightly older baby or toddler, these papier-mâché bowls from the Happy Hooligans blog are sure to be a hit on Mother’s Day. They can be given on their own, or you can place an additional gift inside. They are as useful as they are one of a kind!

Handprint Apron

Little Page Turners

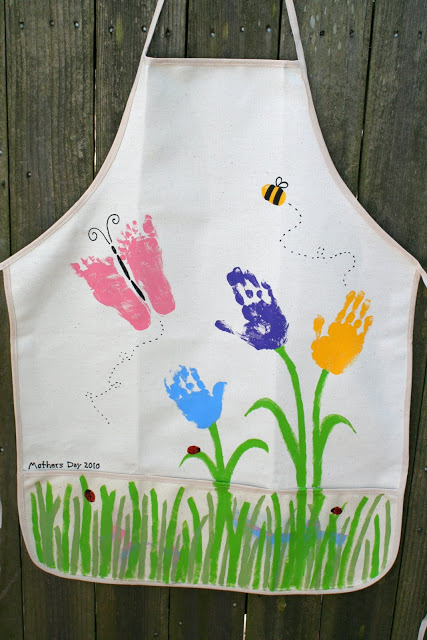
Craft a garden of love with baby’s hand and footprints on an adorable handprint apron from the Little Page Turners blog. Add in a yellow thumb and a few red fingertips for the bee and ladybugs. It's the perfect gift for grandmas who like to cook with their grandkids.

Rainbow Heart Suncatchers

Fireflies Mud Pies

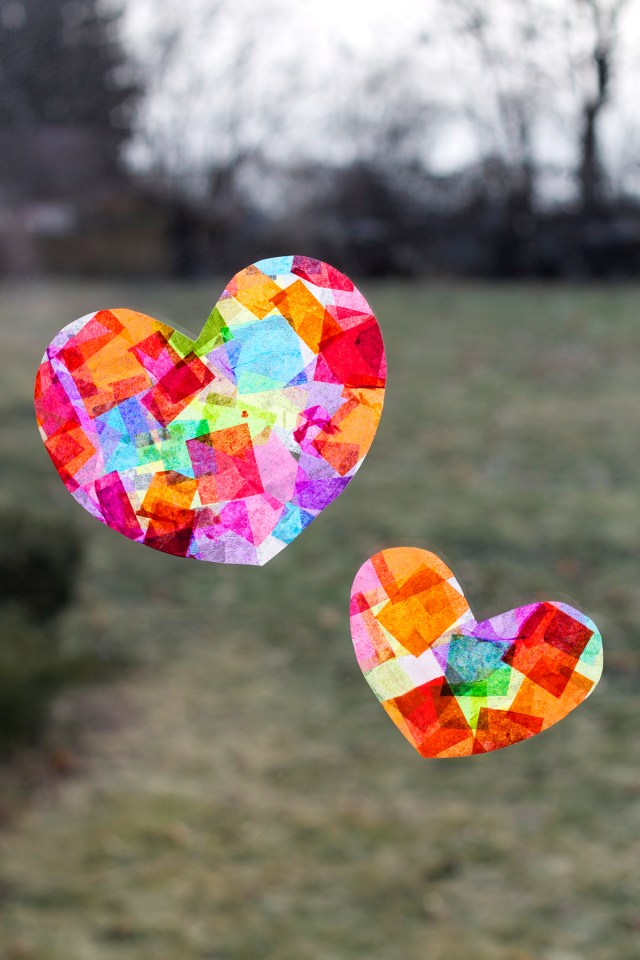
Catch some rays with these rainbow heart suncatchers from Fireflies + Mud Pies. Either cut the tissue paper or have baby rip it up before letting them go to town on gluing the pieces in place. 

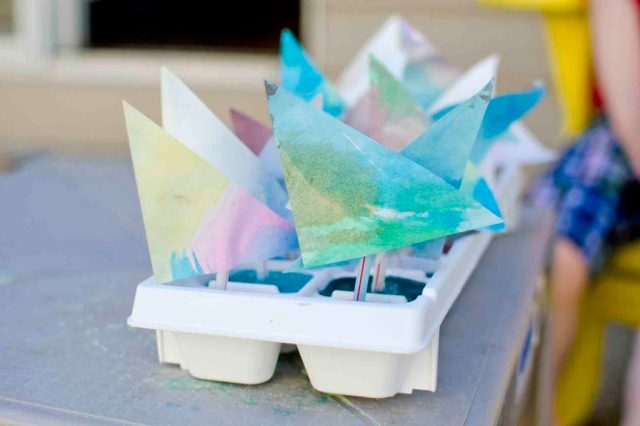
Coffee Filter Flowers

Hands On As We Grow

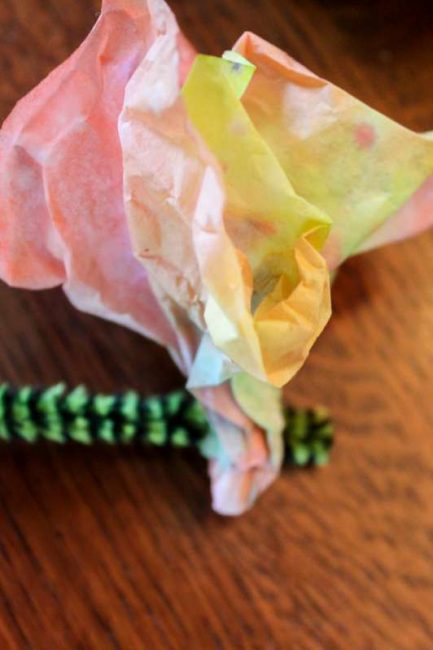
An ice-cube tray of watercolors, coffee filters and pipe cleaners are all you need to make beautiful colored coffee-filter flowers that will never wilt. The Hands On As We Grow blog has instructions on painting or dipping (depending on baby’s dexterity) the filters for a gorgeous Mother’s Day bouquet.

Handmade Mother's Day Cards

The Mombot

This clever idea for making Mother's Day cards combines hand-scribbled art with photos of the artist in action: Take photos of your child while they're creating their card masterpiece and attach the photos to the front of the card. If your child isn't ready to manage a paintbrush or marker, give them finger paints. You'll find instructions for the card (and a DIY envelope to put it in) at The Mombot.

Handprint Memory Box

Mama.Papa.Bubba

Let your little one lend a hand to create this custom handprint memory box from Mama.Papa.Bubba. Draw a heart around the handprint to emphasize the shape, and feel your mom heart melt every time you add a memento to it. If you're giving this as a gift, add a little treat inside the box for an extra surprise.

Flower Family Picture

Domestic Mommyhood

This flower family picture from Domestic Mommyhood showcases cute faces surrounded by real flower petals for a natural touch. Tiny fingerprints make for perfect leaves on the stems. This craft is also great for babies with older siblings and is sure to brighten mom's day.

Mason Jar Vase

Christina's Adventures

Every mom loves flowers on Mother's Day, but showing them off in this mason jar vase makes them extra special. This project can be done almost for free using items you probably already have around your house. It’s fast, easy and yet another idea that lets your mini-me stick their hand in paint, which they'll love. Get the how-to at Christina's Adventures.

Salt Dough Footprint Hearts

roamingrosie on Hubpages

If you have salt, flour, water, an oven and some paint, you can make these adorable footprint hearts. If your baby can hold and use a paintbrush, they can help with the painting, or you can guide their hand as they paint. The result is a memorable decoration that can be used indoors or out. Visit HubPages for the instructions.

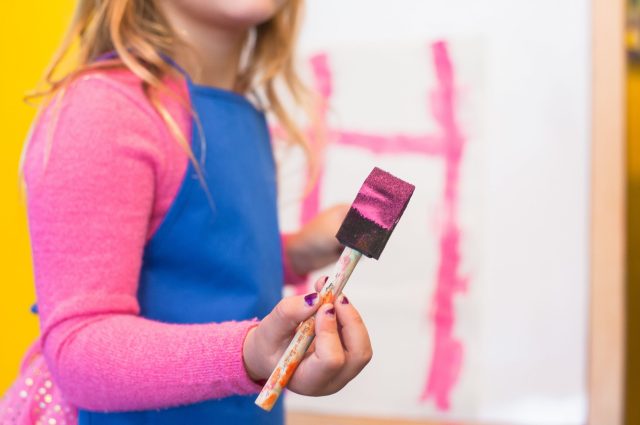
Child-Painted Canvas

The Desperate Craftwives

This incredibly simple project turns a sloppy mess into a piece of fine art. Grab a piece of canvas, a few jars of finger paint, and some shape stickers or die-cut vinyl lettering and let your child work their artistic magic. Your little one will get to play and learn about texture, color mixing and creativity, while the letters elevate their design into something pretty special. See more at The Desperate Craftwives.

Sandy Fingerprint Candle Holders

Sugar Aunts

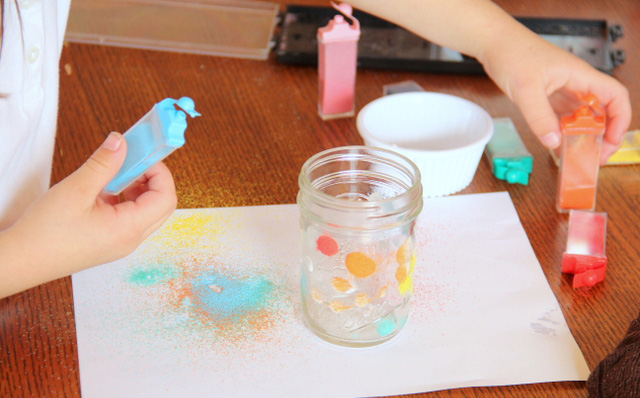
Decorate a candleholder with the help of those tiny little piggies. All you need are a few dabs of glue and some rainbow craft sand to cover a mason jar with adorable finger or toe prints. Check out some of the photos of the finished, illuminated project at Sugar Aunts.

Thumbprint Charm Necklaces

That's What Che Said

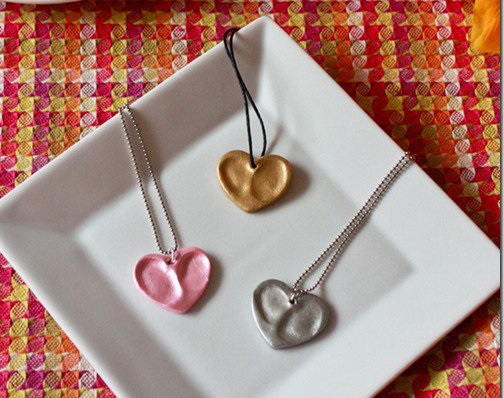
This project requires a little extra work on Mom’s (or Dad's) part, but the result is a unique heart-shaped pendant featuring your babe’s fingerprints. Find the full craft idea, along with links to all the materials you'll need (including oven-bake clay and cookie cutters), at That's What Che Said.

Sandy Handprints

Crafting a Green World

Another spin on the handprint art concept, this craft creates a handprint out of sand. The reminder of just how tiny baby's hands are make it a memorable Mother's Day gift. Steps to make one yourself can be found at Crafting a Green World.


—with additional reporting by Katie L. Carroll

Make sure to capture all the messy fun—and share it with your family and friends near and far—with the Tinybeans app. The secure platform puts parents in total control of who sees and interacts with photos and videos of their kids.


With April right around the corner, we’ll be seeing warmer temps soon. And with warmer weather comes wildflowers! From the beloved Bluebonnet to the Indian Paintbrush and the Texas Lantana, there are dozens of wildflowers that bring color to our prairies and open spaces. We made a list of where you can find and enjoy wildflowers this year, and all these spots are within a two-hour drive, so keep reading and go!

Ennis, TX

One of the best spots to see bluebonnets in North Texas is in Ennis. Just over an hour away from the metroplex, there are over 40 miles of mapped driving Bluebonnet Trails, which you can explore from Apr. 1 - Apr. 31, 2021. The bluebonnets are usually in peak bloom the third week of April, which is when Ennis holds its annual Bluebonnet Trails Festival (Apr. 8-10. 2002). Be sure the check the website for updates. 

Online: bluebonnettrail.org

State Highways 11, 49 and 1455

If you head northeast out of Dallas, in 135 miles you’ll hit the towns of Avinger, Hughes Springs and Linden. This is where, along state highways 11, 49 and 155, you’ll be treated to the bright hues of red, yellow and oranges of Indian paintbrushes, red buckeye and coreopsis.

Online: facebook.com/events/wildflower-trails-of-texas-linden

Fort Worth Nature Center & Refuge

One of the best nature preserves in DFW, there are over 20 miles of trails in the 3000+-acre open space, making it one of the biggest city-owned nature centers in the country.  It's easy to spend a day spotting wildflowers on the beautifully maintained trails. You must register for admission on the weekends and holidays

9601 Fossil Ridge Rd,
Fort Worth, TX 76135 

Online: fwnaturecenter.org


Clymer Meadow Preserve

This 1,400-acre meadow is protected and maintained by The Nature Conservancy and contains some of the largest sections of the Blackland Prairie, the most endangered ecosystem in North America. The Nature Conservancy usually offers wildflower tours with a guide in the spring, but COVID may prevent that this year. Check the calendar of events to check

4318 FM1562 
Celeste, TX 75423

Online: nature.org/clymer-meadow-preserve

George W. Bush Presidential Library and Museum

The 43rd president's library is based in Dallas, and it boasts a 15-acre urban park. The Texas Native Park has a one-mile trail that takes visitors through native Texas habitats, including the Blackland Prarie and the Cross Timbers Forest. You’ll see wildflowers among the native grasses, and of course, bluebonnets in the spring. 

2943 SMU Blvd. 
Dallas, TX 75205
Online: georgewbushlibrary.smu.edu


Cedar Ridge Preserve  

One of the best places for real hiking in DFW (imagine that on the prairie!), there is a nice mix of flat trails and elevated trails that come with stunning views. One of the best trails for spotting wildflowers is the Cedar Brake Trail via the Cattail Pond Trail. 

7171 Mountain Creek Pkwy.
Dallas, TX 75249

Online: audubondallas.org/cedar-ridge-preserve

Arbor Hills Nature Preserve

There are both paved and unpaved trails in this 200-acre nature preserve, and a lot of it wanders through protected Blackland prairie habitat. Be sure to get there early, as this is a very popular place for families, dog owners and even horseback riders. We recommend bringing a map to navigate the trailheads. 

6701 W. Parker Rd. Plano, TX 75092

Onlineplano.gov/arborhillsnaturepreserve


RELATED STORIES: 

10 Dallas Photographers to Book Now

12 Nature Preserves to Explore in DFW (Before It Gets Too Hot!)

The 10 Best Things to Do in Dallas with Kids


Photo: Meghan Fitzgerald via Tinkergarten

Play is important for all kids, especially when it’s child-led, meaning, the actions, discoveries and inventions feel like a child’s own.

There’s even a whole range of types of play, including free, independent play where kids make up the rules and play guided by adults. 

The good news? We don’t have to entertain our children all the time. The quality of the time we spend as play partners matters far more than the quantity.

Often, getting kids to play independently is easier said than done. Enter: Play projects.

A play project revolves around a real-world theme: During the summer 2021 at Tinkergarten, for example, we transformed our homes and outdoor classrooms into “campsites” as part of our camping play project. Leaders helped families work together to add objects, adapt the setting and invent new ways to play in response to our “camping” theme.

This concept of project play is not new. “The Project Approach” is an established way of teaching in which teachers guide students through in-depth studies of real-world topics. Children’s museums also offer immersive experiences that invite pretend play around themes like the supermarket or the hospital. 

It is easy to set up play projects in your own space. To get started, think of play projects in two phases: Setting up the environment and negotiating the play.

Phase 1: Setting Up the Project

The play environment is both the physical setting along with the objects, materials, themes and ideas. You don’t need to create a museum-level experience. In fact, kids learn much more when you start simple and co-create the experience bit by bit, over time.

During a previous summer’s Tinkergarten theme, kids immersed themselves in all things outer space for our Space Camp week. Outer space is captivating for kids and adults alike, making it a perfect play project to stoke the imagination and get kids hooked on science. 

Here’s how to kick off an outer space play project at home: 

  • Gather up a few household objects
  • Head outdoors
  • Look up at the sky and wonder aloud, “What do you think it would be like to go to outer space? Do you think we could use these materials to pretend that we are going on a trip to the moon/another planet? Wonder together how you would get there. What would you see and do when you arrived?”
  • If kids hear this invitation and run with it, let the play roll and join in alongside, following their lead. If kids lull or shift interest, all is not lost—if the project is “sticky” they’ll come back to it.

Phase 2: Negotiating the Play

Once a project takes hold, collaborate with kids to play and develop the environment over time.

Educators in the Project Approach think of this as “negotiating the curriculum.” It’s like a game of catch. We toss out a new material, idea or question. Then, we let kids decide how they want to respond. As we play, we can volley back and forth, always following their lead. This give-and-take approach gives us a supportive way to enrich play but also keeps kids in charge and helps us and our kids develop responsive relationships.

What does negotiating the play look like?

Here’s how the back-and-forth could work for outer space project play:

  • Wonder & Make: Talk to kids about what else you could make for your trip to outer space. Then, work together to use open-ended objects (nature objects, recyclables, cloth, etc.) to create new props. Cardboard boxes can become rocketships. Nature objects and small objects can become buttons and dials on their space vehicle. Rocks and mud can be arranged to create a landing spot on the moon. 
  • Read and learn about space: Visit the library and wonder if there are books about outer space to read. One of our favorites is My Rainy Day Rocketship by Markette Sheppard. The Mars Perseverance Rover Interactive site has photos and video taken on Mars and from the 2020 mission. 
  • Discover the night sky: Take kids on a nighttime walk to behold the moon and stars. If a nighttime walk interferes with your child’s bedtime, look at constellations on apps like SkyViewStar Tracker & Star Walk
  • Plant open-ended material: Place a few simple objects, like a magnifying glass, paintbrush or bucket into the play area and see what kids do with it—maybe they become tools for excavating and collecting space rocks and other interesting specimens. 

As the project persists, kids will iterate and invent with and without you. When young kids repeat play within the same theme, important neural connections are strengthened

No matter how you begin, remember, it should start simple and grow naturally. The process of wondering, inventing, pretending drives the learning. Sharing in this process together connects us to our kids and helps kids learn how to create their own play projects, making their independent play forever more rich and engaging.

For Your First Project:

  1. Pick a Project: What do your kids find most exciting or interesting? Dinosaurs? Art? Cats? Superheroes? Or try out one of the themes below.
  2. Set it up: What environment would inspire play that revolves around that theme? Is there a home or other space in which this play could unfold? How could you mark off a corner of the yard, park or room that could be that space? What first few things do you need to get started?
  3. Add a few props: What ordinary objects could become props in the play? Sticks, dirt, etc.? Having objects ready can help you to wonder with kids about what you’d need to play.
  4. Wonder: Talk together about what you could wear, build or make. 
  5. Play: Start to become the characters or people at the center of your project. So much pretending (and empathy) can come from this. Unicorns have horns, need to eat, have a safe place to sleep.
  6. Read and get more ideas: Read a book about unicorns, and you have gobs of material to bring into your project.
  7. Let it roll: Keep the project up and running, even if your child’s interest ebbs and flows. Then, when it’s clear they’ve moved on, try a new project.

Sample play project topics: Cooking, cats or dogs, bird’s nest, forest, Imaginary creatures, pirate ship, treasure hunt, restaurant, farming, construction and art studio.

RELATED STORIES:
The Simple Truth to Happy & Healthy Kids
Here’s How to Get Your Kids to Play on Their Own (for Long Stretches!)
How a Lobster Can Teach Your Kids Social Distancing


This post originally appeared on tinkergarten.com.

After 18 years as an educator, curriculum developer and school leader, Meghan has her dream gig—an entrepreneur/educator/mom who helps families everywhere, including hers, learn outside. Today, Meghan serves as co-founder and Chief Learning Officer of Tinkergarten, the national leader in outdoor play-based learning. 

Making mud pies, digging in the dirt and searching for roly-polies: opportunities for messy playtime in the dirt are endless. Playing in the dirt and mud isn’t just fun outdoor exploration for toddlers. Digging in the dirt gives developing immune systems a boost and nurtures creativity, all while making muddy, messy memories. From making mud bricks to edible “dirt,” you can give your little ones loads of joy with these muddy play ideas for toddlers. And yes, you should plan on your child needing a bath afterwards.

Mud Mama WV

Mud Kitchen
Making mud pies is a classic kid favorite for a reason: It’s good, dirty fun. Mud kitchens bring indoor play kitchens outside for messier creative play. Kids can start mixing up feasts in a mud kitchen when they’re toddlers and continue to host mud-pie tea parties and make dandelion soup for stuffed animal friends for years to come. Like a play kitchen, a mud kitchen can be fancy, or it can be very basic with nothing more than a few bowls and cups. You can order Mud Mama's step-by-step building plan, pictured above after being fully built, for $10 from Etsy or order one that's pre-built. You can also check thrift stores for plastic kitchen sets that can handle being outside in the elements. If you’d like a more temporary mud kitchen set-up, rinse out plastic yogurt containers or butter tubs, throw in a few sturdy spoons, and add a little water and a lot of dirt and voila! Your chef’s mud pie bakery is ready for business!

Mud Bricks
Making mud bricks is easy! Just pack dirt inside egg crates or ice cube trays and leave them in the sun. Experiment with the ratio of water to dirt: a damp but not dripping mix compacts well and creates nice solid bricks for building towers or fairy houses. In a few hours, you’ll have mud bricks that your little one can use to stack and build.

Entertain Your Toddler

Edible “Dirt”
If your toddler puts everything in his/her mouth, there’s a safe way for muddy sensory play. Whip up a batch of this taste-safe mud substitute from Entertain Your Toddler; the website has the direction to make your own. This edible dirt has a secret ingredient you may already have in your house! Mix up the fake mud, put it in a bowl with plastic measuring cups and spoons or plastic toys, and get ready for messy fun.

Clean-Up
Plastic cars, dirt and soapy water. Combine all three for instant fun. First, let your little one get their plastic cars dirty on a muddy race track or dirt-clod-filled construction site. Then, fill a plastic tub with soapy water and you can both scrub those cars clean. If dinosaurs or farm animals are more your kid's speed, swap this in for this mud and bath party.

Hello Wonderful

Garden Grow
Let little ones dig in the dirt and nurture plants with their own custom planter. You can set aside a bare patch of dirt for your little one to dig in and explore, or turn old dump trucks into garden beds a la Hello Wonderful. Fast-growing seeds like cosmos or leafy greens are a fun choice for little ones exploring in the garden, because they sprout so quickly that kids can see the impact of water and sunshine. Add a watering can and a set of sturdy plastic shovels to fuel muddy garden play, whether your little one has a fancy flower bed or just a patch of dandelions to water.

Twin Mom Refreshed

Mud Painting
Feeling ooey gooey mud between your fingers is a fascinating sensory experience for little ones. Babies can try to finger-paint with mud (or chocolate pudding if you want an edible option). Or, collect mud in a bowl and add a few pint-sized sticks and let older toddlers create masterpieces on white paper the way Twin Mom Refreshed suggests. Mud painting is an easy-to-put-together activity that combines nature exploration with fine motor skill development. Holding a tool, like a paintbrush or a stick used as a paintbrush, builds the muscles and coordination little ones will need in a few years when they learn to write.

Mud Sculptures
Think of mud as nature's playdough. Kids can mold it into all kinds of shapes, and even add twigs or leaves to create different textures. Sprinkle in a little biodegradable glitter to make the mixing and molding even more interesting.

Amazon

Bug Hunt
Digging in the dirt for roly-polies is a backyard adventure that’s just right for toddlers. With a bug home like this one, which includes a magnifying glass in the top, your new bug friends will stay safe from toddlers’ grabby hands, and budding young scientists can get a better look at the creatures living in their own backyards. You can also encourage your little ones to make bug habitats of their own by molding mud houses or piling up sticks.

Available on amazon.com, $7.95.

June Admiraal via Unsplash

Mud Puddle
This kind of muddy play is one of the easiest since nature does all the prep work for you. If you can't wait, get the hose to make your own puddles so you and your child can splash around like Peppa Pig. Stomp in the mud, stir it with a stick, float a piece of bark inside itthere’s no end to the fun that toddlers can have with mud puddles. In warm weather, lose the boots and tiptoe through puddles with bare feet. Feeling squishy mud between their toes fascinates many toddlers. Then check out the classic book Mud Puddle for a fun read and follow up your adventures with a bubble bath to get squeaky clean.


—Oz Spies

RELATED STORIES:

20 Things to Do with Young Kids Before Summer Ends

36 Indoor Activities for When It’s Too Hot Outside

Outdoor Activities for Babies & Toddlers You Can Do Right Outside Your Home

Whether your outside space is a balcony, sidewalk or grassy backyard, here are fun ideas for ways for kids to play when you can’t have playdates but need a break from being indoors. Go way beyond bubbles and sidewalk chalk with these easy DIY ideas for outdoor activitiessome for sitters, some for crawlers, and some for walkers.

Dragon Pan via Unsplash

1. Rainbow Scavenger Hunt
Take your child around your yard or neighborhood and look for items that are the color of the rainbow. From a red stop sign to a yellow leaf to a purple flower, spotting items and learning color names can be a fun activity for you both. With younger babies, carry them to each item and let them explore its color and texture before moving on.

2. Treasure Hunt
Fill some bags, boxes or those plastic Easter eggs with kid-friendly treasures (like stickers or fuzzy pom poms) and then hide them in plain sight in your yard for your child to find. This also works great indoors. For crawlers, spread them out on a picnic blanket and let your child discover each one. 

Busy Toddler

3. The Coolest Play Boats
Ice cubes are a great way to stay cool on a hot summer day. And the colorful ice boats at Busy Toddler use food coloring to keep kids delighted and spark their imagination. These boats require some parent prep ahead of time, which you can do with your little ones watching or helping. Then let loose the boots in an outdoor water table, bucket or inflatable backyard pool. Kids can move them across the water and watch the colored cubes melt.

4. Mess-Free Painting
Giving a baby a paintbrush can mean a big, old messunless you let them paint with water. On a sunny day, hand your child a paintbrush and a small cup of water and let them paint the steps, driveway or a fence. You'll be surprised at how much kids love this simple task.

Fantastic Fun and Learning

5. Shaving Cream = Sensory Fun
We love this idea from Fantastic Fun and Learning. Put the shaving cream into a squirt bottle and mix in some food coloring, then let kids squeeze it onto contact paper and explore with their fingers. This activity is great for little ones learning to sit and crawlers who won’t go slip-sliding anywhere too fast. Just keep a close eye on them so they don’t try to taste the foam or smear it on their clothes.

6. The Cutest Nature Jam
When little ones bang on pots and pans indoors, it can be headache-inducing. So take all that noise and energy outside. Donna Bozzo, author of What the Fun?! 427 Simple Ways To Have Fantastic Family Fun Play, suggests pulling loud kitchen tools and utensils outdoors and letting your baby make music. Attach the makeshift instruments to a fence, tree or other stationary object so they don't disappear. Or, lay them down in the grass for a different kind of sound.

A Crafty Living

7. Guess Which Color
This splatter-paint art project from A Crafty Living is worth the mess it makes. Squirt some washable paint in large blobs on a big sheet of paper and then cover each with a cotton round (the paint blob should be slightly smaller than the cotton round). Strip your babe down to their diaper and help them smack each white round with their feet or a rubber mallet to discover which bold color will burst out. When you’re done, you’re left with a museum-worthy piece of modern art…and a happy baby in need of a bath.

5. Backyard Sensory Barn
Babies love to engage their senses, and this sandbox sensory play activity by Click Pray Love allows your mini-me to have all kinds of tactile adventures. Fill a , plastic container, plastic kiddie pool or other large, low container with sand or rice and some barn- or farm-themed toys. Watch as your child digs through the sand to discover hidden treasures. Switch out the farm theme for a dinosaur dig, car and truck rally, or seashells and sand dollars, whatever you have on hand and whatever your kid loves.

Whitney C. Harris

9. Mix Natural Sights and Sounds
All you need is a clear water bottle and a curious baby to make these DIY nature bottles from life coach and mother of four Leighann Marquiss. Help your child collect objects from your yard or a local park and place them in the bottle. Be on the lookout for dirt, grass, flowers, sand, stones, sticks, acorns and other small items that fit in the bottle. (As always, keep a close watch so baby doesn’t put their finds in their mouth.) Then seal the cap on the bottle and let your child turn and shake it to their heart’s content.

10. Nature Storytime
Take your favorite book outdoors to really bring the story to life. Choose a book with nature themes and point out the sun, wind, leaves or whatever you see when you read about it.

— Whitney C. Harris

RELATED STORIES:

Genius Ways to Beat the Heat With Baby

Your Bucket List for Baby’s First Summer

18 DIY Sensory Play Ideas for Baby


Taking care of our planet is the job of everyone, and that’s why we are totally on board when it comes up upcycling. From reusing old clothing and plastic bottles, to saving money and serving as a role model, there are plenty of upcycle ideas that benefit parents. Keep reading to see our top 12 reasons why everyone benefits from a little repurposing.

You can express yourself creatively.

Bernard Hermant via Unsplash

Whether you love a swipe of a paintbrush, feel handy with a hacksaw or just enjoy a little blood, sweat and tears, upcycling can bring about a huge sense of accomplishment and joy when you express yourself creatively. When you want to feel full of purpose outside the role of being a parent, upcycling projects can help put your mind to good use, all while saving the planet at the same time.

You're being a great role model.

iStock

Taking care of our planet starts with us, and our little ones will follow suit. Recycling, being mindful of food waste and only buying what's necessary are all ways to show our kiddos how to take care of our resources.

It’ll keep you out of the art supply store.

Debby Hudson via Unsplash

If your kid goes through art supplies like she's on fire, using materials you might otherwise throw out helps keep costs down (think: corks as stamps, toothbrushes as paintbrushes and TP rolls for just about anything).


You’ll be able to explain the “junk” in the garage.

iStock

“Oh that? No, it’s not an old rusty wagon without wheels or a bottom; it’s an upcycling project in progress.” Basically, your hoarding habit just went way up on the coolness scale.

Those tiny concert tees bought pre-kid take on a whole new meaning.

Delia Creates

Don’t give up on your tiny tees. Make them into an uber-cool tote, instead. You’ll be the hippest mom at the farmers market.

Kermit would approve.

Little Bin for Little Hands

It's not easy being green. Do you ever wonder how much recycling actually gets... recycled? Repurpose stuff headed for the bin and you won't have to hope it ends up in the right place.

It’s a great way to get rid of the plastic bags under the sink.

Carolina Pez via Unsplash

Maybe, one day you’ll remember to drop all those bags in the recycling container at the store. Or, you could just use them in an awesome upcycling project. Gorgeous mini planters, anyone?

It forces kids to think outside of the box.

Mike Fox via Unsplash

Give kiddos different and new materials; wait and see what happens. In a flash, cereal boxes, paper towel rolls and old jeans might become a miniature city complete with roads and cars. There’s no end to the creativity!

Empty wine bottles look nicer as candle votives.

Or a chandelier, or a vase, or even a bird feeder. There are tons of creative uses for those bottles (besides pouring a second glass), so drink up! Psst! Save the corks for reason #2.

Your home will have history.

Wooden Earth Ltd

Whether you use old crib bumpers to make a quilt for your first born’s big girl bed, or if the dining room table was made from the scrap wood from your grandfather’s barn—it’s a story you’ll share for years.

You’ll save major cash.

Burst by Shopify

Need building blocks on the quick? Skip Target and try juice cartons filled with sand as an alternative. Want to give the play room an update? Make pillow cushions out of old pajamas. Upcycle, and save cash—plain and simple.

You’ll be the cool parent on trend.

Kelly Sikkema via Unsplash

You’ve giggled with other parents about your neighbor and his upcycled messenger back (gum wrappers, seriously?) but the movement is going mainstream—so why not lead the eco-friendly, playground pack?

—Gabby Cullen & Karly Wood


RELATED STORIES

15 Creative Upcycled Crafts for Kids

25 Ways to Reduce Plastic Waste That Are Actually Doable for Families

Eco-Friendly & Sustainable Brands You’ll Feel Good Investing In


It’s that harvesty time of year when apples are abundant and pumpkins appear on every doorstep. Combine the season’s finest produce to make a simple and adorable craft suitable for any age. (Use washable tempera paint and even the messiest toddler can make it!) Read on for the how-to.


You will need:

Paper

Orange paint (tempera, ideally not watercolor)

Green paint or markers (for making the stems)

An apple (or two)

Paintbrush/dish for paint

Optional: black marker or paint to convert pumpkins to jack-o’-lanterns

Step 1: Make the stamp
Simply slice the apples in half (on the vertical). This becomes your pumpkin shape. Apply orange paint directly to the stamp, in a thick layer.

Bonus: Cut up the other half for a snack. Bam!

Step 2: Stamp your pumpkins.
Just press down and create your pumpkin-like shapes, in any pattern they choose. Note that sometimes the stamp is solid and other times it needs filling in. This is okay. It gives them a chance to actually paint and it’s nice to have some variety in each pumpkin.

Step 3: Embellish
Once you’ve filled in your pumpkins and let them dry for a couple minutes, add green stems and vines. Add “Happy Halloween” or a border if you choose.

Optional: Allow to dry completely and then add jack-o’-lantern eyes, nose and mouth. A black sharpie works great for this, or use black paint and a fine-tipped brush. Kids can sketch the shape with pencil first or just free-hand it.

Did you try this craft with the kiddos? Share your pics with us on Instagram! Tag them #redtricycle so we can see them. 

—All photos and copy by Amber Guetebier

These “boo” friendly Candy Corn Marshmallows are one of the easiest treats you can make and only require a few ingredients. They make a super fun treat for any candy-seeking trick-or-treaters and your kids are guaranteed to love them, too.

Makes: 12 Candy Corn Marshmallows

Ingredients:
½ cup orange chocolate candy melts
12 marshmallows
½ cup yellow chocolate candy melts
½ cup brown chocolate candy melts

Method:
1. Melt your orange chocolate candy melts in a candy melting electric pot according to the package instructions, or in the microwave at 30-second increments.

2. Dip the bottom half of the marshmallow into the orange chocolate candy melts.

3. Place marshmallows in refrigerator until chocolate hardens, approximately 5 minutes.

4. Melt your yellow and brown chocolates as in Step 1. Dip the bottom of your orange-covered marshmallow in the yellow chocolate halfway to create a candy corn look. Place in refrigerator until chocolate has hardened, approximately 2–3 minutes.

5. Using a toothpick or the bottom end of a cake-decorating paintbrush and your brown chocolate candy melts, dot two eyes on your candy corn. Place marshmallows on a Silpat or parchment paper and place in refrigerator until chocolate has hardened, approximately 2–3 minutes.

Excerpted from Kids’ Treats: 50 Easy, Extra-Special Snacks to Make with Your Little Ones Copyright © 2015 by Katie Wyllie and published by F+W Media, Inc. Used by permission of the publisher. All rights reserved. Photos courtesy of Katie Wyllie.

RELATED STORIES

3 Easy Ways to Decorate with Candy Corn 

Candy Corn Recipes the Kids Will Love 

100+ To-Die-For Halloween Treats

I am not ready for my oldest daughter to make the transition into kindergarten. I know she’s excited to try something new, but I’m not sure I’m ready. I’m gonna be THAT MOM. You know, the one who takes their little student to class on the first day and ends up sobbing on the way back to the car.

Shut up.

Anyway, I’m taking this summer to try to prepare my daughter —and myself—for kindergarten in the fall. Here are a few tips and tricks I’ve picked up along the way.

Start by Setting a Schedule

When our kids are little, we don’t usually spend much time thinking about their schedule. They get up when they awake, and fall asleep when they’re tired.

We should all try to live like that, but it’s not always an option—especially when you’re dealing with a work or school schedule. Start on day one of your summer vacation by setting a schedule for your little ones to follow. Go to bed at the same time every night and get up at the same time every morning. Make breakfast a habit before a certain time every morning.

It might take you a few weeks to get used to this schedule, but it’s the best thing that you can do to prevent fights once school starts in the fall.

Don’t Skip Meet the Teacher Day

Every school hosts a meet the teacher day a few weeks before the school year starts. It gives your little ones an opportunity to meet their new instructors and some of their new classmates, and to get familiar with where they’ll be spending the next 8 months of their life. This may be the only opportunity you have to get your kid’s supplies list before school starts.

Don’t skip Meet the Teacher day. Just being able to spend an hour in their new classroom, talking to and asking questions of their new teacher can make a huge difference. They won’t be going to a new, unfamiliar place once the school year starts. They’ll be going somewhere comfortable, where they’ve got a desk with their name on it.

Give Them a Break

When it comes right down to it, give them a break. Starting a new school is stressful, no matter how old you are. If you, like me, work from home and have never sent your children to daycare, they aren’t used to you leaving them somewhere for the day other than with a family member, so it will likely stress them out.

Give. Them. A. Break. Lay off on things like chores and other tasks, in favor of letting them adapt to their new environment. As they get used to heading to school every day, you can start slowly reintroducing their normal activities so they don’t get overwhelmed.

Spend Time Reading Aloud

Kindergarten isn’t like it used to be when we were kids. Our little ones are expected to know a lot more going in than we ever were, which means that it’s up to us as parents to make sure they’re prepared. One of the best ways to do this is to spend plenty of time reading aloud both to and with your little ones.

Pick books that you love to share with them, and books that they can read or you can help them sound out that they can read to you. One of my favorite books to share with my daughters is J.R.R. Tolkien’s The Hobbit—even if I’ve blown my voice out trying to read Gollum’s parts like I’m Andy Serkis. Read to your kids. Have them read to you. It’s the best thing you can do to help get them ready for their first year of school.

Work on Fine Motor Skills

Reading isn’t the only thing your new kindergartner will need to be able to do. They’ll also need a basic grasp of various fine motor skills like painting, writing, coloring, and cutting with scissors. These are fairly easy to practice though—hand them a paintbrush instead of letting them fingerpaint. Give them a pair of safety scissors and let them go to town on some construction paper, then glue all the pieces together in random orders to create mosaic art.

The goal here is to help them develop their fine motor skills, but they don’t need to feel like they’re learning to achieve this goal. Make it a game and they won’t even realize that they’re gathering the skills that they need to succeed in kindergarten.

You’ll Be Fine—and So Will They

Take a deep breath, Mom and Dad. You will be fine, even if you shed a few tears when you drop your little student off for the first time. They’ll be okay too. Just spend some time getting them ready for what will be the beginning of one of the most unique experiences of their life, and they’ll be more than happy to get up and head to school every morning. I hope.


Jennifer Landis is a mom, wife, freelance writer, and blogger. She enjoys long naps on the couch, sneaking spoonfuls of peanut butter when her kid's not looking, and binge watching Doctor Who while her kid's asleep.  She really does like her kid, though, she promises. Find her on Twitter @JenniferELandis.