You waited 9 months and baby is finally here. And even though you’re ready to have fun with that little bundle, baby—not so much (especially during those first few months). But in between the diaper changes, naps, and feedings, you and your little one can find time to play simple games that benefit baby’s development. Playing helps babies learn about the world and develop new motor skills and social skills. The key is knowing at what age they’re ready for baby games like peekaboo and blowing bubbles. Here’s an age-by-age guide for the best games to play with babies at different times during their first year.

Games for Babies: 0-3 Months

two moms play peek a boo, games for babies, with a newborn on a bed
iStock

1. Imitation Game

Your face is your baby’s favorite thing to look at. Keep it about a foot away from your newborn so they see you properly, and then stick out your tongue or form an O with your mouth. Before you know it, baby will copy you. Bonus points for making silly noises to go along with your expressions.

2. Singing

Newborns might not be able to see you from across the room, but they can hear you, and they recognize (and love) your voice. Sing a lullaby or “Wheels on the Bus,” belt out your favorite song or commercial jingle, or make up a song about your daily activities. It doesn’t matter if you’re out of tune, your voice gives your baby comfort and joy.

3. Flashcards

While even the smartest newborn nerd isn’t ready for math or reading flashcards yet, simple images from cards or books get their attention. Black and white images, simple patterns and bright colors are easiest for them to see at this age. They also love images of other babies. All you have to do is hold up the card, point at the picture, and talk about the image. Or put it down in front of them to explore during tummy time.

4. Hanging Toys

Your little one might not be reaching out for toys yet, but looking at them is one of their favorite baby games. Hang a mobile above the crib or find an activity gym with hanging toys and lay baby on their back to enjoy. Baby-safe mirrors are great, too. Babies won’t know it’s their face, but that won’t dampen their enthusiasm for staring at it or reaching out for it.

5. Repetitive Routine

While the endless cycle of eating, burping, sleeping, diapers and baths may not be thrilling for you, it’s your baby’s whole world. Add some fun to the routine by singing a song during bath time, dancing after a diaper change, or stopping to look at framed photos of family members. Whatever you do, the key is doing it consistently.

Related: Baby Games: 7 Sure-Fire Ways to Amuse Your Baby

Games for Babies: 4-6 Months

two dads hold a baby in the bed playing games
iStock

6. Interactive Stories

Your little one is a bit more responsive at this age. Change up those simple newborn activities for slightly more interactive baby games. This is a great time to introduce games like “This Little Piggy.” They don’t require independent movement from baby, but kids find the story super fun.

7. Moving Tummy Time

Put tummy time in motion to mix things up. Once your baby has pretty good head control, lay them on their stomach on a small blanket. Then slowly pull them around the room. Make motor or train noises for even more silly fun.

8. Blowing Bubbles

You don’t need to wait until baby’s old enough to chase after bubbles to introduce then. At this age, babies are starting to see better, so they will be fascinated with the moving rainbows of bubbles. Blow the bubbles near them but not directly at them to keep the soap out of their eyes.

9. Echo Noises

When your baby makes a happy noise, make one back. If they blow bubbles with their lips, blow some back. You’ll get big smiles real quick from this imitation game.

10. How Big Is Baby?

It’s amazing how fast those early months fly by. Your six-month-old will seem huge in comparison with how little they were just a few months ago, making the classic “How Big Is Baby?” game all the more poignant. To play, hold baby’s hands and ask in a sweet voice, “How big is baby?” Then put their hands up over their head and say, “This big!” Mix it up by replacing “big” with different adjectives smart, sweet, etc.

Games for Babies: 7-9 Months

a dad kisses his baby on the forehead, baby sitting on the counter, playing games for babies
iStock

11. Patty Cake

You don’t need to retire those songs from the newborn stage, but continue to up the game with tunes that have motions and finger play to go along with them. Start by showing the motions to songs like “Patty Cake,” “Itsy-Bitsy Spider” and “Wheels on the Bus.” You can also help babies do the motions with their hands.

12. Peekaboo

By now your baby is beginning to have an understanding of object permanence, knowing that when things are out of sight, they aren’t gone forever. If your little one hasn’t already discovered the joy that is peekaboo, this is the perfect time to try it out. Hide your face behind your hands, hide baby’s face behind your hands, or pop out from behind a door or curtain. You can also hide or partially hide objects (like putting a musical toy under a blanket) to see if your child will look for them.

13. Flying Baby

At this age, your baby should have enough control and strength for some flying time on your knees. Lay flat on your back or slightly propped up on a pillow. Use your bent legs to support your baby’s body, hold their hands, and gently fly them around. You can go up and down, side-to-side or a combination of the two. Sound effects and silly songs are mandatory with this activity.

14. Roll the Ball

Once your child is able to sit, sit across from them and roll a ball toward them. At first, baby probably won’t roll it back, but they might pick it up and play with it or chew on it. When they lose interest in the ball, pick it up and roll it back to them to start the game over. Eventually, they’ll be rolling it back to you.

Related: The Smart Parents’ Guide to Montessori Toys for Babies & Toddlers

Games for Babies: 10-12 Months
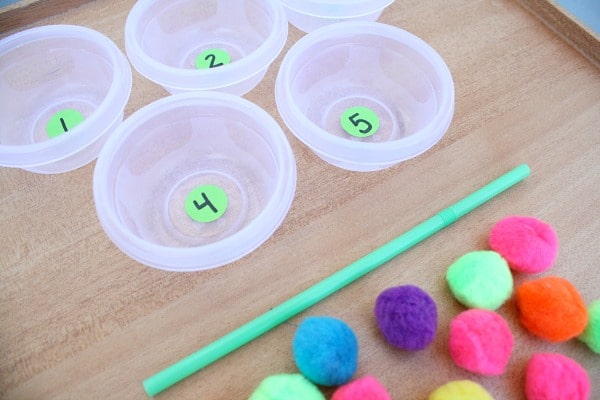
iStock

15. Sensory Boxes

Nothing is more fun for your older baby than taking things out of a box and putting them back in. Fill a box or bin with a combination of balls, soft blocks, small books, scarves or baby-safe household items like a wooden spatula. Look for objects that have different textures and are big enough not to be choking hazards. Show your child how to take things out of the box and put them back in. It won’t be long before they’re dumping out and rearranging every box they can get their hands on, not to mention your purse and diaper backpack.

16. Obstacle Course

Let the baby games begin! Chances are your little explorer is on the move, or ready to be soon. Whether scooting, crawling, walking or full-on climbing, a baby-appropriate pillow obstacle course is a good energy burner. Set out couch cushions or pillows all around the floor. Demonstrate how to climb over, around or peek under them and then watch your kid go.

17. Dance Time

There are so many ways to enjoy dancing with your baby. You don’t have to stick to baby music; play your favorite tunes if you’d like. Sit on the floor together and bop your head and body or pretend to play an instrument. Baby might not be ready for air guitar yet, but it won’t take much prompting to get them bopping along to the beat. You can also hold baby in your arms and spin in slow circles or sway back and forth. Or sit them in your lap and bounce them on your knees in time to the music.

18. Stack & Attack

Stacking cups, stacking rings and blocks are a favorite for your almost one-year-old. In fact, any items that can be put on top of one another and knocked back down without breaking are fair game. Try plastic storage containers, empty yogurt containers, or small boxes and bring in your little destructor to hulk-smash them down.

19. Bath Splash

A few plastic cups, clean sponges and washcloths add baby thrills to the nightly bath. Use the cups to show how they can be filled with water and them emptied. Squeeze the sponges and washcloths on baby’s belly. Show baby how to smack the water to make a big noise.

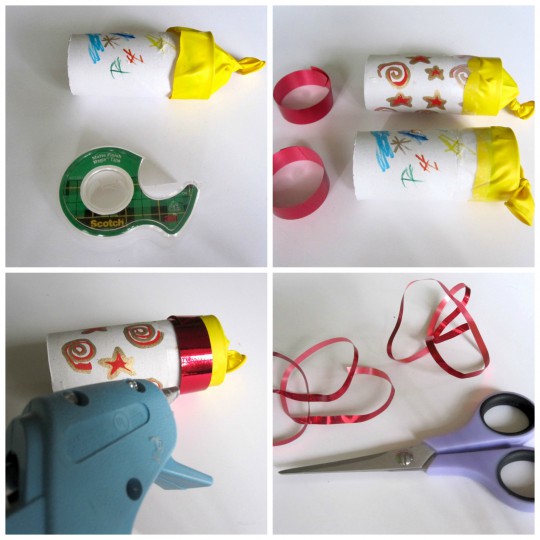
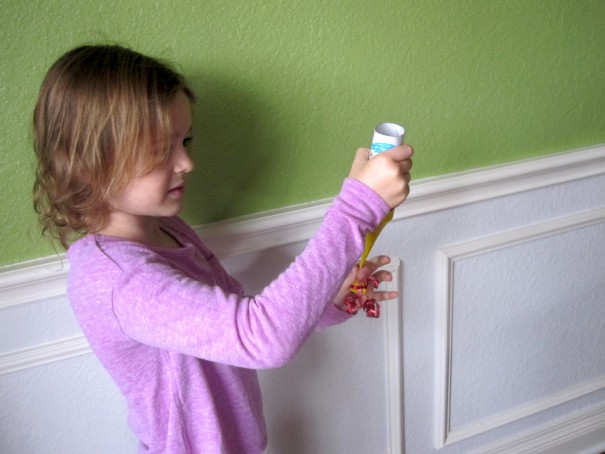
20. Make Noisemakers

Fill a clear plastic container with dry beans or rice. Give it a shake and roll it along the floor to show your baby how to make music with it. Add a few colored pom poms to the container to make the shaking even more interesting for your baby.

Related: Play All Day: 20 Sensory Play Ideas for Babies & Toddlers

The tunnel is our Rube Goldberg favorite

Need some craft ideas that aren’t your usual? Raid the recycle bin, bust out any toilet paper rolls lying around, and get crafting! From Star Wars characters to bird feeders and even flying fish, the possibilities are endless when you’ve got a stash of toilet paper rolls on hand!

Animal Puzzles

If you had one of those flip puzzle books that allowed you to create animals with different tops, middles, and bottoms, then you’ll appreciate this adorable idea.

Cactus Toilet Paper Roll Craft

How adorable are these cacti?! These would be fun decorations for a kiddo’s room or party!

Sliced Toilet Paper Roll Design

Swipe through the images in this post to see the spray-painted final products of this toilet paper roll craft! This is one you could make as detailed or as simple as you’d like. You could also hand-paint it for some extra fun.

Toilet Paper Roll Snake

toilet paper roll crafts
The Clumsy Crafter

This adorable toilet paper roll craft will have kids creating their own snake out of multiple toilet paper rolls. After your kiddo is done and the paint is dry, it's playtime! Get the tutorial from The Clumsy Crafter

Birthday Crowns

toilet paper roll crafts
Creative Jewish Mom

What a cute idea for a birthday party favor! Kids can make their own crowns and wear them throughout the whole event. Get the tutorial over at Creative Jewish Mom

Bird Finder Binoculars

toilet paper roll crafts
Art Bar

Whether you're on an outdoor adventure or peeking at birdies from your window, these adorable Bird Finder Binoculars from Art Bar are perfect for exploring. All you need are some empty toilet paper rolls, string, and colorful masking tape to make your own.


Related: 33 Easy & Fun Paper Crafts for Kids

Star Wars Characters

toilet paper roll crafts
Hello, Wonderful

The gang's all here! This cast of Star Wars characters from Hello, Wonderful is perfect for your young Jedis. Great for an entire afternoon, these mini crafts use up that collection of TP rolls you've been collecting.

Flying Carp

toilet paper roll crafts
Squirrelly Minds

Everyone's day can use a little more color, especially in the form of whimsical and cheery flying carp from Squirrelly Minds! With basic supplies like tissue paper and double-sided tape, your littles will be running around with a few flying fish in no time.

Collage Animal Marionettes

toilet paper roll crafts
Art Bar

How adorable are these Collage Animal Marionettes from Art Bar?! Make your own with simple supplies, including bright beads and tissue paper.

Happy Birthday Sign

toilet paper roll crafts
Super Make It

If you have a stack of old TP rolls lying around, why not turn them into a useful sign like this one? Color the tubes, do some specific cutting and you have a truly unique way to say "Happy birthday!" Get all the details over Super Make It.

Super Hero Cuffs

toilet paper roll crafts
Reading Confetti

You don't need special powers to make these awesome wristlets with your little hero. After painting the tubes, let your kids decorate them with stars, flowers, lightning bolts, or anything that they think gives them special powers. Find out how to make the slits for little arms just right over at Reading Confetti.

Slinky Snake

toilet paper roll crafts
Eighteen 25

Practice dexterity and scissor cutting by whipping up one of these googly-eyed reptiles. Start by painting a toilet paper roll and letting it dry. Next, have your little one use safety scissors to snip a spiral shape into the roll. Decorate the bouncy creature with stripes or dots and a pair of inquisitive eyes. The gals over at Eighteen 25 have the low-down on how to get this toilet paper roll craft just right.


Related: 27 Adorable Toddler Crafts You Can Pull Out Anytime

Shape Stamps

toilet paper roll crafts
Mama Papa Bubba

Mama Jen of Mama Papa Bubba wows again! This toilet paper roll craft is the ultimate win-win. While the bambino brushes up on shapes and colors, you get to upcycle all of those saved rolls. On a rainy day, use the shapes to make cards or just let your kiddo go stamp crazy on the poster board.

Confetti Poppers

party poppers are one of the best New Year's Eve party ideas
Gabby Cullen

Speaking of parties... turn your kid's next one into the shindig of the year with these confetti poppers crafted out of a tied balloon wrapped and taped over a toilet tissue roll. Pour confetti into the open end, gently pull the end of the balloon... and POP! Check out our tutorial here. 

Bird Feeder

toilet paper roll crafts
Fireflies and Mud Pies

Keep an eye on your feathered friends by whipping up this easy feeder. All you have to do is spread the shortening onto a toilet paper roll and then roll the tube into bird seeds. The seeds will stick to the roll, and you can hang it up porch-side or stick it on a branch. Fireflies and Mud Pies has the details for this awesome toilet paper roll craft.

Cardboard Village

When you need to keep it simple, a mini village made from toilet paper rolls will do the trick. Pull out the markers, ribbon, paper, and whatever else the kids want to use, and get crafting!


From squares to cylinders, the traditional grilled cheese sandwich has just been reinvented thanks to My Little Gourmet. And they only take 10 minutes to make! Serve these grilled cheese roll-ups as a snack or accompaniment to some hot tomato soup (we’re sure the roll-up shape makes it more fun for the kids). We’ve got more easy toddler lunch ideas here.

Serving size 2

Grilled Cheese Roll-Ups Ingredients:

4 slices of sandwich bread
4 slices of cheese (recommend gouda)
1 tablespoon butter

Method:

1. Cut the crusts off of the bread.

2. Roll each slice flat with a rolling pin.

3. Place a slice of cheese on each piece of bread and roll up tightly.

4. Melt the butter in a pan over medium heat.

5. Place the rolls, seam-side down, in the pan and press down so that they don’t unravel.

6. Rotate until golden brown on each side and the cheese is melted.


Laura Leer is a mom and writer of My Little Gourmet. She lives in Berlin with her husband and 2-year-old son, Arik, who are the main taste testers of her delicious meals. For more kid-friendly recipes, check out her blog here.

Let’s get babyproofing around the house

Although it seems like it was just yesterday you were bringing your sweet baby home for the first time, the months have flown by. You’ve joyfully witnessed baby’s first smile, first time rolling over (both ways), and don’t even get us started on how amazing it was the first time baby sat—without padding or leaning on anything. Sounds like crawling is just around the corner—yet another in the line of baby’s firsts. That means it’s time to start babyproofing the place.

Our handy babyproofing checklist includes clever DIY tricks that make your home safer for your child and can save you some money too. Whether you need to babyproof your cabinets, your fireplace, or drawers, these ideas are a great place for any parent to start.

When to Start Babyproofing

As your little one gets close to crawling, it’s time to babyproof your home and other places they visit frequently, like grandparents’ homes. To start, get on the floor and look at the surroundings from a baby’s perspective. See what’s tempting to grab and pull on, what’s at eye level, and what could injure them. Then, put away fragile items, move cords, secure furniture that could fall over, and put padding on sharp edges. Every few months, and when your child reaches a new milestone, like walking, evaluate your home for additional babyproofing needs. As kids grow taller, the danger zones will change and likely increase.

Related: 12 Babyproofing Tips to Corral Your Crawler

Babyproofing Checklist for Your House

1. Secure stairway railings

The railings on staircases or landings on upper floors may look narrow, but they’re big enough for kids’ limbs (or heads) to get stuck in. Secure clear plastic or fabric to railings to deter kids from playing on them.

2. Hide cleaning products

Plastic bins with lids and latches that baby can’t open are a safer place for cleaning products than under your kitchen sink. If you can store them on a high shelf or out of sight in a tall cabinet, that’s even better.

3. Corral cords

Cut a slit down an empty paper towel roll or piece of pipe insulation and thread multiple wires through it to keep them from becoming tangled in your tot’s curious hands. You can also use zip ties to pull together cords and then tuck them far away from baby’s reach. Don’t forget your USB cords that still hold a charge when they’re plugged in.

4. Cover outlets

Plastic covers are the easiest way to cover outlets around the house (and safest too). But in a pinch, or when you’re visiting relatives or traveling, you can put adhesive bandages or duct tape over electrical outlets. Avoid cartoon varieties of bandages that will attract little ones’ attention.

Related: 15 Products You Need When Your Baby Starts Crawling

Renee Servinsky of Sassy Wife/Classy Life

5. Block off the fireplace

Babyproof a fireplace without sacrificing aesthetics too much by covering the opening with a piece of magnetic chalkboard (we love the one above from Sassy Wife/Classy Life). The chalkboard blocks off the fireplace and give little ones a surface on which to draw with chalk and play with magnets (choose large magnets that don’t pose a choking hazard).

6. Place dishtowels out of reach

Nix the dishtowel hanging off your oven door handle. Kids can pull down on it and open a hot oven or bonk themselves with the heavy door. Move towels to a higher shelf or put them on command hooks out of baby’s reach.

7. Test choking hazards with a toilet paper tube

There’s no need to purchase a choke tester. Anything that can fit into an empty toilet paper tube is small enough for your baby to choke on. Keep all those wee things out of reach.

Related: Your Guide to Safe Sleep for Baby

8. Create a TP protector

Babies love to unroll toilet paper as much as pets do. Keep your TP intact and out of baby’s hands and mouth with a two-liter soda bottle! Cut off the top and bottom of the bottle and cut a slit down the remaining center piece. Use tape to cover sharp, raw edges and slide the container over your toilet roll to cover it. See the tutorial at My Frugal Baby Tips.

9. Protect with pool noodles

These summertime staples can be used for everything from door stoppers to crib-rail covers that prevent tots from rolling out of bed. They’re also good for wrapping around sharp edges, like around the fireplace, to minimize bumps and scrapes.

10. Pad corners with tennis balls

Tennis balls can soften sharp corners where a pool noodle doesn’t fit. Cut a few small slices into the ball’s core so you can wedge it over items like table corners. It may not look pretty, but this hack is pretty temporary. Before you know it, your toddler will be steady enough on their feet that you no longer feel the need to protect every corner in your home.

11. Shorten pull cords

Use clothespins or twist ties to shorten and hold up pull cords on curtains and blinds to remove this strangulation risk from your home. Command hooks are also handy for keeping cords out of reach.

12. Sock it to knobs

To keep little hands from turning door knobs, cover them with a spare sock and wrap a hair tie or rubber band around the base to hold the sock in place. An adult can still squeeze and turn the handle, but a child won’t be able to.

13. Band together on horizontal cabinets

Attach hair ties or rubber bands to keep paired cabinet doors closed. Just loop the tie around the handles and your baby will only be able to open the doors a little bit, not wide enough to slip a hand through.

14. Get a handle on vertical drawers

Slide a yardstick or tension rod (or another long, thin object) through the handles of horizontally stacked drawers, rather than spending time and money on individual locks.

Make sure to capture photos of your baby crawling around their newly babyproofed pad—and share them with your family and friends near and far—with the Tinybeans app. The secure platform puts parents in total control of who sees and interacts with photos and videos of their kids.

Did you run out of food coloring? Are you unhappy with your crust? Do you not have the right tools? It’s no problem with these great baking hacks

It’s that most wonderful time of the year: holiday cookie time! This year, don’t dread it, own it with these Christmas baking hacks to salvage any quandary. From a baking powder substitution and what to do if you don’t have a rolling pin to what to use in place of eggs or butter, we’ve got the goods on making goodies.

iStock

1. Holiday baking often calls for some pepperminty goodness, but who keeps peppermint syrup on hand for once-a-year baking? (No, Schnapps doesn’t count). Use an abundant ingredient: peppermint candies. Just put them in a Ziploc bag and smash them to bits. A great stress reliever!

2. Use tongs to make an even crimping pattern along the edge of your pie crust.

3. No rolling pin? Try this rolling pin hack: Use a wine bottle as a rolling pin (no, it doesn’t have to be full!). 

4. Fill a wine bottle with ice (and cork well) to keep pie dough chill while rolling it out, great for when it's hot or humid. 

5. Sub a little of your water for vodka and your pie crust somehow comes out flakier. And now you have an almost-full bottle of vodka on hand. Just sayin'...

Related: Holiday Treats You Can Have Delivered

A pile of red, green, and white star and present shaped Christmas cookies
rawpixel via Unsplash

6. Add a marshmallow to the top of your cupcakes five minutes before you take them out of the oven for a gooey, perfect topping—no frosting required.

7. If you run out of food coloring, use Jello to tint decorative icing.

8. Looking for a natural way to dye when baking? Check out these simple recipes for making natural food coloring yourself. 

9. Fill an oral syringe with thin icing to get precise lines and letters when decorating. 

10. If you do have piping tips, fill two piping bags or Ziplocks with different colored frosting. Don't overfill the bags; now put both bags into one tip, and you'll squeeze out a swirl of color.  

Related: 38 Classic Holiday Cookies to Try This Year 

iStock

11. Put a pan of water in the bottom of the oven to give your bread a crisp, browned crust. You can also use a spray bottle with water; spritz the oven to create steam.

12. Substitute butter in your next boxed cake recipe for a super-rich and luscious cake. You can even just melt it to make sure it incorporates easily.

13. You can also sub avocado for butter if you want something dairy-free and heart-healthy. Use one avocado to one stick of butter ratio. And if you run out of butter (or avocado), you can use applesauce in its place.

14. When making pies, freeze your butter, and then grate it into your flour mixture, instead of trying to crumble it with your fork. This will help integrate it more evenly and keep the butter cool.

15. Soften your butter BEFORE you mix it into your cookie dough batter, and try using salted butter instead of sweet cream.

Measuring spoons with baking ingredients are lined up on a table
Welcome Industries

16. Use a set of visual measuring cups. Perfect for kids and parents who need to squint just to read the measurements, the shape tells the size! The innovative cups make cooking and baking fun and easy for everyone.

17. Soften butter in the microwave, but be careful. Use a low power level, like two, and put it in for no more than 10 seconds to avoid melted butter (vs. softened). If it's not soft enough, continue to microwave at five-second intervals until it is. 

18. Soften too-hard butter by putting it between two pieces of waxed paper and whacking it hard with a rolling pin. Once it’s been smacked a bit, roll it out (still between the waxed paper). The kids will love helping with this one.

19. Another method for softening too-cold butter without microwaving it to a puddle: set it on top of the stove while the oven is preheating. It will gradually soften: this works great if you are baking a cake and want to use the butter for a no-fail frosting.

20. Bring cold eggs to room temperature by placing them in a bowl of hot water for 5-10 minutes. 

Related: 34 Food & Meal Prep Hacks Every Parent Needs 

A father and daughter stand over eggs in the kitchen baking together
iStock

21. Use the other part of an eggshell to remove any errant bits of shell. Miraculously, this works and is way faster than struggling with a spoon or your fingers.

22. Baking for someone with an egg allergy? Use a flax egg. Simply measure one tablespoon of flaxseed meal (that’s flax seeds you put in the blender or you can buy already blended) to two tablespoons warm water for each “egg.” Mix it and let it sit for five minutes. The consistency will be similar to an egg. Or, opt for this egg alternative from Bob’s Red Mill.

23. If you want your chocolate chip cookies to have a more caramel flavor, sub out ½ cup of white sugar with additional brown sugar. If you want them with a more sugar-cookie-like taste, leave out all the brown sugar and use only white (most recipes call for some of each).

24. Use a muffin tin to make sure your cookies turn out uniform in size.

25. Easiest cookie ever? Hershey’s Kiss in pretzel circle, melt on parchment paper covered cookie sheet in oven until just soft. Boom. Next level: Use Rolos instead. 

Related: Feeling Left Out? These Are the Common Baking Substitutions & Swaps You Need 

A gooey chocolate cookie broken into pieces next to other chocolate chip cookies
Jennifer Pallian via Unsplash

26. Dust your cookie cutters with flour or powdered sugar before you use them to help keep them from sticking.

27. Want soft gooey cookies? Under-bake them slightly. If the recipe says 12 minutes at 375 degrees, pull them out at 10.

28. Sprinkle just a little bit of sea salt on your chocolate chip cookies before baking for that sophisticated professional flavor.

29. Use a wine glass to cut out perfectly even biscuits or sugar cookies.

A clear mixing bowl on a table with bright yellow ingredients being stirred into another ingredient
Taylor Kiser via Unsplash

30. If you’ve “sorta” burned your cookies, use a box grater to shave off the darkest parts.

31. Also, measure out your cookie dough with an ice cream scoop, then chill them on the pan for a bit before baking (you can even freeze them, which means you can do this all ahead of time, bake the cookies the morning of and you get a better cookie). If you can’t afford the time (or space), just chill the bowl of dough for 20 minutes in the freezer before you start to scoop.

32. Store your cookies (or what's left of them) in an air-tight container with an apple wedge to keep the cookies moist. 

A boy and his friend are in the kitchen stirring ingredients in a silver bowl during a baking themed birthday party
Annie Spratt via Unsplash

33. Use an ice cream scoop to assure level amounts of batter for cupcakes.

34. You can make gluten-free flour by blending up gluten-free oats until they are powdered. 

35. Moisten the heck out of your boxed cake mix with a ½ cup of applesauce, yogurt, or even—wait for it—mayonnaise. Try it! We swear it works.

36. Add ½ cup of oil and two eggs to any boxed cake mix and LEAVE OUT the water or other liquids... and voila! You’ve got cookie dough. (Mind. Blown.)

Related: Baking Kits for No-Fail Treats

Baking ingredients, bowls and spoons sit on a table waiting for you to use some baking hacks
Calum Lewis via Unsplash

37. Keep your brown sugar from going rock-hard by storing it in an air-tight container. Toss in a piece of bread to keep it moist. 

38. If it's too late and your brown sugar is already hard, microwave it for 30 seconds in a bowl covered with a wet paper towel or place it in the oven to soften for about 15 minutes. 

39. Does your recipe call for powdered sugar, but you are out? Use a spice grinder or food processor and pulverize white granulated sugar until it’s powder.

40. Slice your cheesecake with dental floss (but not the minty kind).

41. Hate dealing with metal sheet pans and cookie tins? Use a silicone baking mold instead. We love Silpat molds—there's no need to ever grease the molds or use liners, and your goodies bake to perfection (though depending on your oven, you may want to add a couple of minutes to the cooking time). 

42. Need a baking powder substitution? The following are equal to 1 tsp. of baking powder:

  • 1/4 teaspoon of baking soda + 1/2 teaspoon of cream of tartar.
  • 1/2 cup plain yogurt + 1 tsp. baking soda. Mix dry ingredients first before adding yogurt to dry ingredients (Reduce the amount of water or other liquids.).
  • 1/2 tsp. lemon juice + 1/4 tsp. baking soda.

Looking for more common baking substitutions? We've got you covered

Great! You’ve got the hacks. Now you need the recipes. Here are our favorite 51 insanely popular cookie recipes.

—Additional reporting by Taylor Clifton and Erin Lem

Looking for good New Year’s party ideas? Ring in 2023 with a festive craft for kids that’s as easy as it is fun. Using basic art supplies (and leftover holiday trimmings), you can help your little party people pop it like it’s hot when it’s time for the 10…9…8…! Find out exactly what you’ll need to create confetti poppers for kids at home, and then plan your menu from our favorite easy appetizers

Supplies for confetti popper for kids

confetti poppers for kids

Paper Rolls (toilet or towel, whichever you have on hand)

Construction Paper and/or wrapping paper in festive colors

Balloons

Ribbon (regular and curling)

Markers

Scissors

Hole Punch (if you don’t have one handy, just cut up the paper)

Scotch Tape

Hot Glue or Elmer’s Glue

Jewels (optional)

Related: 16 Easy Ideas to Help You Celebrate New Year’s Eve at Home

Step One: Create Confetti

confetti poppers for kids

Using the hole punch (or scissors) create paper confetti using construction paper and leftover holiday wrapping paper in festive colors.


Step Two: Decorate the Popper

Using markers, have your handy helpers decorate their roll. Little doodlers can go festive with stars and fireworks, write fun New Year’s Eve-themed words, or even draw pictures. It's all about creativity!

Related: 22 Super-Easy Appetizers That Just Look Fancy

Step Three: Cut the Balloon

Tie a knot in the balloon, in the same spot you would if it was full of air. Then, using the scissors, carefully cut off the top of the balloon. Note: If you cut the balloon too close to the knot, there’s won’t be enough at the bottom to lay over the end of the paper roll.

Step Four: Create the Popper

Place the cut balloon on one end of the decorated roll and secure, using the tape. Cut lengths of regular ribbon, and using either hot glue or Elmer’s glue (if using Elmer’s, you’ll have to wait until it’s dry to continue) line the popper where the tape and balloon meet the roll. Once this is complete, cut pieces of curling ribbon and tie them around the knot of the balloon.

Optional Step: Fasten jewels to the thick piece of ribbon using glue. Hot or regular glue will do the trick.

Related: How to Make a Vision Board with Kids

Step Five: Pop the Confetti Poppers!

confetti poppers for kids

After all the crafty work, let your party people do some popping. Fill the open end of the tube with the confetti, pull down on the balloon knot and release! The confetti will explode everywhere, so be prepared for giggles. You can refill over and over for more New Year’s Eve fun.


OK, that’s an exaggeration…she didn’t really almost ruin my marriage, but she did make me very twitchy and short-tempered with my husband for a few weeks.

It started out innocently enough: One morning, my perennially messy husband began bemoaning the state of his dresser, as he tried in vain to locate an undershirt without pit stains or holes in it from within a tangled wad of old t-shirts.

“You should read that tidying up book,” I said sarcastically. To which my husband replied, “What are you talking about?”

After I explained the basic premise of Marie Kondo’s “The Life-Changing Magic of Tidying Up” which was so hugely popular a few years back, I noticed a foreboding twinkle in my husband’s eye. Next thing I knew, he’d downloaded the audiobook and was listening to it every morning as he got ready for work.

His obsession began slowly, presenting itself in his innocent yet sweeping suggestions of how Kondo would handle my ongoing fight against the after-school clutter that my children amass—with graded papers spilling out over the dining room table and squished school snacks littering the bottoms of backpacks. At first, it was kind of endearing that he was noticing what I struggle with on a daily basis and offering sympathy and advice (albeit unsolicited advice).

Then, a week or so later, my husband quietly observed me tussling with our Tupperware cabinet. As I tried to find just the right storage container with matching lid for leftovers, he said, “Have you ever considered holding each of those storage containers in your hand and asking yourself, ‘Does this bring me joy?’” This was the first of many times in the coming weeks that my eyes rolled violently back in my head and I cursed the day that I ever uttered the words “Marie Kondo” to my oblivious husband.

But the straw that broke the camel’s back was the day that he suggested that “we” (meaning I) change the way that “we” (I) fold our laundry to better facilitate the ease with which we can find what we’re looking for in our dresser. I’d had enough.

You see, I’m the laundress (if you will) in our house. I’m the one who pre-treats stains, washes, dries, folds and hangs our laundry. It’s a job that I actually (mostly) enjoy—I find it meditative to quietly fold clothes and I enjoy the scent of fresh laundry—call me crazy. Also, I have it down to a science. I have a certain way that I do things. Certain days I launder bed linens and towels. Certain ways I sort delicates from denim and certain ways I fold t-shirts, socks and towels. Don’t question my madness and please don’t accuse me of proliferating a 1950s housewife stereotype because I’ve already done all of this myself. But this is what works for our family. And so it is.

So, you can imagine the offense that I took when my husband, who has maybe used the washing machine once in our marriage—and, in spite of holding a degree in technology, still seems wholly unable to figure out how it works—suggested that I was doing the laundry wrong. That’s when my head just about exploded. But I humored him and let him earnestly teach me the “roll technique,” while fully planning to go about folding the clothes my own damn way as soon as he’d left the room.

But then, something unexpected happened: I started working at perfecting “the roll” and I figured it out. I began to see the value in it. I found that I was easily able to fit more shirts in our drawers and was able to find just the shirt that I needed without upending the whole drawer in the process. Rather quickly and unexpectedly, Kondo’s method of rolling t-shirts turned our drawers into organized, easily navigable laundry holders. Maybe Kondo—and my husband—were onto something here… grumble, grumble.

As the weeks passed, the verve with which my husband initially embraced the “KonMari” lifest‌yle began to wane. While he has steadily kept up the momentum of many of the ideas and organizational tips that the author explains in her book, he has let go of some of the more rigid habits (for instance, he’s finally stopped uttering the words, “Does that bring you joy?” and I’m forever grateful because that was annoying as all hell).

And I’ve actually continued to implement the roll method of laundry folding. I think it’s safe to say that I am not only a believer now, but also a proponent of the whole idea (but don’t tell my husband this).  Another good thing to come from this journey is that now my husband often helps me fold laundry, so that’s an improvement in our previous division of the laundry labor.

All in all, I like the ideas that Kondo presents in her book. Nothing that she writes is particularly earth-shattering, but she does offer a fresh perspective on organization. What challenged me most was my husband reading one book on organization and thereby declaring himself the resident expert on de-cluttering and laundry. Ultimately, though, the KonMari method effected change in our home and I think that my husband has a new appreciation for what I do on a daily basis to keep our home functioning. Also, I’ve learned to be more judicious with my self-help book suggestions from now on. Be careful for you wish for…

Originally published May 2017.

RELATED LINKS
My House Is a Disaster & I Couldn’t Love It More
How to Clear the Clutter from Your Kids’ Rooms for Good
Dear Husband: I Need More Help from You

I'm Jenny, a married, sober mother to two kids and a whole gaggle of pets. I've lived in Texas my whole life and am the by-product of two dyed-in-the-wool Southern families. As a result, I can write a phenomenal, heart-felt thank you note and never wear white shoes after Labor Day.

We all know that the “job” of a stay-at-home parent is really like a million jobs rolled into one—but how much would a stay-at-home parent make if they were paid? A new study puts quite the price tag on parenthood.

Using data on a selection of jobs that equate with all of the daily tasks that come with being a stay-at-home parent, Salary.com came up with a median annual income for 2021. And, drumroll please… stay-at-home parents should be making a whopping $184,820 a year. This amount was up over $6,000 from the pre-pandemic medium.

Photo: Matthew Henry via Burst

So what’s the job description of a stay-at-home parent? Salary.com pulled information on several different positions including accountant, CEO, coach, dietician, event planner, janitor, plumber, psychologist, teacher—and many more to come up with the salary fitting for the demanding role.

Of course, ask any stay-at-home parent and they’ll tell you that you can’t put a price on being able to stay home with the kids.

You can calculate your own salary by using this salary wizard.


RELATED STORIES:

Moms Should Basically Be Immortal, New Study Suggests

World’s Most Obvious Study Reveals Having More Kids Ages You Faster

Parents Want This More than a High-Paying Salary, According to New Study

If you buy something from the links in this article, we may earn affiliate commission or compensation.


Looking forward to your big upcoming vaycay? Packing up the kids can be an unbearable task, but with our picks of adorable little luggage options, it doesn’t have to be! Before you head to the airport or start packing up the car, be sure to check out our roundup of adorable kids luggage, including everything from child-size duffles and suitcases, to backpacks that are perfect for little hands. Now you can focus on an awesome and memorable trip!


best kids luggage unicorn suitcase

GURHODVO Unicorn Suitcase

$66 BUY NOW

Who doesn't love unicorns? This suitcase is bringing all the Lisa Frank vibes and we love it.


Harry Potter Hogwarts Express Rolling Luggage

$120 BUY NOW

For the little Harry Potter lover in your life, nothing is cooler than rolling this puppy through the airport on the way to Orlando.


best luggage for kids batman suitcase

Batman Rolling Suitcase

$98 BUY NOW

Holy cool suitcase, Batman! Bonus: it's not black, and you'll spot it from across the baggage claim.


Unicorn Kids Hard Shell Carry On Rolling Luggage & Backpack

$86 BUY NOW

Coordinated luggage never looked so cute! This adorable Unicorn Kids Hard Shell Carry On Rolling suitcase ($70) and backpack duo is lightweight and the perfect size for littles. The spinner suitcase makes for easy maneuvering and the telescoping handle means your kids can stow the matching backpack easily.


Rockland 2-Piece Camo Luggage Set

BUY NOW

This simple set of fabric travel bags is perfect for kids or even adults heading on a short trip. Coming in over 20 patterns (we think this camo one is adorbs for boys!), the Rockland 2-Piece set ($41) is great for budgets and comes with a detachable shoulder bag. Use the telescoping handle to keep the bag and suitcase together and make traveling a cinch.


best kids luggage Wildkin Overnighter Duffle Bag

Wildkin Kids Overnighter Duffel Bags

$40 BUY NOW

Wildkin's Overnighter Duffle Bag ($30) not only comes in tons of adorable designs like mermaids, unicorns, chevron prints and boho chic but it's functional too. The kid-sized duffle bag is ideal for weekend getaways, coming with a moisture resistant lining, easy carrying handles and an exterior pocket. Traveling never looked so cute!


best kids luggage American Tourister R2D2 Spinner Suitcase

American Tourister R2D2 Spinner Suitcase

$125 BUY NOW

This American Tourister Star Wars R2D2 spinner suitcase ($100) is so cool, we want to use it. The soft side spinning luggage is designed to fit most overhead compartments so it's ideal for kids. Each case comes with coordinated zipper pulls and amazing interior lining. Choose from your fave Star Wars characters, like C3PO, Darth Vader, BB8 and a Storm Trooper.


best kids luggage Stephen Joseph Girls Classic Rolling Luggage

Stephen Joseph Girls Classic Rolling Luggage

$52 BUY NOW

Stephen Joseph's Classic Rolling Luggage comes in eight adorable prints and is perfect to use as a carry-on. It's colorful, whimsical and functional, coming with several exterior pockets, a telescoping handle and wheels.


––Karly Wood

Images by retailers

RELATED STORIES

10 California Road Trips to Take Before Your Kids Turn 10

How to Prevent Jet Lag for Your Spring Break Adventures, According to Experts

Adorable Kids Luggage on Amazon Prime


Getting your kids excited about math is as easy as 1-2-3: just introduce them to these awesome learning games. You’ll jump-start their number knowledge while also giving them a chance to work on their fine motor skills and play with bubble wrap, sidewalk chalk and stickers. Read on to get the skinny on all our favorite counting games.

Feed the Sharks

Days with Grey

Grab some stickers and markers and get your kiddos counting with this fab idea from Days with Grey. They’ll get to feed each shark using colorful dot stickers.

Race to Lose a Tooth

Toddler Approved

This fun game from Toddler Approved is sure to make your little ones smile. They’ll roll the dice and practice counting as they pull marshmallow “teeth” from a mouth. 


Pom Pom Challenge

NurtureStore

This idea from NurtureStore is a two-for-one: kids can practice counting while also building their fine motor skills. Challenge them to use just a straw to move the right number of pom poms to the correct container. 

Pop Goes The Number

Hands On As We Grow

They're going to do it anyway, so why not make popping bubble wrap an educational opportunity? Hands-on mama-of-three Jamie Reimer has the details at Hands On As We Grow.

Counting Rocks!

Fun-a-Day

Young counters can play a variety of counting games with these handmade number rocks: match number pairs; line them up from 1-9, and see what happens when you put one number in front of another. Fun-loving mom Mary Catherine shares the step-by-step scoop on her site, Fun-a-Day.

Splashing Digits

Melissa Heckscher

Would your kiddo like a few water balloons to smash? Yes, please! When the weather warms up, let your cute calculator get a little wet with this easy number identification game that requires only water balloons and chalk. Check out the details on Coffee Cups and Crayons.

Apples Up on Top!

Buggy and Buddy

This activity pays homage to a rhythmic little story (by Dr. Seuss) about a bunch of silly animals stacking apples on their heads. Using felt and Velcro, kids can stack up apples and compare their load to a friend or siblings. Check out Buggy and Buddy for the details.

Shoot the Sum

Melissa Heckscher

We love this easy activity because there are just three steps: stack up numbered cups, ask your kids to knock them down, and (if they can) add up the total. Kids will delight in shooting and knocking stuff down, but really they’re (Shhhhh!) learning simple addition as well as simple number identification. Parents who don’t allow toy guns can substitute with ping-pong balls or air rockets (see above). Get the details over at No Time For Flashcards.

Roll for Results

Buggy and Buddy

Let your kids roll the dice and plink their beads into a bowl. This simple counting game lets kids practice counting while they race to get all their beads (or jellybeans, or goldfish, or whatever small object you choose) into their bowl before you do. Get the instructions from Chelsey at Buggy and Buddy.

Linear Learning

Melissa Heckscher

Learning numbers doesn't have to be a desktop affair. Instead, use this equation for getting antsy kiddos outside and moving: sidewalk chalk, a paved place to scribble and a simple running game. Draw a line, mark out numbers, then tell your running mathematician to sprint to the numbers as you call them out. More advanced counters can add and subtract their way up and down the line. You can thank Coffee Cups and Crayons for the idea!

Number Maze

Melissa Heckscher

Here's another easy outdoor activity that requires only sidewalk chalk. Kids will learn how to count to 10 (and figure out their lefts and rights) by winding through a simple number maze. Find out more at Hands On As We Grow.


—Melissa Heckscher with Susie Foresman


RELATED STORIES:

11 Math Games That Equal Tons of Fun

Early Math DIY Flashcards for Toddlers

How to Add Mathematical Fun into Your Recipes

Feature photo: iStock