One of them even involves a salad spinner!

When you want to get creative with your kids but don’t want the mess to take over, outside art is key. The messy stuff can stay outside (like all that baby-safe paint), and your kids (probably) won’t mind when you use the hose to spray them down when they’re done. From painting with water to using salad spinners to contain the mess, check out these outdoor art ideas that are big on creativity, but easy on cleanup.  
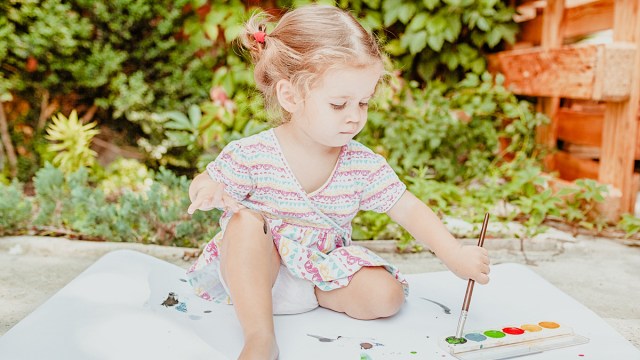
Paint with Water

adorable kids doing outdoor art
Jackie Currie via Happy Hooligans

Quite possibly the cleanest, easiest idea of the bunch, we love the simple brilliance of water painting. This is an especially great outdoor art project for toddlers because there’s no paint to be found! Happy Hooligans has more tips and tricks.

Use a Salad Spinner

use a salad spinner for outdoor art
Meri Cherry via Meri Cherry

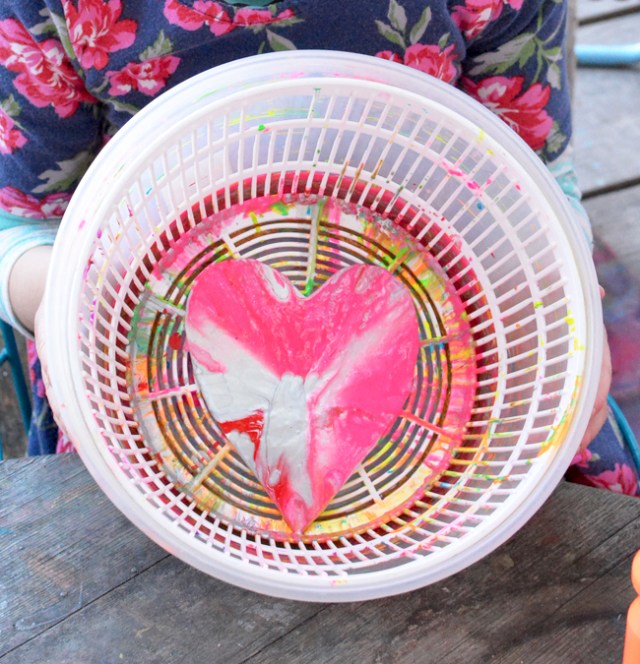
The best way to prevent art from getting messy is to keep it contained. That's why we think this spin-art idea from Meri Cherry is pure genius. Your kids will get swirly designs, and all you’ll have to do is drop the spinner in the sink when everyone is done. See what you’ll need over at Meri Cherry.

Pull out the Squirt Guns

use a squirt gun for outdoor art
Melissa Lenning via Fireflies and Mud Pies

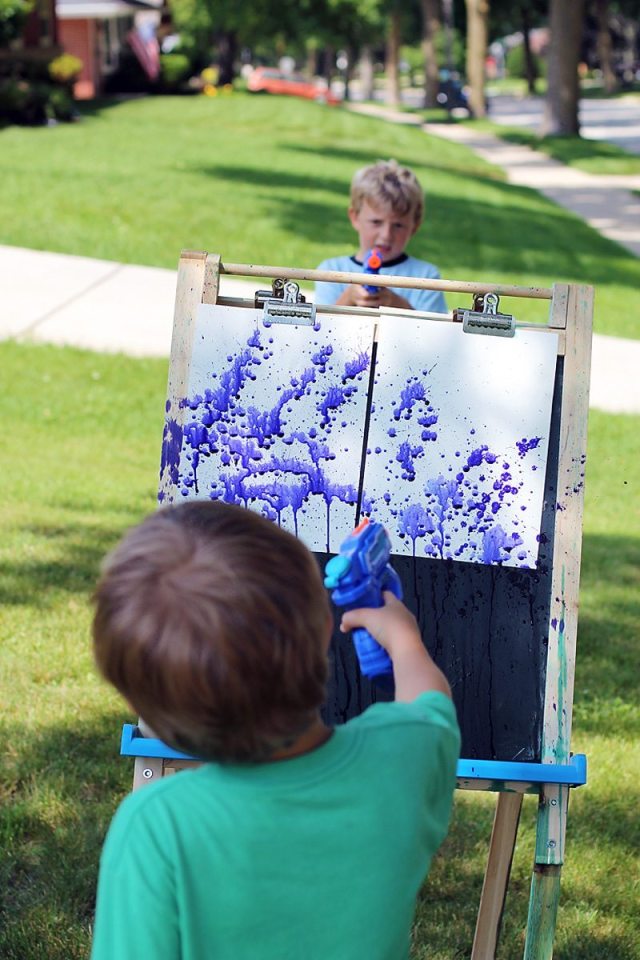
If you don’t want the family art easel to be covered in paint, you can easily recreate this outdoor art idea by attaching a few sheets of paper to a tree! We love the idea of containing the colors in a squirt gun, too. Get more details about this brilliant idea over at Fireflies and Mudpies.

Related: 27 Adorable Toddler Crafts You Can Pull Out Anytime

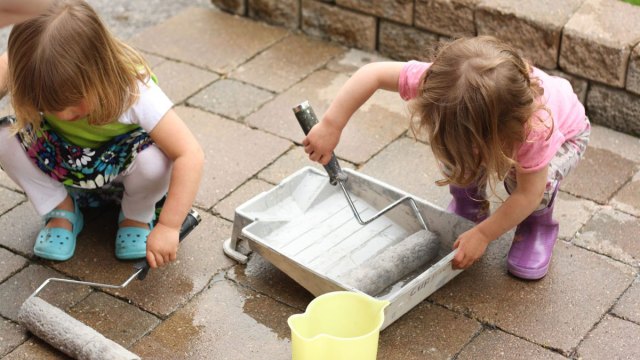
Make Foam Paint for the Sidewalk

use foam paint for outdoor art
Stephanie Pass via the Tip Toe Fairy

You’ll be able to ditch the dusty residue of sidewalk chalk with this easy foam paint recipe. Plus, keeping the paint contained in the condiment bottles helps to keep little hands free of stains. 


Related: Need 20+ Minutes of Quiet Time? Study Says These Crafts Are Your Best Bet

Skip the Paint Brushes

Aleacia Hitchcock

These incredible rainbow pour pots are pretty easy when it comes to cleanup, especially since there aren’t any brushes involved. Just be sure to totally cover the space before handing over the squeeze bottles. Make your way to Messy Little Monster for the tutorial.


Colored Salt

Chelsey Marashian via Buggy and Buddy

Colored salt projects are gorgeous, and they help to hone fine motor skills, too! After you've taken plenty of pictures, all you’ll need is a broom and dustpan to sweep it away. Find out how to color the salt—and how to get it to pour just right—over at Buggy and Buddy.


Paint Rocks

iStock

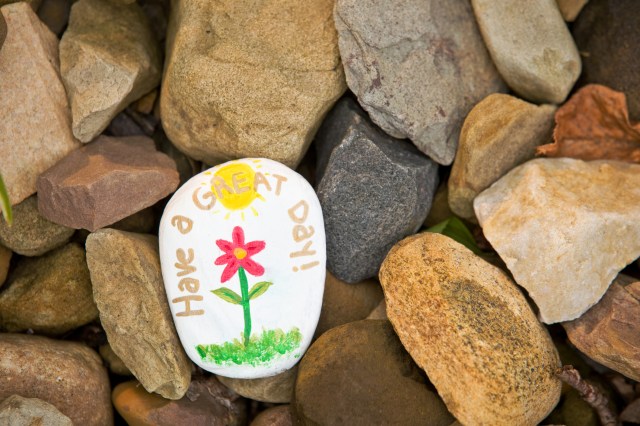
Kids only need a little bit of paint for this outdoor art project, so you don't have to worry (as much) about spills. We love the story behind the idea of painting rocks, too!

A holiday art project featuring your baby’s handprint or footprint is a fun, festive way to capture the moment

When there’s a new baby in the home, it’s practically a requirement that their tiny toes and fingers make their way into some sort of cute keepsake. Even if Christmas footprint art isn’t your thing (right now anyway), we’re betting the grandparents will think it’s the absolute best. We’ve rounded up our favorite ideas, and, one day, when the kids are grown, you’ll look back and marvel at how far they’ve come.

Cardboard Christmas Footprint Ornaments

So, these might not be the fanciest Christmas footprint art projects we’ve seen, but they are adorable, and you can make them with supplies you probably already have at home.

Mistle-toes Ornament

How adorable is this ornament? This Christmas footprint art project will win over even the most skeptical of parents. Check out this easy-to-follow tutorial from Midget Momma.

Thumbprint Heart Ornaments

Instead of little toes, use little fingerprints to create this adorable oven-baked clay snowflake with a heart in the middle. We also love the use of vibrant colors that don’t scream ‘holiday season.’ Get the tutorial from Made to Be a Momma.

Footprint Ornament Tile

A cute Christmas footprint art project
Make the Best of Everything

Capture those little piggies just as they are this holiday season with this Christmas footprint art project. We love the sweet saying that goes on the back of this tile ornament; find it and a full tutorial at Make the Best of Everything.

Salt Dough Ornaments

Christmas footprint art is a fun gift for grandparents
Viva Veltora

Create Santa and Rudolph using some salt dough, paint, and your child's hand and foot. Sturdier than paper and festive enough to display every year, these adorable ornaments are a great project to help you and your child get into the holiday spirit. Visit Viva Veltora for a simple tutorial.

Wooden Handprint Ornaments

Rustic Trims

To create these wooden ornaments, you'll need a little help from Etsy. You trace your child's hand, stamp it, or take a photocopy of it. Then you send that plus your child's hand measurements to the Etsy shop MadeWithMamaCo, and they'll craft a wooden ornament of your child's hand. They also burn your child's name and age into the wood and finish the ornament with a twine ribbon for hanging on your tree.

Christmas Penguin Plate

This penguin plate is a cute Christmas footprint art idea
Fun Handprint Art

Shake it up with a penguin plate instead of a footprint ornament. It's just as cute and can be displayed along with other Christmas decorations. The secret is all in the type of paint you buy. Get the details from Fun Handprint Art. 

Angel Handprint

Christmas footprint art angel
That Artist Woman

Your child is always a little angel, of course, and this DIY craft from That Artist Woman helps you prove it. It's easy to do and will be cherished forever. While your child's hands and feet are covered in paint, make multiples of this design to give to grandparents and other loved ones.

Mistletoes Printable Art

HappyHeartPrintables

Here's an easy way to keep it simple. Purchase a digital download of this template from the Etsy shop HappyHeartPrintables, and then break out the paint and your baby's little feet. Add your child's name and the year, then pop into an inexpensive frame for personalized decor or a fun present for grandparents!

Handprint & Footprint Kit

This clever kit from Bubzi Co makes it easy to preserve your child's tiny little toes and fingers forever. The kit comes with clay you insert into the frame and then gently press your child's hand and foot into. Pop two photos in the photo spots and your keepsake is done. You can buy the kit on Amazon ($18). Pro tip: If you suspect your child will be too squirmy or squeamish for the clay, wait until they're asleep to take their prints.


Jennifer Tyler Lee, Bay Area mom and author of The 52 New Foods Challenge, shared with us one of her favorite healthy lunch ideas: Homemade Chicken Noodle Soup. She tells us, “My kids love a hot lunch, and this recipe is an easy way for me to send a cozy meal that I know they’ll enjoy.” Her pro tip? When packing soup, only fill the thermos part way to the top with liquid to avoid spills.

Prep time: 15 minutes
Cook time: 30 minutes
Serves 6

Ingredients for homemade chicken noodle soup:

1 ¼ to 1 ½ pounds boneless skinless chicken thighs
4 tablespoons extra virgin olive oil
1 teaspoon wholegrain mustard
½ teaspoon kosher salt, plus more to taste
¼ teaspoon freshly ground black pepper
1 cup onions, chopped
1 cup carrots, chopped
1 cup celery, chopped
4 cups chicken broth
1 bay leaf
1 cup dry pasta (macaroni or rotini work best)

Method:

1. Preheat the oven to 450 degrees. Line a baking sheet with parchment paper.

2. Whisk together 3 tablespoons of olive oil, mustard, 1/2 teaspoon salt, and 1/4 teaspoon pepper in a medium bowl. Toss the chicken in the mixture until well coated. Spread out on the lined baking sheet as flat as possible and roast 23-25 minutes, until cooked through. When done, remove from the oven and let rest for 2 minutes. Then chop into 1-inch pieces and set aside. Reserve any cooking juices.

Tip: If you’re in a pinch, use a pre-cooked rotisserie chicken and skip to Step 3. Heat a large stockpot over medium heat. Add the remaining tablespoon of olive oil and then the onions and cook gently for 2 to 3 minutes, or until the onions are translucent. Add the carrots and celery and cook for 2 to 3 minutes more, or until the vegetables begin to soften.

4. Add the broth, 1 cup water, and the bay leaf. Cover and bring to a boil. Add the pasta, then reduce the heat to low and simmer for 8 minutes, or until the pasta is almost cooked.

5. Add the chicken to the pot and simmer for 2 minutes more.

6. Season to taste with salt and pepper.


Reprinted from THE 52 NEW FOODS CHALLENGE: A Family Cooking Adventure for Each Week of the Year, with 150 recipes. Reprinted by arrangement with Avery, an imprint of Penguin Publishing Group, a division of Penguin Random House LLC. Copyright © 2014 by Jennifer Tyler Lee.

Featured image: iStock 

Tantalize your family’s taste buds with this one-pot culinary delight. Cheese, chicken, and pasta make this dish hearty and satisfying, while the spices, tomatoes, and mushrooms balance out the dish’s nutritional needs. Ceri Marsh from Sweet Potato Chronicles gives the details on recreating this simple meal.

Ingredients for One Pot Tomato Chicken:

1 Tbsp olive oil
4 skin­less, bone­less chicken breasts, cubed
2 cloves gar­lic, minced
2 cups mush­rooms, sliced
1 Tbsp fresh Thyme
1/2 cup white wine
1/2 cup chicken stock (or 1 cup of stock if you don’t have or feel like using wine)
1 x 28 oz can of whole toma­toes
1 cup water
225 grams of dried pasta
salt and pep­per to taste
1/2 cup mozzarella

Method:

1. Warm up your olive oil in a large, deep skil­let over medium heat. Brown the chicken, you may need to work in batches. If you over­crowd the pan you’re going to boil the meat and that’s not what you want! Once all the meat is nicely browned (but don’t worry about it being cooked through), add the gar­lic and give it all a stir.

2. Now add the thyme and mush­rooms and let them soften up and kick off their juices. Now add the wine and/or stock, water, and toma­toes. Break the toma­toes up with the back of a wooden spoon.

3. Bring the sauce to a bub­bly sim­mer and add your pasta. As the pasta soft­ens up in the heat, push it under the liq­uid. Depending on which pasta you’re using it will take about 15 to 20 minutes—it will be longer than if you were just straight up boil­ing the pasta in water. Give it a taste now so you know how much salt and pep­per to add. Remove from the heat.

4. Top with a big hand­ful of moz­zarella and allow that to melt as you bring your yummy din­ner to the table. After din­ner, get some­one else to wash that one pot!

Sweet Potato Chronicles focuses on children’s health and nutrition and is co-founded by fashion editors Laura Keogh and Ceri Marsh. Their site cuts through the clutter and provides parents with the most important information on cooking for kids. For more healthy eats and family fare, head on over and follow Sweet Potato Chronicles


This one-pot recipe is a guaranteed crowd pleaser

We couldn’t resist this simple Tomato Basil Pasta recipe from Apron Strings—it’s literally made in one pot! Even better, it’s got tons of healthy veggies, making sure your little ones get the nutrition they need. Sounds like a dinner winner. For even more easy dinner ideas, check out our collection of 30-minute meals.


Tomato Basil Pasta Recipe Ingredients:

12 ounces linguine pasta
1 can (15 ounces) diced tomatoes with liquid
1 large sweet onion, cut in julienne strips
4 cloves garlic, thinly sliced
1/2 teaspoon red pepper flakes
2 teaspoons dried oregano leaves
2 large sprigs basil, chopped
4 1/2 cups vegetable broth (regular broth, not low sodium)
2 tablespoons extra virgin olive oil
Parmesan cheese for garnish

Cooking Method:

1. Place pasta, tomatoes, onion, garlic, and basil in a large stock pot. Pour in vegetable broth. Sprinkle on top of the pepper flakes and oregano. Drizzle top with olive oil.

2. Cover the pot and bring to a boil. Reduce to a low simmer, keep covered, and cook for about 10 minutes, stirring every 2 minutes or so. Cook until almost all liquid has evaporated – leave about an inch of liquid in the bottom of the pot–but you can reduce as desired.

3. Season to taste with salt and pepper, stirring pasta several times to distribute the liquid in the bottom of the pot. Serve garnished with parmesan cheese.

Recipe courtesy Apron Strings

This hearty pumpkin soup recipe takes advantage of a key fresh ingredient this time of year: pumpkin!

Nothing goes with all those cozy sweaters and falling leaves like a hearty pumpkin soup recipe. This is the best time of year to make a batch from scratch since you can use the abundance of fresh pumpkins in the supermarket or use up your Halloween decorations to create it. Add a nice hunk of bread and a salad on the side, or top with fresh asparagus and potatoes, and you have a warm and balanced meal to usher in the season.

Pumpkin Soup Recipe Ingredients:

1 tablespoon butter

1 medium onion, finely chopped

2 cloves garlic, crushed

1 pound pumpkin, peeled, seeded, cut into 1-inch cubes

3 cups chicken stock

1 tablespoon tomato paste

1 tablespoon grated parmesan cheese

1/4 teaspoon salt

1/4 teaspoon pepper

Optional: asparagus (lightly steamed) and/or diced potatoes (steamed or roasted)

Method:

1. Melt butter in a large saucepan over medium heat. Add onions and garlic and cook until translucent, 3 to 4 minutes, stirring.

2. Add pumpkin and cook 3 minutes, until lightly softened.

3. Add stock and paste and stir to mix. Bring to a boil over high heat, lower to a simmer, and cover. Cook 20 minutes, until the pumpkin is very tender.

4. Transfer to a food processor and puree until smooth. Add cheese, salt, and pepper; mix and serve warm.

5. If serving with asparagus, lightly steam and add two or three spears diced to add a punch of color.

Recipe adapted from pumpkinrecipes.org

You’ll want to make this yummy snack all year

Pumpkin bread that’s moist, flavorful, and easy to make? Yep, it’s true! This easy pumpkin bread recipe is perfect for the festive holiday season, especially when your time is limited since there is very little prep time or dirty dishes involved. Try making the pumpkin bread in a regular loaf pan, or if you’re looking for a unique present, bake the bread in a coffee tin or in old soup cans. Then wrap it up with cellophane or tissue paper and you’ve got yourself a great (and delicious) gift.

Easy Pumpkin Bread Recipe Ingredients: 

1 (15 ounce) can of pumpkin puree
4 eggs
1 cup vegetable oil
2/3 cup water
3 cups white sugar
3 1/2 cups all-purpose flour
2 teaspoons baking soda
1 1/2 teaspoons salt
2 teaspoon ground cinnamon
2 teaspoon ground nutmeg
1 teaspoon ground cloves
1 teaspoon ground ginger

**this recipe will yield three 7″ x 3″ loaf pans. We suggest cutting the recipe in half if you don’t want that large of a portion. If you do cut the recipe in half, it will make one regular loaf.

Method:

1. Preheat oven to 350 degrees F (175 degrees C). Grease and flour three 7×3 inch loaf pans.

2. In a large bowl, mix together pumpkin puree, eggs, oil, water, and sugar until well blended. In a separate bowl, whisk together the flour, baking soda, salt, cinnamon, nutmeg, cloves, and ginger. Stir the dry ingredients into the pumpkin mixture until just blended. Pour into the prepared pans.

3. Bake for about 50 minutes in the preheated oven. Loaves are done when a toothpick inserted in the center comes out clean.

Recipe adapted from Allrecipes.com


This no-brainer crock pot recipe is as easy as it can get

For an easy dinner, nothing beats relying on your crock pot. This crock pot chicken recipe—from Phyllis Good’s new book, Stock the Crock—is truly a slice of heaven. Convenient, delicious, and adaptable to Paleo diets, we’re betting this recipe will soon become a part of your nightly rotation. Read on for the crock pot recipe below, and then check out her book by clicking here.

You’ll need a 6 qt. oval slow cooker
Serves 4 to 5
Prep: 10 to 15 minutes
Cook: 4 to 5 hours.

Chicken Crock Pot Recipe Ingredients:

1 lemon, sliced
4 sprigs fresh rosemary
4- to 5-pound whole chicken
1⁄2 teaspoon salt
1⁄2 teaspoon black pepper
1 1⁄2 to 2 cups chicken broth (make your own, page 256) or dry white wine, or a combination of the two
3⁄4 to 1 pound gluten-free noodles, cooked, optional
1⁄2 pound peeled baby carrots, cooked, optional
1 1⁄2 cups peas, cooked, optional
fresh toppers: fresh rosemary and lemon slices

Method:

1. Grease the interior of the slow cooker crock with butter or nonstick cooking spray.

2. Place the lemon slices and rosemary sprigs into the cavity of the chicken.

3. Holding the chicken over the crock, sprinkle salt and pepper all over the bird. Place it in the prepared crock.

4. Pour the chicken broth and/or white wine down along the sides of the crock so you don’t wash the seasoning off the chicken.

5. Cover. Cook on Low 4 to 5 hours, or until the legs move freely and an instant-read meat thermometer stuck into the breast (but not against the bone) registers 160°F or stuck into the thickest part of a thigh (but not against the bone) registers 175°F.

6. Remove and discard the lemon slices and rosemary sprigs. Cut up the chicken, and serve with noodles, carrots, and peas, if desired. Add fresh rosemary and lemon slices, if desired. Reserve the broth for gravy or as a soup base for another meal.

Good to Know: Simple Swaps

Add 1⁄4 teaspoon garlic powder in addition to salt and pepper in Step 3. After seasoning, put the chicken in the crock, breast down, and sprinkle in a pinch of saffron just before cooking. Saffron isn’t cheap, but it really boosts the wonderful flavor of this chicken!

For more broth, add 3 to 4 cups of water in Step 4.

Place half of an onion into the cavity of the chicken in Step 2 for additional flavor. Remove it in Step 6 before cutting up the chicken.

How to Make It Paleo-Friendly

Use sea salt instead of iodized salt.

Eat the chicken with vegetables (remember, no legumes, potatoes, or grains) for one main meal and with fresh salad ingredients for another (steering clear of commercial salad dressings, of course).


Phyllis Good is the most trusted name for slow-cooker recipes. According to the New York Times, her books have sold more copies in the US than the combined works of popular Food Network hosts Ina Garten, Giada De Laurentiis, and Jamie Oliver. With her new cookbook Stock the Crock (Oxmoor House, September 2017, $21.99), Good has compiled 100 delicious must-have recipes as well as 200 easy-to-follow variations for any dietary preference (gluten-free, paleo, vegan, etc.). Crowd-sourced from Good’s massive fan base and tried-and-tested by Good herself, the recipes in this book promise to be made time and again.

Excerpted from Stock the Crock by Phyllis Good. Copyright © 2017 Oxmoor House. Reprinted with permission from Time Inc. Books, a division of Time Inc. New York, NY. All rights reserved.


This might be the easiest dessert you make, ever

Fun dessert alert! Did you know you can whip up your batch of ice cream right at home without any extra appliances? All you need are the right ingredients and plastic bags. Read on for the “scoop” on how to make homemade ice cream in a bag.

Ingredients for Homemade Ice Cream in a Bag:

1 tbsp. sugar
1/2 cup milk (will make about one scoop of ice cream, can sub soy, coconut, or rice milk or use cream)
1/4 tsp. vanilla
6 tbsp. rock salt
1 pint-size plastic food storage bag (e.g., Ziploc)
1 gallon-size plastic food storage bag
Ice cubes

How to Make Ice Cream at Home:

1. Fill the large bag half full of ice, and add the rock salt.

2. Seal the bag.

3. Put milk, vanilla, and sugar into the small bag, and seal it.

4. Place the small bag inside the large one, and seal it again carefully.

5. Shake until the mixture is ice cream, which takes about 5 minutes.

6. Wipe off the top of the small bag, then open it carefully.

Insider Tips:

A 1/2 cup of milk will make about 1 scoop of ice cream, so double the recipe if you want more. But don’t increase the proportions more than that—a large amount might be too big for kids to pick up because the ice itself is heavy. This ice cream won’t have quite the same consistency as a pint of store-bought, but you can control the ingredients so that’s a big win.

If there is a milk allergy, try this with fruit juice. Use straight pineapple juice—it’s a terrific fruit sorbet. OR rice/soy milk as the milk substitute.

This recipe for how to make homemade ice cream in a bag is courtesy of Yuumii, an online community founded by a San Francisco family who wanted to come up with creative ways to spend more quality time with their kids.

Related: 15 Sweet Ice Cream Sundae Bar Ideas


If you have yet to unleash this culinary treat on your kiddos, then you’re in luck, because kids go absolutely crazy for it!

As if pasta couldn’t get any better, this dish takes the multi-colored pasta and makes it a more complete and hearty meal with the addition of veggies. This tri-color pasta salad recipe is very adaptable, so don’t be afraid to mix it up with whatever you’ve got in your pantry or in your refrigerator. Serve with French bread and enjoy either hot or cold.

Tri-Color Pasta Salad Recipe Ingredients:

2 tbsp olive oil
1 small red or yellow onion, finely chopped
1/2 tsp dried herbs (basil, marjoram, oregano, thyme, plus a squeeze of lemon juice)
2 garlic cloves, finely minced
1-2 c soft vegetables (sliced bell peppers, corn, chopped and salted eggplant, sliced mushrooms, peas, chopped spinach)
1/4 tsp salt
14.5-ounce box of tricolor pasta
1-2 c cut-up hard vegetables (carrots, celery, zucchini, broccoli, or cauliflower)
2 tbsp sour cream
1/2 c grated Parmesan cheese
1 tbsp fresh basil, finely chopped

Preparation Method:

1. Heat the olive oil in a large skillet over medium-high heat. Add the onion and cook, stirring occasionally, until soft, about 3 minutes.

2. Stir in the dried herbs and the garlic and cook for about a minute, and then stir in the soft vegetables and 1/2 tsp salt. Cook, stirring occasionally, until the vegetables are tender, about 4 minutes, stirring often. Turn off the heat and set aside.

3. Boil a pot of water, and cook pasta for 3 minutes. Add the hard vegetables and continue to cook until the pasta is al dente. Reserve 1/2 c of the pasta water, then drain the pasta and vegetables and return them to the pot.

4. Stir the sour cream and 1/2 tsp salt into the pasta, then add 1/2 c of the Parmesan, the basil, and 1/4 c of the pasta water.

5. Stir to combine, add the cooked soft vegetables or leafy greens, and add more pasta water if needed. Serve with more Parmesan on the side.

Recipe adapted from Melissa d’Arabian, photo courtesy of Incidental Cooking