Spring has arrived and warmer weather is here which means it’s time to get the kids outside and away from their screens. But what can we do to keep kids entertained while still learning and innovating?

Check out these stimulating and fun outdoor STEM activities that can be made with materials you have at home.
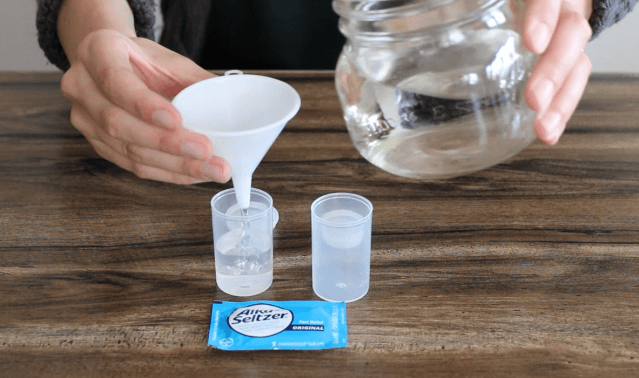
Tiny Rocket
This activity is out of this world.

Test different amounts of water and Alka-Seltzer and see how high your rocket can go! When you mix these effervescing tablets with water, a chemical reaction takes place between the citric acid and sodium bicarbonate contained in the tablet and the water. This chemical reaction creates many, many bubbles of carbon dioxide gas. When the lid can’t hold all that gas anymore, the canister goes shooting off! This action can be explained using Newton’s Laws of Motion.

Materials:

– Film canisters

– Alka-Seltzer

– Water

Instructions:

– Fill your film canisters with varying amounts of water.

– Drop ¼ to ½ of an Alka-Seltzer tab into your water and quickly replace the cap and turn it upside down.

– Test different ways to make your rocket go off, just keep faces clear of the exploding canisters!

Exploding Bags 
A new kind of baking soda and vinegar activity.

Watch as your bag explodes! Popping the inner bag releases the vinegar and mixes with the baking soda causing the solution to quickly make bubbles and gas until the bag can’t take it anymore! Try this activity with different measurements and record your findings!

Materials:

– 1 medium to large zip bag

– 1 small to medium zip bag (this bag needs to be smaller than your other bag)

– Baking powder

– Vinegar

Instructions:

– Pour some vinegar into the small bag and zip closed. Make sure there’s some air left in the bag.

– Pour some baking soda in the larger bag, add the smaller bag of vinegar, and close the bag making sure to get out as much air as possible.

– Lay your bag on a flat surface and smack it until you pop the inside bag, shake, and watch as your bag inflates and eventually pops!

Lemon Juice Balloons 
Ever needed a new way to blow up a balloon? 

How big can you make your balloon? When the acidic lemon juice mixes with the baking soda base, it rapidly creates carbon dioxide and blows up the balloon! What combinations make the biggest balloon?

Materials:

– Balloon

– Lemon juice

– Baking powder

– Bottle or jar (the mouth needs to be small enough for a balloon to fit over it)

– Funnel (optional)

Instructions:

– Add lemon juice to your jar.

– Add baking soda to your balloon using a funnel.

– Stretch the opening to your balloon and fit it over the mouth of the bottle. Tip the balloon up and let it fall into the lemon juice.

– Watch the chemical reaction blow up your balloon!

This post originally appeared on Tierra Encantada.
Tierra Encantada is a warm, community-oriented Spanish Immersion Daycare and Preschool headquartered in Minneapolis, MN and currently expanding nationwide. We offer quality child care for children ranging from 6 weeks – 6 years of age. We focus on the growth of the whole child and believe children learn best by doing. Our award-winning bilingual education program fosters early cognitive development and teaches a respect for diversity.

Three meals a day may not be enough to cover a child or teen’s nutrition needs to grow, learn, and stay active. An afternoon snack can help fill the gap. The questions to ask are: What foods do our kids really need? And how to make snacking healthy and prevent it from interfering with any of the three other daily meals? To find out the right answers, we asked the experts.

Do Kids Need a Snack?

Most experts agree that kids of all ages need an afternoon snack to fill the gap between lunch and dinner. What they eat and when can make a difference when it comes to keeping them attentive and energized throughout the day. That makes it a good reason for us as parents to plan for it and make snacking part of our kid’s daily eating schedule.

Public health experts consider that this afternoon snack still needs to combine nutrient-dense food items, like any meal, if we want to make sure that it actually benefits the child’s needs. The Dietary Guidelines for Americans 2020-2025 insist on nutrient-dense foods that provide vitamins, minerals, and other health-promoting components and have no or little added sugars, saturated fat, and sodium.

“As a general rule, ANSES, the French Agency for Food, Environmental, and Occupational Health & Safety, considers that it is preferable not to create opportunities for eating between formal meals (breakfast, lunch, “afternoon tea”, supper) particularly in view of the need to restrict excessive daily energy intake. ANSES thus recommends that food should only be served at school in the framework of a formal meal, such as breakfast or “afternoon tea”, and should not take the form of a separate snack,” reports Claire Bladier, a professional in nutrition research who collaborated with experts from ANSES.

What Are the Core Elements of a Healthy Snack?

Unplanned snacks tend to lead to the highest amounts of sugar, sodium, or fat. Fortunately, there are plenty of delicious and healthy snack options that you can easily stock up on. We asked Cecile Cottus, Registered Dietitian, to guide us in finding out the core elements that make up a healthy snack and that allow each family to make tailored and affordable choices that meet their preferences.

1. Focus on simple food ingredients. Whether you shop for ready-to-eat snacks or like to prepare homemade snacks, it all starts at the grocery store. When shopping, choose food items with the shortest nutrition labels, 5-6 ingredients maximum. This will help you stock up on nutrient-dense food items. Learn more about how to read ingredients labels in this article.

2. Cover a minimum of two food groups. A balanced snack will ideally combine a minimum of two food groups:

  • Grains with fruit or veggies
  • Grains with a dairy
  • Grains with cheese

3. Think outside the box. Be creative. Find and combine the simple food ingredients your kids already love. Treats can be part of your kid’s afternoon snack as long as you find a balance over the week. As an example, it can be ok to give your child a bar of chocolate if it comes with bread or another source of grains. This option can be healthier than serving a bar made out of a long list of ingredients you don’t know.

Once at school, your child will decide when to eat and how much, but by planning ahead and providing them with balanced meals, you can boost their brainpower and give them the energy they need without the rush on junk foods.

Ready to reinvent snacking in your house? Plan ahead, be creative and don’t forget to get your kids involved. Need some help to get started? Have a look at the snack category on Teuko.com.

This post originally appeared on Teuko Blog.

Teuko is the first platform that empowers families to simplify lunch packing. Using Teuko, they can find and share kid-approved lunchbox ideas, recipes, and tips, all in one place. Teuko is transforming the lunch packing experience by boosting inspiration and motivation week after week. 

Photo: Hannah Tasker via Unsplash

Some children are picky eaters, while others gobble down practically everything in sight. For those parents who struggle with getting their kids to eat, mealtime can feel nightmarish. Lucky for you, change is possible. Prepare to turn even the most challenging appetites into miniature foodies.

Here are 7 creative ways to feed your kids:

1. Use Fun Utensils. If you have a fussy eater, now’s the time to buy those adorable kid’s utensils you’ve been eyeing at the store. There are forks shaped like airplanes, trucks made to hold tacos, and even plates that make eating a game!

Honestly, with devices like this, mealtime should be just as much fun as playtime.

2. Make Tasty Treats. This tip is twofold. Firstly, if your kids don’t have food restrictions, get in the habit of cooking adult food. Season it as you would your own food and demonstrate how much you enjoy eating it. This is likely to make your youngsters curious enough to try it.

If they grow up eating bland kiddie food, you’ll have a greater challenge transitioning them to adult foods. However, keep in mind that people frequently use salt to season their dishes. While you may appreciate the taste, children require very little sodium in their diet. Instead, focus on other healthy seasonings like turmeric, garlic, and ginger.

Secondly, offer your children dessert if they finish the food on their plate. Frozen fruit smoothies and popsicles can be a sweet but healthy end to their meal. Pretty much every kid has a sweet tooth — making a tasty treat the perfect incentive for them to finish their veggies.

3. Space Out Meals. The human body has limits on how much it can eat at a time. If your child had a big lunch, they might not be as hungry at dinnertime. Space out the meals and offer nutritious snacks throughout the day. Babies usually feed every one to three hours, while toddlers and older kids will eat a mixture of snacks and larger meals each day.

4. Cook Together. Do your children help in the kitchen while you prepare their meals? Cooking together is a terrific way to teach them about nutrition. As they help you prep dishes, they can try new ingredients. By involving them in the process, you are sparking their interest and imagination. If they’ve helped you make the dish, they’ll be much more likely to try the food.

As a bonus, your children learn vital life skills that will be useful when they move out of the house. Many people struggle with cooking, and teaching your kids will help them cultivate these skills early.

5. Form Interesting Shapes. You can transform most foods into something fun and interesting with a cookie cutter or stencil. Everyone knows that a star-shaped lunch is much more fun to eat than a basic square sandwich! You can apply this same method to other foods like fruits and vegetables.

If the ingredients are difficult to cut, you can position them on the plate to form an image or word. Even a simple smiley face is more enjoyable than shapeless blobs of food. While distracted by the unusual designs, your kids won’t mind feeding themselves. For an educational twist, ask them to name the icons you made.

Easy shapes to create include:

  • Stars
  • Triangles
  • Letters
  • Numbers
  • Faces

6. Invent Wild Names. Sticking with the theme of making mealtime fun and exciting, try inventing wild new names to pique your child’s curiosity. These can range from entirely different words to fun descriptions that will make trying new things an adventure.

Some examples include:

  • Broccoli, also known as miniature trees.
  • Bananas, also known as monkey food.
  • Grapes, also known as tiny juice balloons.
  • Carrots, also known as x-ray vision carrots.
  • Pretzels, also known as tree branches.

7. Eat at the Same Time. Do you eat at the same time as your child? Some parents choose to eat separately because they’ve only had time to prepare their kid’s meal and not their own. Break this habit by cooking more meals that are suitable for the entire family. A quick toss in the food processor will make atypical meals soft enough for your toddler to enjoy. However, make sure to follow safety suggestions regarding portion size and consistency to avoid potential choking hazards.

Besides encouraging your kids to try new foods, eating at the same time teaches them the importance of family mealtime. They’ll learn they have to wait at the table while everyone is finishing, which means they’ll have more time to nibble on their leftovers.

Look Forward to Mealtime

Using these creative tricks, your kids will be looking forward to mealtime. Remember to stay positive as you try these various methods with your family. Some will be more successful than others, but the key is to remain enthusiastic and optimistic. Children can sense things, and if you’re worried or stressed, it could impact their actions.

Keep an open mind, and feel free to try variations of these ideas. Maybe bright colors will interest your child more than fun shapes—do what works for you and your family!

Jennifer Landis is a mom, wife, freelance writer, and blogger. She enjoys long naps on the couch, sneaking spoonfuls of peanut butter when her kid's not looking, and binge watching Doctor Who while her kid's asleep.  She really does like her kid, though, she promises. Find her on Twitter @JenniferELandis.

Editor’s note: This story is aimed to lower the chemicals you use in everyday life, such but please follow the CDC guidelines for keeping your home and surfaces disinfected and clean to prevent the spread of COVID-19. 

If you’re on a mission to detoxify your home during this spring cleaning season, remember, there are some common household toxins that tend to go overlooked (did you know tea tree oils are a hidden toxin?). In order to make your home as safe as possible, cross-check our list of hidden toxins and chemicals in your home, and what you can use in their place.

iStock

Hidden Toxin: Bug Spray

What to do about it: It's a fact that bugs can be creepy, especially when they invade your home. But, according to the CDC, pesticides you can find at the store are one of the leading causes of poisoning. Instead, opt for natural solutions like cinnamon, essential oils or diatomaceous earth, which is basically tiny fossils that'll smother any bug problems. 

Marco Verch via flickr

Hidden Toxin: Fluoride

What to do about it: According to naturopathic doctor John Dempster, research shows that the synthetic fluoride in our drinking water and toothpaste has been linked to cancer, thyroid and neurology problems. Install a water filtration system to rid your water of fluoride and other toxins and consider switching to a fluoride-free toothpaste.

kathycsus via flickr

Hidden Toxin: Bisphenol A (BPA)

What to do about it: You can find BPA hiding in plastic wrap, food packaging and reusable containers, baby bottles and water bottles. It’s best to switch to glass whenever possible as Time Magazine reported a growing concern from the National Toxicology Program regarding BPA exposure levels in babies and young children that could cause harmful brain and behavioral effects.

p.v via flickr

Hidden Toxin: Poisonous Houseplants

What to do about it: Who knew that decorative ivy growing just outside your home or philodendron displayed in an indoor pot can be poisonous to both your children and pets? There are dozens of houseplants to avoid for human and animal safety, including Ivy, Philodendron, Pothos, Arrowhead, Peace Lily, Dieffenbachia, Caladium, Mother-in-Law’s Tongue and Oleander.

shalommama via flickr

Hidden Toxin: Tea Tree Oils

What to do about it: While you may have an arsenal of essential oils for personal use, remember that your dogs and cats do not share the same oil love. Vets are seeing more and more animals brought in for issues related to essential oil use in the home, most popularly, from diffusing oils around them. The ASPCA even has a warning listed in their animal poison control info center: “We would not recommend using essential oils in areas where your pets have access unless pets are supervised or the use of the oil is approved by your veterinarian.” Be sure to stay away from tea tree, wintergreen, cinnamon, pine, eucalyptus, pennyroyal and citrus oils around pets, which are extremely toxic to your furry friends.

sophistichate via flickr

Hidden Toxin: Phthalates

What to do about it: This household toxin can be found in scented products like laundry detergent, dish soap and air freshener. Companies do not need to disclose what is in their fragrances by law, so unless you see scent ingredients listed on a label, it’s best to opt for fragrance-free whenever possible to eliminate the risk of phthalate exposure. You will also want to avoid plug-in air fresheners and aerosol sprays. The EWG warns of using these products as they can trigger allergies and often contain suspected endocrine disruptors.


Samantha Gades via Unsplash

Hidden Toxin: Scented Candles

What to do about it: Studies have found that as many as 30% of candles contain heavy metals (including lead!) in their wicks to make the wicks firmer, according to Thank Your Body. When burned, these lead-laden candle wicks release five times the amount of lead considered hazardous to kids! As an alternative, you can make your own simmering potpourri by boiling lemon, rosemary or other herbs, and cinnamon on the stove, or diffuse safe essential oils (see above!). But if candles are still your thing, that’s OK too! Just be sure to look for 100% beeswax candles with cotton wicks.

Shopify Partners via Burst

Hidden Toxin: Sodium Hydroxide

What to do about it: Sodium Hydroxide is also known as lye, and it can be found in oven cleaning solutions and drain opening liquids. It is extremely harsh and corrosive and can cause burns to skin and eyes. Best way to avoid this harmful toxin? Don't use it. Baking soda solutions work on grimy ovens just as well—they just require a little more elbow grease.

— Kaitlyn Kirby


RELATED STORIES: 

Hate Laundry a Little Less with These 5 White Vinegar Hacks

12 Non-Toxic Ways to Clean Your House


photo: Pixabay

Everyone wants a healthy baby. But whether or not we say it out loud, sometimes a mom or dad is secretly hoping for a particular gender to complete the family. And, it turns out, there are some science-backed things you can do to help your wish come true.

If You’re Hoping for a Baby Boy, Stock up on Bananas
A study published in the Proceeding of the Royal Society B found that women with diets high in potassium (found in bananas, as well as potatoes, clams, and artichokes, among other foods) are more likely to bear sons.

“We were able to confirm the old wives’ tale that eating bananas and so having a high potassium intake was associated with having a boy, as was a high sodium intake,” the study’s lead author Fiona Mathews, a specialist in mammalian biology at Exeter University, told the Guardian newspaper.

— and, Drink Milk. With Cereal
The study also found that diets higher in calcium led to higher numbers of boy babies. “The old take about drinking a lot of milk to have a girl doesn’t seem to hold up,” Mathews said in a CNN report. “In fact, more calcium meant they were again more likely to have a boy.”

There’s more: Mamas who want boys should also start their day with a bowl of cereal, since daily cereal consumption also appeared to result in more male births. Of women eating cereals daily, 59 percent had boys, compared with only 43 percent of boy births for women who reported eating less than a bowlful per week, the report said.

Hoping for a Baby Girl? Cut the Salt, Skip the Bananas & Load up on Magnesium
Mamas hoping for a little girl might want to try a diet low in salt and rich in beans and hard cheeses, according to scientists from Maastricht University in Holland. Their research found that women with a diet high in magnesium and calcium, and low in sodium, appeared more likely to give birth to girls. This was in conjunction with the timing of intercourse, which the scientists said should be avoided the day of and the day before ovulation.

“In total, 32 women satisfied the conditions of the prediction rule and the observed percentage of female babies in this group was 81%,” a report published in the journal Reproductive Biomedicine. “The conclusion of the study is that a maternal diet together with timing of sexual intercourse and use of a prediction rule will lead to an increased probability of a girl baby.”

The researchers also told moms who want baby girls to avoid potassium-rich foods.

No matter what gender you’re hoping to have, all pregnancy (and pre-pregnancy) diets should be packed with nutrition. Because, of course, all we really want is a healthy baby boy or girl.

For more gender-swaying myths versus realities, click on this article from Daily Mail.

Did you try anything to sway your baby’s gender? Tell us in the comments below. 

This homey recipe courtesy of Kari from GI 365 is perfect for those chilly but busy days—just pop some chicken, butternut squash, and cream of chicken soup in the crock pot in the morning, and you’ll have a complete meal ready by the time you get home. For extra brownie points, skip the sodium-heavy cans of soup and make your own cream of chicken soup using Kari’s recipe.

Ingredients:
3 pounds butternut squash, peeled and seeded
1½ pounds chicken thighs, browned (browning is optional)
1 tablespoon olive oil, for browning
1 medium onion, small dice
1 cup homemade cream of chicken soup
1 tablespoon rosemary, minced
1 tablespoon sea salt

Method:
1. Cube the squash into 1½ inch cubes and place in the crockpot. Cut the onion into a small dice and place it in with the squash.

2. If you’re browning the chicken, place a cast iron skillet over medium-high heat. When the pan is hot, add the olive oil and the chicken thighs. Brown for just a minute on each side. Transfer the chicken to the crockpot.

3. Pour the homemade cream of chicken soup over the top and sprinkle with sea salt and rosemary.

4. Place the lid on the crockpot and turn to low for 8 hours.

Note: To make this completely dairy free, be sure to use a non-dairy cream of chicken soup. Browning the chicken adds extra flavor, but it’s not necessary if time is short.

What do you think of this recipe? 

Recipe and photo courtesy of Kari from GI 365

For the home cooks looking to change up their dinnertime routine with healthy and tasty meals check out the new book, Mr. Food Test Kitchen: Guilt-Free Weeknight Favorites. Published by the American Diabetes Association, this new cook book features healthy family recipes for diabetic and non-diabetic eaters. Check out the recipe below for Athenian Pizza, a healthy take on the classic pie.

Serves 12, 1 slice per serving

Ingredients:
1 tablespoon olive oil
1 onion, thinly sliced
1 (10-ounce) package prebaked whole-wheat pizza crust
4 ounces roasted red peppers, patted dry and sliced
3 tablespoons sliced black olives
1/2 cup crumbled reduced-fat feta cheese
1 teaspoon Italian seasoning

Method:
1. In a large skillet over medium heat, heat oil. Add onion and cook 15 to 20 minutes, or until golden and caramelized, stirring frequently.

2. Preheat oven to 400°F.

3. Place pizza crust on round pizza pan. Top with onion, roasted peppers, olives, and feta cheese. Sprinkle with Italian seasoning.

4. Bake 8 to 10 minutes, or until crust is crisp. Cut into 12 slices and serve immediately.

Good to Know: Caramelizing onions brings out their natural sugars and makes them taste unbelievably good. So ya won’t wanna skip this step. And since the feta and olives add a touch of saltiness, there’s no need for any added salt.

Health Information:
Calories 90, Calories From Fat 35, Total Fat 4.0g, Saturated Fat 1.5g, Trans Fat 0.0g, Cholesterol <5mg, Sodium 200mg, Potassium 30mg, Total Carbohydrates 13g, Fiber 2g, Sugar 1g, Protein 4g, Phosphorus 5mg

A healthy pizza! Music to your ears. “Like” this story if you plan to make this recipe instead of ordering from your local pizza parlor.

With more than 30 million adults and children with diabetes in the United States alone and an additional 1.7 million are newly diagnosed each year diabetes is a disease that touches us all. MR. FOOD TEST KITCHEN: GUILT-FREE WEEKNIGHT FAVORITES will provide your diabetic and non-diabetic eaters with healthful recipes they can make Monday through Friday when they’re short on time but have a family to feed. Available on Amazon.com for $12.

While chicken breast isn’t especially known for its natural flavor, Nicole from Nibbles by Nic discovered a great way to dress up an otherwise bland piece of poultry. She seasons the chicken and then marinates it, which creates big time flavor. The best part? Most of the ingredients should already be in your pantry. Huzzah!

Ingredients:
2 tablespoon dijon mustard
2 tablespoon light agave nectar
2 tablespoon balsamic vinegar
2 tablespoon reduced-sodium soy sauce
2 tablespoon worcestershire sauce
2 cloves garlic minced
zest 1/2 lemon
zest 1/2 orange
1/2 teaspoon salt
1/2 teaspoon garlic powder
salt/peper to taste
Ground Pepper to taste
1 1/2 pounds chicken breast trimmed of fat and cut into 4 uniform pieces

Method:
1. Heat grill or grill pan to high heat.

2. Whisk first 8 ingredients together in a medium sized bowl. Season chicken with salt pepper and garlic powder.

3. Marinate spice-dusted chicken for at least 2 hours and up to 24 hours.

4. Place chicken on grill or grill pan for 3-4 minutes to cook per side depending on thickness (When you see char marks flip it)

5. Baste chicken with remaining marinade halfway through cooking time.

Chef’s Tips: Throw peppers and zucchini strips tossed with olive oil on pan for side.

Recipe and photo courtesy of Nicole from Nibbles by Nic. Hop on over to her blog for more fantastic recipe ideas and nibbles for kids.