reading technology

Mandy Chen, a private tutor, creator of ‘Fun with Joy Mandarin,’ and co-host of ‘Chinese Tea podcast,’ has experience teaching kids of all ages—from younger than one year to high school. Given the current environment and interest in home education, she’s sharing her tips on how to structure bilingual learning at home—practical ideas that don’t require formal tutors or teachers.

How do you structure bilingual learning at home? How does one start?   

“The most important element I think is consistency. Even just 30 minutes a day works—as long as it’s consistent. Of course if you have more time, great. But consistency is key.”

As far as the structure goes, I would break it down into 3 simple categories—choose any order you want:

  • Singing and dancing: This could involve anything from nursery rhymes, movie theme songs, pop culture songs, and even topical coronavirus songs going on now.

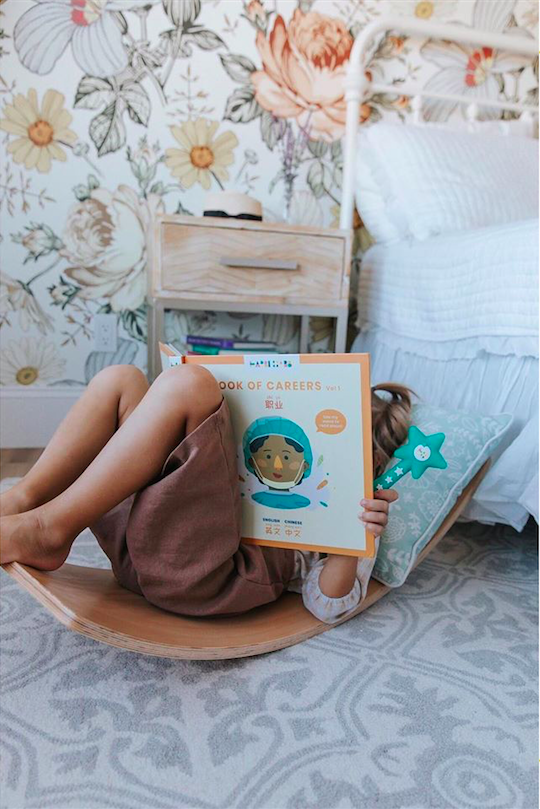
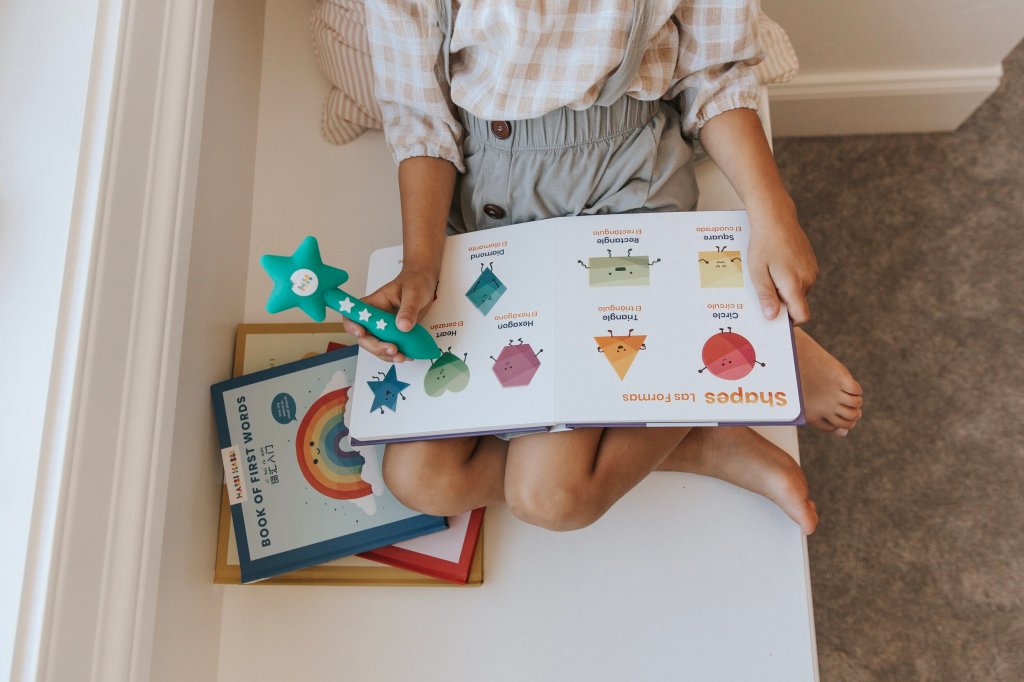
  • Storytime: This could be 1 book or 2 books … it doesn’t matter. It can even be the same book, for young children where they want to repeat the content to learn and remember it. For parents who don’t speak Chinese, there is an increasing number of sound/reading wand/robot products on the market now to help.

  • Interactive activity: This could be something like tracing, arts & crafts, or games.

If the session is only 30 minutes, does this mean each activity is 10 minutes? Is 10 minutes too short?   

“No, as long as you keep it consistent. I don’t think it’s too short. Realistically, the hardest thing is to be consistent, and that’s the most important. Similar to exercise, if you can just keep a regular routine of 30 minutes a day, that is terrific.”

The activities sound like they require a lot of parent engagement. Is it possible to be more independent? Or is that unrealistic?   

“It’s possible for the kids to learn independently. For the singing/dancing, you can just play it on youtube—that doesn’t mean you have to show them the screen—you can just play the audio. Of course, if there are actions or dancing paired with the song, that might be helpful for them to see so they can join along.

For storytime, there are so many products and sound books available—products like Habbi Habbi that allow kids to try to read by themselves. There are also products that can play themselves (like books on tape or those robot toys that have pre-recorded stories or music on them). You can even find bloggers who read Chinese stories or are conducting virtual storytime on Youtube.

For the activity, there are activities kids can do themselves like simple word tracing, pairings, or puzzles. You just need to print it out, and they can color the word.”

A lot of young kids have short attention spans. What activities, based on your experience, work well for kids?   

“I’d suggest building off something they love—a favorite toy, LEGOS, for example, can be used to build 2D or 3D Chinese characters! Integrate the activity with that toy. Also, young kids with short attention spans often have a hard time sitting still because they want to move. So you might integrate the Chinese activity with movement, for example, dancing with the song.

Every kid is different in what they like and what holds their interest. I’d suggest parents try different types of activities and for whichever one that sticks, continue to do more of that activity, with different content.”

We’ve discussed ‘basic exposure’ types of activities. What if you want to go a little bit deeper? 

“There are other activities that can be more involved but are also fun. Fun is important because it’s so important to make sure language learning holds their interest and is not a chore. Some example activities include a Chinese art wall or poster, building their own illustrated Chinese dictionary, or writing their own Chinese story.”

When they create a story, would they write it or speak it? 

Either! It depends on their capability. If they can, I’d encourage them to write it. I’d also encourage them to make their own illustrations. Kids love imagining and building characters, their stories, and the setting.”

Speaking of writing vs speaking, young parents are often focused on teaching speaking because it’s more approachable. How do you even start to think about writing, in a way that doesn’t feel like memorization or worksheets? 

“Start with simple characters, with fewer strokes like 人 or 天. And just like English that starts writing with tracing, you can just start with tracing or coloring the characters. Start with 50 characters, a simple list, and go from there. In my experience, kids think Chinese characters are fun because they look more like drawings than words, so they enjoy coloring them. You don’t have to just focus on pencil tracing, it can be coloring with crayon and markers or even using materials like Playdoh and pipe cleaners.”

H&AL of Habbi Habbi
Tinybeans Voices Contributor

Habbi Habbi Reading Wand & Bilingual Books is the easiest way to start kids on Chinese & Spanish. Just turn on and tap. Every inch is tappable, and our books are as intentional in content as they are beautiful - topics like kindness, emotions, and more. @BeHabbi | habbihabbi.com.


I don’t know about you but every day, since quarantine began 7 weeks ago, I finish multiple sentences with, “Never mind, what does it matter anyway…”

Don’t wear your school shoes out to play!

When did you guys last get a bath? Did I shower today?

It’s past bedtime!

Did you stain that shirt?

How long have you been playing that game/ watching that show?

I was going to do my hair but…

I don’t like that kind of bread.

Your socks don’t match.

Hairspray, perfume, mascara? No? what does it matter?

And I don’t mean this in a depressing way like we’ve lost all hope. What I mean is that there are so many things that normally would matter but we are completely far outside the realm of normal. These things don’t matter because all that matters right now is to stay home. Keep those that live in it alive. And wash your hands.

So many little things that we would normally care about really don’t matter right now. Seriously! They are so small and really are completely irrelevant in the grand scheme of things. We have much bigger things to worry about. They aren’t asking for very much- just stay home. And yet at times, it feels like a lot is being asked of us. Stay home?! But what about school, work, baseball, getting a haircut, going shopping, planning a vacation… Seeing our family?

It is hard to believe we are really going through this. Everything has changed. Does anyone else wake up each morning and ask themselves, is this seriously happening? Seriously?? A worldwide crisis, a pandemic? But it is. And when we may feel at our very most vulnerable, we have to put our big girl pants on and suck it up. Why? Because we have to be there to support our kids. They are young. They are small. And they are going through this too and it can be just as hard on them.

BUT it is only temporary. I am an optimist at heart. Just ask my Mom. She has always told me I wear rose-colored glasses. Let’s look on the bright side and think of all of the things we have been able to do since the orders or mandate to stay at home. All of us have wide and varied experiences at home but let’s think of all of the new things we have had time to do here.

1. Cooking! And dinners together as a family every single night. Saying prayers together. Being thankful for what we have.

2. Gardening, landscaping, and enjoying the weather outdoors. Thank goodness it is Spring. We have watched the trees, plants, and flowers grow!

3. We have expanded our vocabulary: Coronavirus, social distancing, shelter in place, PPE, COVID, quarantine, N95, novel virus, contact tracing… and so forth.

4. We have strengthened our abilities to telecommute, work from home, video conference, learn online, and network virtually.

5. We have been creative and have still hung out with friends by playing games together but virtually. Poker, Scavenger hunt, and so on. It is fun to get social, even from a distance. Hunter has had virtual nerf gunfights and a ukelele jam session with his BFF. Talk about resilience.

6. We have learned to become our own beauticians and taken matters into our own hands. Home haircuts, hairstyles, manicures, grooming, etc. What’s amazing is the beauticians are creating videos to show us how!

7. We have the fear of the unknown but as parents, we are strong every day for our children. We try to explain the severity of the situation in their terms. And boy is that tough.

8. We long for the day when we can all get back together. To hug, embrace, shake hands without 6 feet of distance. How will society change? Will we go back to shaking hands? Will we always wear masks in public, on planes, to the grocery store? Will we ever be able to go without hand sanitizer?

So much goes through my mind on a given day. I am afraid of the unknown, as I am sure you are too. How will we start school in the fall? When will we ever have a family vacation? Will my retirement savings get back to where it started before the pandemic?

One thing I know is that we are being stretched far—much further than we could have ever imagined but we are growing in more ways than we know. We have the gift of time right now. And a lot of it. That is until we get to the other side of this.

This post originally appeared on Life, Love & Little Boys.

Located in Bloomington, Indiana I am a wife, full-time working Mom to 3 boys, a part-time graduate student & a writer. I am also an optimist, problem solver, peacemaker, gardener, runner and a crazy-busy mom just trying to enjoy each moment. I truly value my friends, family and my mommy tribe.

Parents are looking for new ways to keep their kids engaged while learning at home. Carson Dellosa Education has teamed up with Disney to create a collection to help parents teach their kids essential skills through fun activities that can be completed just about anywhere. These new resources keep students motivated and  feature characters from Disney, Pixar, Marvel and Star Wars. 

Disney Take Along Tablet

The collection is now available at CarsonDellosa.com and Amazon and includes the following products:

Magical Adventures Workbooks: Kids can relive the magic of their favorite Disney movies like Toy Story 4, The Lion King, Zootopia, and more while completing 200+ standards-based math and language arts activities. Includes 140 stickers. Preschool – Grade 3; $12.99

Disney Magical Adventures

Flash Cards: Characters from Star Wars, Spider-Man, and The Avengers help kids put their early language and math skills to the test while engaging their memorization and active recall skills. Each set includes 54 flash cards and a bonus parent resource card with learning games. Ages 3 – 8+; $3.49

Disney Flashcards

Trace With Me: Elsa, Lightning McQueen, Miguel, and other Disney/Pixar friends inspire children to practice fine motor and early reading skills over and over again on convenient dry-erase pages that magically wipe clean. Ages 3+; $7.99

Take along tablet

Take-Along Tablets: Mickey Mouse, Cinderella, Mr. Incredible, and Sulley introduce a variety of writing, tracing, and coloring activities to entertain children while practicing early learning concepts. Ages 3 – 6+; $3.49


—Jennifer Swartvagher

All photos courtesy of Carson Dellosa/Disney

RELATED STORIES

Prime Video Offers Free Kids Content for All Amazon Customers

Audible Stories Now Streaming Free for Kids

Take Advantage of Free Online Courses from Ivy League Universities

Photo: igor kisselev/shutterstock.com

When learning how to form the letters of the alphabet, children respond differently whether they are kinesthetic, auditory, tactile, and visual learners. In addition to supporting a child’s preferred learning st‌yle, using various methods can also increase the “fun factor” when practicing how to write!

Kinesthetic Learners:

Kinesthetic activities provide children with opportunities to learn through movement. Children who prefer this learning st‌yle may find it more challenging to sit still when engaged in a learning activity. Their capacity for learning increases when both their brain and their body are engaged.

You may think a kinesthetic-based activity is a challenge for an activity that is traditionally done with paper and pencil, but movement can definitely be incorporated into writing activities. For example, have children hold scarves and use big arm movements to write the letters in the air. Or, have the children move around the room then freeze when you call out a letter. Their task is to form the letter with their bodies. They might create the letter “L” by having two friends lie on the floor in the correct formation. Or, they might decide they can make the letter “t” all by themselves by sticking their arms straight out on each side.

Auditory Learners:

Auditory activities appeal to children who learn best through actively listening. They may also find it helpful to talk about the material they are learning. Providing auditory learners with opportunities to both hear and recite information is ideal.

To incorporate the auditory learning style in writing practice, children can be taught rhymes or sayings that help them remember the pathways to use when forming letters. For example, children can use the rhyme, “Pull straight down for capital E. Then add some shelves. 1, 2, 3!” Hearing this rhyme, then remembering and reciting it themselves, can help children when they forget how to print a letter.

Tactile Learners:

Children who prefer tactile activities learn best by touching and manipulating objects. They generally prefer “doing” over simply hearing or seeing instructions. They are often referred to as “hands-on learners,” and prefer activities like building, using art materials, and using manipulatives.

There are many ways to incorporate tactile opportunities into learning how to write letters. Children can use their index finger to practise printing letters in trays filled with salt, sand, or shaving cream. Children can use paintbrushes and water to “paint” the letters on chalkboards or other surfaces like a brick wall. Tactile learners may enjoy using playdough to create the letters. Working with a partner, they can also take turns printing letters on each other’s back. To support tactile learners’ recall of letter formations, have them make the letters using art materials like stamps, pipe cleaners, or stickers.

Visual Learners:

Visual learners benefit from seeing the material they are learning. They may prefer to read and write versus listening and speaking. They can typically recall information better if it has been presented to them visually.

When learning how to write letters, children who are visual learners can benefit from seeing the letters and writing them. Provide these learners with a visual of what the letter they are learning looks like. Provide them with opportunities to trace the letter before moving on to independent practice where they write the letter themselves. Visual learners who are focusing on printing can benefit from the handwriting worksheets.

These tracing letters worksheets provide children with the steps to forming each letter, using the proper pathways. Tracing the letters allows children to rehearse the pathways before moving on to independently writing.

To support visual learners who are focusing on cursive writing, worksheets that follow the same pattern as the printing worksheets can be used: Provide a model of the letter, allow for opportunities to trace the letter, then move on to independent practice.

These cursive letters worksheets also provide students with practice linking cursive letters together to form words.

The worksheets noted above have been carefully crafted with appropriate lines to promote the correct sizing of letters. Young children who are experimenting with writing may print very large letters. As they become more experienced with writing, children need guidance around which letters are tall and which letters are short. They also need guidance to correctly write “tail” letters, which have parts that hang below the line, like “p” and “y.”

Providing children with multiple ways to practice writing letters can help them to be successful and also maintain their engagement in the learning process. Worksheets will help them achieve the end goal of being able to correctly form written letters on paper.

Alesia is a founder of PrimaryLearning.org, an educational website that helps elementary school teachers and homeschool parents with hands-on worksheets, activities and thoughtful articles.

One sunny fall morning, I watched my daughter tear open a birthday present, eager to unearth the mysterious goodies hidden inside.

“Here,” she said, tossing the card in my direction. “Could you read this to me?”

I paused for a moment. This exact scene had played out numerous times across birthdays, holidays, even reading penpal letters.

I shook my head. “No. Read it yourself.”

“I can‘t understand it,” she replied.

I studied the card once again. What? Was it written in Greek?

For years, like many parents do, I focused on making sure my daughter’s handwriting was straight, clean and as legible as possible. We perfected every descender and closed every ‘a’ so it wouldn’t resemble a ‘u’ and so on. After that we progressed to cursive but quickly gave our attention to typing skills. After all, schools across the country had started dropping cursive from their curriculums entirely.

Nearly every state in America has adopted the Common Core State Standards Initiative from 2010, which seeks to establish consistent educational standards across the U.S. and ensure high school graduates are prepared to enter college. The standards for English Language Arts include core topics of reading, writing and language and a modern section called “media and technology”. This component includes keyboard skills, but does not mandate cursive handwriting.

Spencerian script was the standard cursive writing st‌yle in the U.S. from the mid 1800s through the early 1900s. It was then simplified into the Palmer Method around the 1920s, followed by D’Nealian cursive, which students learn today. Yet the use of cursive declined overall as people first shifted to typewriters and then to personal computers. Public school instruction of cursive in the U.S. has steadily declined since the 1970s, but handwriting, penmanship and cursive continue to remain hot topics among educators and lawmakers across the nation.

Some applauded the Common Core’s move into modern times while others lamented the death of decorative penmanship. But recently, in 2016, Alabama and Louisiana passed laws mandating cursive proficiency in public schools. By doing so, they became the newest of over a dozen states now requiring cursive for 3rd graders and up.

What changed? Are parents and teachers growing sentimental about their own upbringing? Are we rebelling against the current digital shift in a grassroots back-to-basics swing to simpler, more analog times?  Even if nostalgia spurred the changes, science is there to back it up.

An article published in Psychology Today says “…learning cursive is an important tool for cognitive development.” Brain scans reveal activated neural circuitry when children print letters and then read them out loud, but the same effect does not occur when the letters are typed. The swoopy, connected st‌yle of cursive is even more demanding than printing and creates a greater neural response in both hemispheres of the brain due to it’s artistic nature.

“Cursive is also more likely to engage students by providing a sense of personal st‌yle and ownership,” the Psychology Today article explains. More and more often, today’s youngest generations struggle with hand writing correspondence and creating their own personalized signatures. As today’s youth grew up without writing in cursive, they lost the ability to read it as well. Could the decline of handwriting sever our ties to the past, to our history, to ourselves?

My daughter never had trouble reading typed materials, but if I put a handwritten document in front of her, her eyes would glaze over. The perfect schoolteacher handwriting from our cursive tracing books had done little to prepare her for real handwriting from real people.

I simply couldn’t fathom a future in which my daughter would be incapable of understanding Great Grandma Vi’s apple pie recipe, family genealogy or the Declaration of Independence. But what could we do?

A Google search for “cursive handwriting” gave dozens of search results for tracing workbooks. Another search for “cursive instruction” produced YouTube tutorials for calligraphy. Adding specific keywords such as “how to practice reading people’s handwriting” prompted solutions for ADHD kids and how to effectively teach writing skills. A proper resource didn’t seem to exist.

Thanks to the global community that is Facebook, I rallied friends, family and even strangers to contribute samples of their everyday handwriting for our cause. Using my daughter as a sounding board, we combed through nearly 200 writing images to select our favorite five dozen based on their legibility (or lack thereof), uniqueness and beauty. The short paragraphs came to us from all corners of the world, from Japan to Peru and from right- and left-handed writers, all genders and all ages.

These samples, along with a sprinkling of history and terminology, have been organized into Handwriting: A Study of Penmanship in the Digital Age, an easy-to-read, fact-filled supplement for classroom instruction and home-based reading practice. The content is entirely comprised of animal facts and is suitable for all ages.

Maggie lives with her husband and "old soul" tween daughter in the Pacific Northwest. She shares their travel adventures, field trips, and homeschool ideas from a city-based homestead. Maggie's first book, Handwriting: A Study of Penmenship in the Digital Age, is available on Amazon.

If summer left you with 2,463 popsicle sticks stuffed into gallon-size freezer bags courtesy of a twice-a-day fudge-sicle habit, you’re in luck. Popsicle sticks are a kid crafters dream, especially during this time of the year—there are a ton of fun Halloween-themed projects that require them. Here are eight that will make you and the fam wish you’d eaten even more ice cream bars.

photo: Glued to My Crafts

Witch-full Thinking
Looking for an easy activity for the under-eight set to have fun with at the next Halloween party? This is it! Stacey from Glued to My Crafts made these in minutes with a little black paint, card stock, ribbon, and (of course) popsicle sticks. P.S. These would make adorable magnets, too!

photo: Frugal Fun 4 Boys

Candy Catapult
This contraption, spotted over at Frugal Fun 4 Boys, was created by blogger Sarah and her four boys (and one girl). The goal? Find something fun to do with extra Halloween candy that would not be eaten. The catapult itself is made from popsicle sticks, rubber bands, and a plastic spoon. Kids enjoy building the launcher just as much as they do using it.

photo: Buggy and Buddy

The Itsy Bitsy Spider (Web!)
An oldie but goodie, you probably made these adorable little spiderwebs when you were in elementary school. If not, here’s your chance! All you’re doing is wrapping the yarn around the sticks in a web pattern. This Buggy and Buddy interpretation uses painted sticks for a modern vibe.

photo: Pinning for Purpose

Puzzle Play
Make and put together your puzzle? That’s one way to keep antsy kids busy. Kristin, a mother of three and the blogger behind Pinning with Purpose, shares this simple (and fun) craft for popsicle stick puzzles. It’s beyond simple: just glue popsicle sticks onto the back side of a Halloween theme-template, then trim! Download the free templates and get more how-to deets over at Pinning with Purpose.

photo: Crafts by Amanda

Mummy Dearest
Technically, Amanda of Crafts by Amanda wanted these kid-friendly puppets to resemble mummies. But when they were done, they also looked like little mini ninjas. Whichever direction you go in, these party crafts–made with sticks, googly eyes, and felt fabric–will be a hit at your next classroom or home shindig.

photo: Momerish

On the Fence
These Momerish mini pumpkins win the “Majorly Cute” award! Who knew that with just a handful of orange pompoms, some googly eyes, and a popsicle stick fence you could create an entire tot performance. Your little one will love getting into the spirit by singing along with you to the “Five Little Pumpkins” song.

photo: Live Craft Love

Monster Mash
This is one monster you won’t want to be afraid of because you’ll want to display it someplace where you can see it all the time. Start by painting and drying the sticks. Then, glue a handful of them into a square shape and let your tot decorate the face to their heart’s content. Additional details and info can be found at Live Craft Love.

photo: The Lolly Project

Top It Off
Très chic Halloween cake toppers have never been so simple to create. If free hand isn’t your jam, take a cue from The Lolly Project by tracing a few Halloween cut outs. Next, glue them to the popsicle sticks and voilà!
Do you know of a cool Halloween craft project we can try? Tell us about it into the comments below. 

—Ayren Jackson-Cannady

What’s a rhino without its horn? Considering the name itself stems from the Greek — “rhin,” meaning nose, and “ceros,” meaning horn, you can’t really impersonate a rhino properly without one. So get your little rhino-lover up and running with this DIY one-horned rhino headband.

rhino-horn-supplies

What you’ll need:

Grey felt (two sheets)

pen/pencil

headband

scissors

paper for tracing

glue gun

cotton balls (not pictured)

Step One:  Make stencils for the ears and horn
You can draw this freehand — or find some rh-inspiration here. Make sure the front and back of the ears are connected in the middle so you’ll be able to wrap them around your headband.

rhino-step2


Step Two: Cut out the pieces
Trace your stencils onto the felt and cut to create the shapes that will become your rhino horn and ears. (Note: Make two horn cut-outs; you’ll need to glue them together later.)

rhino-step3

Step Three: Glue and shape the ears
Wrap those adorable ears around your headband. Using (ideally) a hot glue gun, glue the front and back of the ears together (Note: It’s OK if the edges don’t line up perfectly.) Then, glue the outer bottom edges of the ears down so that the ears curl inward a bit.

rhino-step4
rhino-step5

Step Four: Now, for the horn
Using a hot glue gun, glue your two horn-shaped pieces of felt together, excluding the flat side. Be sure to apply the glue only to the inside edges; you’ll need to leave the middle empty so you’ll have space to stuff it. Once the glue is dry, cut a slit into the open side of the horn. This will be used to attach the horn to your headband.

rhino-step6

Step Five: Stuff it up
Use the top of a pen to push cotton balls into the horn until it’s filled up like a pillow (don’t worry about stuffing the bottom flap). Then, glue up the open side so that your “pillow” is sealed.

rhino-step7

Step Six: Attach your horn
Slide the headband into the slit of the horn, then use your hot glue gun to attach the bottom flap to both the underside of the headband and the upper part of the horn. If needed, dab glue all around the edges so the horn doesn’t slide around.

rhino-step9

You’re done! Put on your horn and do your best rhino-charge. Or, sit back and enjoy this thrilling video of the real thing.

rhino-kids

Got a better way to get in the rhino spirit? Share your ideas below! 

— all photos and copy by Melissa Heckscher


Faster than a speeding bullet! Craftier than Martha Stewart! Blast into fun and creativity by taking a page from your kiddo’s favorite comic book, and everyone can be a superhero for the day. With a few extra items added to your next supply run, you can make a no-sew cape in as much time as it takes to save the world— at least, one they’ve created—a single afternoon. Scroll down for the easy how-to, and your littles will be flying high in no time.

You Will Need

1. 1 pillowcase

2. 1 sheet of Kuni sticky-back felt (any color) for superhero logo

3. 1 sheet of Kuni felt (any color) for superhero logo

4. Superhero Logo Template

5. Ribbon

6. Scissors

7. Hot glue gun (parental supervision required)

7. Glue sticks

9. Sharpie Marker

10. Jewels (optional)

Creating the Cape

1. Cut the pillowcase in half. We used a new jersey pillowcase because the fabric is so soft, but even an old one will do the trick. Look for the folded end, because, once cut, this will be a perfect place to insert ribbon. Tip: If you are going to use new material, iron out all the folds in the fabric before starting.

2. Roll out and measure the ribbon so there’s enough to thread through and hang from your superhero’s shoulders.

Design the Superhero Emblem

1. Print out a lightning bolt, or any other fun superhero template for tracing. (We love the simple ones from A Beautiful Mess and Vanilla Joy).

2. Trace the lightening bolt with your marker, then cut out the shape. Any yellow felt will do, but we used Kuni brand with sticky backing for extra thickness.

3. Cut out a circle from another sheet of felt (different color).

4. Hot glue the circle in the middle of the back of the cape. Pick a spot and stick with it, hot glue sets in a flash!

5. Place and secure the logo in the middle of the circle with hot glue.


3. Roll out and measure a length of ribbon for the seam along bottom of the cape and then hot glue the ribbon to the edge— this will help to keep the cape in action during play time.

6. Bonus Step: If your superhero loves a little sparkle, now is the time to add jewels!

Finish the Cape

1. Take the length of ribbon and thread it through the hole created in the folded top of the pillowcase. It should be long enough to drape around your little superhero’s shoulders.

2. Go outside and save the day!

Will you make one of these super simple superhero capes? Share with us in the comments below.

— Photos and copy by Gabby Cullen


Have your doodlebugs maxed out on all the usual crafts? Put down the pipe cleaners and glue sticks and reach for a new kind of supply. Some might even be lying around your house! Read on to see what to add to your art box and get ideas for how to use it.

Trace That Face with Plastic Boxes
Consider us sold on keeping those pesky plastic boxes around for a lot longer now that we’ve seen what sewing and crafty mom of IndieTutes has done. She turned them into an avant-garde photo frame by popping them over each of her family member’s head and tracing their faces onto each panel! You can also draw windows to turn them into dollhouses or car garages. Note: Supervise as your artist tackles the plastic with a Sharpie.

Photo: IndieTutes


Ships A’hoy with Wine Corks
Mom and her curious buccaneer will love collecting wine corks. These light brown stoppers have a multitude of uses: Make stamps, pseudo-LEGO peeps or a floating bathtub toy! You can create a solo ship from one cork or combine more for a bigger vessel to tackle the waves. Get the sailing directions from DIY expert Handmade Charlotte.


Photo: Handmade Charlotte


Softest Paint Ever with Dad’s Shaving Cream
Borrow some of pop’s shaving cream to make the fluffiest paints in the whole world. These bright colors will inspire your kids to tackle the canvas with their hands. Craft vlog Get Crafty Crafty teaches you how to easily make this new set of paints here.

Screenshot taken from Get Crafty Crafty


DIY Decal with Washi Tape
Washi tape is masking tape’s more hip and eco-friendly sister, who also gets bonus points for never leaving behind a sticky mess. Redecorate simple household items or follow renowned ceramic designer (loved by Oprah and IKEA) Nina van de Goor of Ninainvorm’s tip on her Etsy blog. Let your kiddo create their own washi tape decals. It’s one art we don’t mind on our walls.

 Photo: Ninainvorm


Create Art To-Go with Foam Boxes
Don’t toss out those take-out boxes just yet! The squishy foam cover actually lends itself to becoming a really cool canvas for personalized stamps. All your tiny designer needs is a pencil and a paint roller. Remember to be quick (but steady) when transferring the painted image over — it could easily smudge. See an example of the step-by-step process here.


Photo: The Meta Picture


Less Watery Mess with Tempera Paint Sticks
Make these tempera paint sticks a staple in your craft box, stat. These solid sticks promise no water, no brushes and most importantly, no spills while maintaining that glossy painted look. All you have to do is twist off the cap and have an art attack with the paper. Get a set of 12 for $17.99 at Stubby Pencil Studio.


Photo: Stubby Pencil Studio


Perfect Baby Brushes with Q-tips
For young crafters who want to practice fine tuning their motor skills, Q-tips are a saving grace to little fingers. These tiny tools are great for creating baby-sized strokes (and minimizing paint splatters) and dots. Learn how to create a seven-layered brush for a perfect rainbow with kids’ craft blog Makes and Takes.

Photo: Makes and Takes


Make a Fortune with Cupcake Liners
Instead of letting those fancy crepe papers sit around the house until your next baking session, take a leaf from creative mama Megan of That’s What She Said and use the extras to make these adorable cupcake fortunes. Click here for the tutorial, and don’t forget to slip in a fortune before folding them over!

Photo: That’s What She Said


Fluff it Up with Foam Art Paint
If you’re a bit disappointed with how quickly shaving cream deflates, then you might want to consider foam paint. Creative blogger Jean from The Artful Parent experimented with her lil’ finger painters and discovered that foam paint actually has a 3D effect. Unfortunately, the shape doesn’t hold after it’s dried, but the colors do stay on the page! Click here to see more awesome photos from creative blog The Artful Parent. And get your foam paint at Discount School Supply for $7.29.

Photo: The Artful Parent


Draw Smudge Free with Yoobi Layering Markers
The Yoobi marker set comes in a pack of 8 but actually makes 16 colors because to their magical “step-2” magic marker. Draw over the base layer with the white marker to reveal a second lighter color! Your lil’ colorists will be so astonished that they won’t want to play with another drawing set for a long time. Check out cartooning and art supply blog Kid Sketches for pictorial examples of this product.

Photo: Kid Sketches


Metal Embossing with Disposable Cookie Sheets
We never thought cookie sheets could double as canvases, but crafty blogger Suzy of Suzy’s Artsy Craftsy Sitcom has figured out a way to turn those silver papers into glossy tiles. Download her floral patterns for tracing here or let your doodler’s inner artist shine.

 Photo: Suzy’s Artsy Craftsy Sitcom


Drip, Swirl and Dip with Marbling Paint
Magic Marble Paint looks messy at first, but it’s really a magical well for transformation. This is your chance to make old toys seem new. Fill a large container with water and then shake paint in. Then have your eager wizards draw patterns before dunking any object of their choice into the mix. Every time you pull out, the results will surprise. Remember to wipe away any excess paint before removing the object or a second layer will form. Get a set of 6 for $39.99 at Peach Tree Global.

 Video by Heather Munn

What other type of cool innovative craft supplies have you and your kids played around with? Let us know in the Comments!

— Christal Yuen


We’ve all got go-to books that both us and our kids enjoy, but reading Goodnight Moon every night can get a little repetitive. To add some excitement to your family’s reading routine, check out these adorable TouchThinkLearn board books from Chronicle Books and enjoy watching your little ones discover their new favorite bedtime story.

  
Written and illustrated by children’s author Xavier Deneux, these innovative TouchThinkLearn books (best for kids ages three and up) encourage hands-on, multi-dimensional learning through their simple raised shapes and scooped-out forms on opposite pages. By seeing the image, tracing its shape, and reading the words, little learners can master essential concepts while being entertained by the adorable images! As if these interactive books couldn’t get any better, TouchThinkLearn’s board books are extra durable, skipping fragile flaps, and they will last through tons of readings at home or at school.

In Colors, Deneux pairs colors and their everyday counterparts perfectly. The red apple, the brown bear, and the green caterpillar give easy examples so little ones can understand the colors as they read. In Opposites, each page depicts opposing pairs, like an empty and full fishbowl and outdoor and indoor bunnies, to illustrate the differences between the two. The cutouts are so creative that each opposite fits inside the other! We love the heavy elephant versus the light cloud…so simple and cute.    

Our favorite part of these sweet stories? They’re simply adorable! Displaying cartoon animals, bright colors, and interesting shapes, your kids (and maybe you!) won’t be able to put them down.

TouchThinkLearn: Colors and TouchThinkLearn: Opposites cost $14.99 each and are available at chroniclebooks.com. Look out for the Shapes and Numbers editions coming in Spring 2014!

What’s your kid’s favorite bedtime story?

– Claire Schillings