Crafting and outdoor exploration come together with this project—learn how to build a boat that floats and sails. The best part? You’ll only need to buy a couple of supplies because the main part of this barge is made from sticks that you find outside. Read on for the step-by-step instructions and you’ll soon have a ship to sail the high seas (or slow streams).
What You’ll Need
1 piece of paper (patterned scrapbook paper is nice, but plain construction paper also works)
2 craft sticks
string or twine
scissors
hot glue gun
glue stick
14 sticks in similar sizes (5-6 inches long works well)
How to Make the Boat
1. Start by wrapping 12 the sticks together with your twine. We used Kid Made Modern Craft Twine (target.com, $9.99) to add a pop of color, but white string would also work just fine. Tie one end of the twine to the end of one stick and wrap the string around a few more times, then move on to the next stick. Wrap the twine around that stick a few times and then use the same piece of twine to wrap the third stick and so on and so on until 12 of your sticks are connected. (You’ll use two elsewhere.) Don’t worry too much about how many times you loop around or how perfect your wrapping is. Knot off the twine on the last stick. Then, do the same thing on the opposite side of your sticks.
2. Wrap two sticks onto the bottom. Now add two more sticks, one on each end of your boat, to the bottom of your group of sticks. Again, tie a knot on one end of the stick then weave your twine in and out of the connected sticks, looping the twine around each stick and then around the stick on the bottom. Repeat for the second stick.
3. Cut 2 triangles out of your paper. Ours measured 5-inches along the side and bottom, but you may want to adjust based on the length of your sticks. We used Kid Made Modern Print Palooza patterned paper (target.com, $7.99 for 150 sheets). However, if you have plain construction paper, ask your child to decorate it with stickers, crayons, markers, or any other way you like.
4. Add the craft sticks as your mast. Line up the craft sticks along the edge of the triangle to create your mast. Use a hot glue to secure the craft sticks.
5. Glue the triangles together. Ask your child to cover the two triangles with glue, using the glue stick. Then, press them together to complete your sail.
6. Connect the sail to the raft. Slip the craft stick in between two of the sticks in the middle of your boat. Use a piece of twine to wrap around the craft stick and around the two middle sticks until it feels fairly secure. To give it extra support, add hot glue all around the area where the craft stick and twigs come together.
7. Sail your boat. Once the glue has cooled and dried, your craft is ready for its first voyage. Fill a baby pool or other vessel (even the bath tub!) with water and watch your homemade schooner float.
8. Create some wind. Want to get your boat moving faster? Use a straw to blow it across the water.
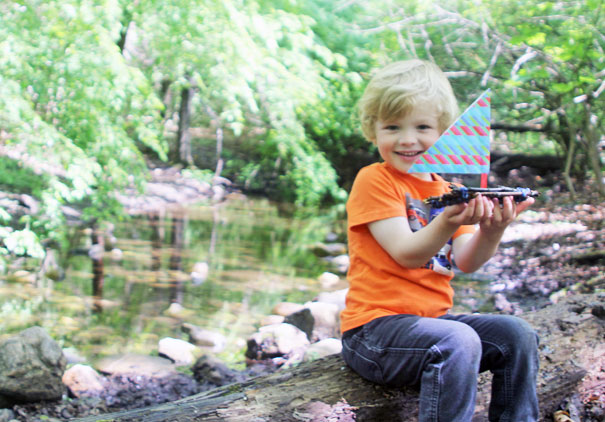
9. Take it to the park. For further experimentation, we took our model to the park so it could sail in a real stream. Even after several sails and a few capsizes, our sailboat has held up.
Happy sailing!
Project inspired by Minieco’s handmade boats.
Have you crafted any boats with your kid? Tell us about your design in a comment.
–Julie Seguss
Need some fresh ideas?
Related reads


